Good day everyone! Following February 14 comes another holiday, which is celebrated in our country annually on February 23. Last time we talked about what, and also did with the children
Today we continue and will, together with the children, congratulate our defenders and make them interesting and original cards.
This type of work is the most common for school students or kindergarten students. Because it is not so difficult to make such a miracle, you just need to listen to the teacher’s instructions and everything will work out.
So, if you haven’t yet decided to do this and give it as a gift, then perhaps you will stop at this option.
On this day, all mothers, daughters, grandmothers, and indeed the entire female half of the population congratulate the male half on this celebration. It is so customary that the symbols of this holiday are national flags, military equipment and other vehicles, as well as stars on shoulder straps.
Therefore, all drawings or pictures are directly related to this. I propose to make the first option out of paper - this is a tie, using the origami technique.

I also really liked the idea with a dollar bill, or you can take our rubles and roll them up, like this, it looks pretty cool, and as they say, a small stash at hand.

For the smallest craftsmen of the second junior group kindergarten You can make work from plasticine.

Now we will make a postcard with a car depicted on it. You can make such a charming and funny creation with children in the senior and preparatory groups, or use it in primary school.

Stages of work:
1. Prepare everything you need for work, this is paper, glue, scissors and pictures of cars.

2. Cut out the necessary details to complete the plot.

3. Then, to make the machine seem three-dimensional, make a cut, while folding the sheet of paper in half.

4. This is such an interesting and cute plot.

5. You can decorate the outside as you wish, using various decorations and decors.

6. You can either make an applique or simply draw with colored pencils or felt-tip pens.

Cool design using scrapbooking technique
I’m giving you a few ideas that impressed me, you can take them as the basis for your work and create your own plot. See how bright you can make a star.

The cutie is very talented, even the flower is not at all out of place.

Wow, a message or a little surprise).

In general, it looks wonderful and not primitive.

So, create for the joy of everyone!

And surprise, in general, act.

I also offer you step-by-step instructions that you can take for your creative work in the scrapbooking style, here:
Original ideas for greeting cards for schoolchildren on February 23rd with templates
I would like to make and decorate a card in a special way, I know that many are interested in options for volumetric products, because they look great and amazing. Moreover, if there is step by step instructions, then you and your children at school can do such a miracle.
Or you can create this creation at home, and then your son or daughter will give it to dad.
Stages of work:
1. First of all, you will need to find double-sided cardboard, preferably blue or light blue, this will be the background of the sea. Then fold the blue sheet in half and glue a boat-shaped base to it.

2. Accordingly, in order to glue the base from the ship, you first need to make it, to do this, find an image of the ship or ask me for a template, I will send it to you for free by email. So, print it out on A4 sheet and cut out the desired image along the contours using a stationery knife.


4. Carefully glue the white one to the blue base.

5. This is how it should work out for you.

6. Looks simply fantastically beautiful and charming.

You can make a simple applique from colored paper and geometric shapes, to do this, draw templates, and then glue the composition together using them.


You can take another simple route, print this sample and then color it or applique it.

I liked another type of postcard, I’m happy to show it to you.
We will need:
- colored paper or cardboard
- scissors

Stages of work:
1. Draw templates, approximately how you should get it, I showed you in this picture, it’s nothing difficult, even a beginner can handle it. But decide for yourself what color to make for each workpiece; this is a creative work that can be done in a craft lesson.

2. For the base, it is best to take colored cardboard, either double-sided or plain. Fold the sheet in half and cut a circle on one part.

3. Now all that remains is to design the product. Find a suitable text or write your own by hand.

4. Glue the greeting inside the card.


6. And the front side will look like this. It's like a ship floating on the waves.

I also saw this cute guy yesterday, I suggest you build him too.

To create such beauty, cut out the blanks with scissors.

Glue everything you have planned onto the background you need. The flag can be made from satin ribbons and matches or use a cotton swab instead of a stick.

If you really want a masterpiece, take a look here, it’s stylish and a very cool idea for children of any age.

We make cards with children in kindergarten from paper for dad and grandfather
An excellent option would be a fairly simple postcard with a picture of a bear cub in military uniform. You need to make such a background on a sheet of paper using a printer.

Cut out the stencils according to the sample.

Then glue them onto the background.

And on the reverse side write or print a congratulation.

Well, I also found such a simple idea for very small young talents.
We will need:
- multi-colored cardboard with embossing
- colored paper
- scissors
- ruler
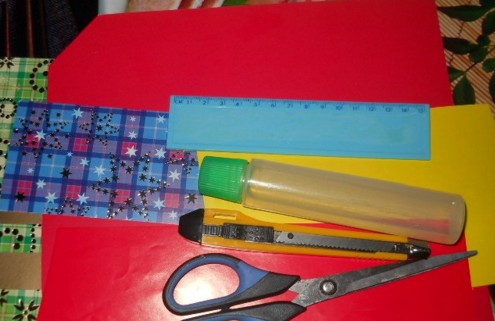
Stages of work:
1. Print the stars on A4 sheet, or make stencils, and then draw them on colored paper and cut them out.

2. Fold a sheet of embossed cardstock in half. Cut two strips from colored paper and glue them overlapping. And also decorate with a star.
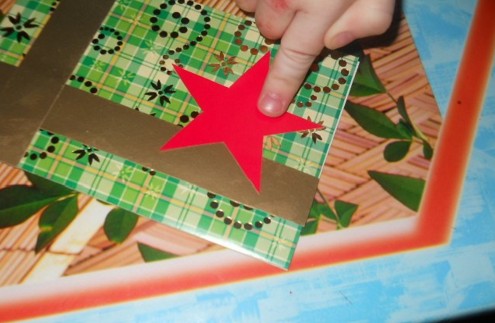
3. Such a very beautiful and sweet result, write your wishes on the other side.

Unusual gift in quilling style Tank
It will be really cool if you make a postcard and, in addition to everything else, give it a small souvenir in the form

Anyone familiar with this technique can easily create any plot).

And for those who are not familiar yet, I found a video from which you will learn how to do this:
You can deviate from the topic and make it out of numbers, but in the same style.

Master class on how to make a shirt with a jacket
The easiest option can be a souvenir using the origami technique; use colored double-sided paper or a white A4 sheet.

It turned out to be a small shirt with a tie.

In addition, since this is a postcard, you will need to come up with a poem or congratulation and read it with expression.
Or you can go another way by first making a tie from a blue or light blue sheet, and decorating it with all kinds of stickers, sequins, rhinestones, etc.

And then glue it and you get the simplest gift option.

And if you want to do something more serious, then use these instructions.

It is necessary to make a mock-up of the product as shown in the figure.

Then use a ruler to fold along these lines. Of course, draw the lines with a pencil, not a felt-tip pen; a felt-tip pen is shown here to make it easier to see.

This is how the jacket looks like.

All that remains is to make the collar, make it according to the diagram.

Then cut and roll.

Finish the work by gluing on the necessary finishing touches, a tie made of satin ribbon or paper and a poem.

You can also make a card with a little secret.

In anticipation Defender of the Fatherland Day the relevance of the issue increases significantly. The most valuable gift for men will be something made from the heart, with their own hands. In this article we will tell you How to make your own postcard for February 23rd.
The main thing in the article
Postcards for February 23rd for kindergarten made of paper: photo ideas and instructions for implementation
In kindergarten, children are just beginning to develop creative skills. Homemade holiday cards for dads, grandfathers or brothers can be for kids. Depending on the age of the children, you can offer the following gift cards that the children can make themselves.
For the little ones
The little ones can give their dads a painted card. This can be brush strokes with different colors or finger painting. Postcards with a baby's palm are popular. The main thing is that the teacher or mother signs children's creativity, and the baby will be happy to present a hand-made gift to dad.
For middle group
Children from the middle group not only draw, but can also handle glue, so they can be offered to make an applique as a gift for February 23rd. If the kids have already learned how to use scissors, then let them cut out the details for the future card themselves. If they do not yet have such skills, then prepare the necessary preparations for the composition in advance. The applique can be folded into the shape of a rocket, ship, tank or car. 
For senior group
Children from the older group can prepare different postcards for February 23rd. The following options will look great:
- Drawn postcard.

- Application.

- Creativity using semolina, which is glued on and painted in different shades.

- One of the new directions is compositions from napkins.

Any of the options will look great and will discreetly please the defender of the fatherland, who will receive such a homemade postcard as a gift.
Postcards for Defender of the Fatherland Day to school: photo instructions
We offer schoolchildren primary classes make postcards in the form of medals. They can be simple or complex using many elements.
Simple gift medal
We prepare the following tools and necessary materials:
- medal template;
- decorative parts;
- colored pencils or paints;
- scissors;
- lanyard or ribbon for medal.


Medal for February 23rd using origami technique
To make such a gift you need:
- colored cardboard;
- green colored paper in two shades;
- scissors;
- glue (preferably in a pencil);
- lace or ribbon.

How to make a postcard for dad with your own hands: templates and photos
You can make a postcard for your beloved dad with. The idea is original and not difficult to implement, so even a child can cope with making such a gift.  To work you need to have:
- colored cardboard;
- paper (blue, red, white);
- scissors;
- ruler;
- glue, for children it is better to take it in a pencil.
Now you need to make the following preparations:

How to make a three-dimensional postcard for February 23?

There is nothing complicated about gluing a three-dimensional postcard. Let us describe its step-by-step production. The main element of the postcard will be the boat. For a three-dimensional boat, you should prepare colored cardboard blue color. This will be the base. Next, fold a sheet of white paper in half and make a boat using the template. 
Line designation:
________ - lines for cutting;
_ _ _ _ _ _ - lines for folding.
For decoration you can use the following templates. 
Now all that remains is to decorate the resulting card by gluing the prepared decor.  A gift card can have any three-dimensional element. So, for example, you can do interesting option with an airplane.
Applique postcards for February 23: manufacturing instructions
For an appliqué postcard you need to prepare the following:
- colored cardboard, which will be the basis of the postcard;
- colored paper;
- glue;
- scissors.
Now to the work process:

You can also make another applique with a boat.

Postcard-shirt for February 23: how to make it yourself?
There are many options for folding a card-shirt. Its production is not limited to color. The photo below shows two ways to fold such an unusual card as a paper shirt. 

Funny cards for February 23: photo ideas


Postcards with congratulations for Defender of the Fatherland Day


Children's cards for February 23
A child can give his dad or grandfather a hand-made congratulations card. A postcard with a tank is perfect for children. To make it you will need:
- cardboard base;
- colored paper;
- scissors;
- glue stick.
Initially, you need to print stencils for the tank. 
Transfer the details (elements) onto colored paper according to the template. Let the child cut them out. The parts of the tank need to be glued onto pre-prepared cardboard. The postcard is ready! You can also use felt or any other suitable material. 
How to make a video card for February 23?
Today, even a schoolchild can make a video card for February 23rd. All you need is a phone with a camera.
A video postcard can be:
- in the form of changing pictures or photographs accompanied by a song;
- just a recorded video with congratulations.
After such a postcard is completed, it can be recorded on a flash drive, which can be presented to the defender of the fatherland, or it is quite possible to send such a congratulation through social networks.
Making beautiful cards for men for Defender of the Fatherland Day: video
In this lesson we will look at what you can draw for February 23, Defender of the Fatherland Day, and how to draw February 23, Defender of the Fatherland Day, with a pencil step by step. Previously, this holiday was called differently, in the USSR - the Day of the Soviet Army and Navy from 1943 to 1993, and was first established in 1922 as the holiday Day of the Red Army and Navy. Now let's look at the drawing we will draw for February 23rd. It is not very complicated, elements of which are in separate lessons.
Before you start step by step drawing, let's also look at the options for drawings for Defender of the Fatherland Day.
Here is a similar picture, only slightly different.

Eternal Flame, there is a separate lesson.

Another attribute of the holiday is, below are two options.


Now let's begin. In this lesson we will use a protractor to divide a circle into five equal parts. If you don't have one, there is a tutorial where you can draw a star without it - .
So, draw a circle and divide it in half. Mark 72 degrees from the vertical line and draw the line completely, because we will need them.

Measure it at 72 degrees, also, so as not to get confused, I marked our divisions with dots.

Now mark the lines on 1/2 of the line that are not marked and draw a shape like this, the corners of which are slightly rounded.

Erase the circle and what is outside the star. Make another outline of the star on the outside, the sides of which should be at equal distances from each other.

Let's draw


Here is a schematic drawing of February 23rd. Now you can color it.
A handmade gift for dad on February 23rd is the most... good option holiday present. The father will be proud to show it to his friends who come to the house, since he will always share the achievements of his children with everyone around him.
As children grow, the nature of a handmade gift will change from year to year - as the child’s skills improve and his creative imagination develops.
DIY gifts for dad on February 23
Before moving on to talking about the step-by-step process of making a gift for dad with your own hands, it’s worth saying a few words about the fact that some personal achievements of his children can be a wonderful holiday surprise for him, for example:
- Victory in a sports competition. A cup, certificate or medal received by a child on the eve of Defender of the Fatherland Day will be the best gift for his father. You can even dedicate your victory to him and make a short speech right at the moment of presenting the awards.
- If dad is interested in playing checkers or chess, then the best gift from a child on Defender of the Fatherland Day will be his victory over colleagues or friends of the father in an amateur tournament in these sports.
- Children who have received the same holiday gifts can give their dads prizes or awards in prestigious Olympiads and competitions .
See what you can do original gifts for dad on February 23 - video with master class:
Gift for dad on February 23rd in kindergarten
Kindergarten students make their first hand-made gift for dad on February 23 already at 2 younger group. What could be a gift from a three-year-old child?
Ship with sails

Necessary materials:
- Sponge for washing kitchen dishes.
- Long wooden skewer.
- An ordinary toothpick.
- Squares of bright crepe paper (four sizes).
- Tricolor ribbon.
- Felt pen.

Such a boat can be made in the middle group.
Tie for beloved dad
Due to the special significance of the gift, children perform this craft from forms prepared in advance by the teacher.

Necessary materials:
- A blank tie made of golden cardboard.
- Strips of black and orange paper.
- Five-pointed star cut out of orange paper.
- PVA glue, glue brush.
- Oilcloth and napkin (for blotting glue).
Execution sequence:
- On the very bottom corner of the blank, children begin to stick an imitation of the St. George ribbon, alternating black and orange stripes. The black stripe should be applied first.
- Children bend the excess length of the strips onto the inside of the workpiece, promptly removing excess glue using a soft napkin.
- Above St. George's ribbon a five-pointed star is glued.
An interesting gift for dad on February 23 can be prepared in preparatory group using the most available material.
Tank for the Defender of the Fatherland

Necessary materials:
- 6 matchboxes.
- A sheet of green paper.
- Glue stick.
- Thick black braid.
- A roll of tape.
- Pencil.
- A strip of black cardboard.
Execution sequence:
- Using tape, the child must fasten 4 matchboxes together: two at the top and two at the bottom (this will be the body of the tank). He fastens the two remaining boxes (for the tower) separately.
- The child covers the resulting blanks with strips of green paper.
- By covering the edges of the blank intended for the body with black tape, we get an image of caterpillars.
- Next, you need to fasten the hull and turret blanks together.
- Now the most difficult part of the task: wrap the pencil in a strip of paper and glue the tube for the cannon. Having cut one end of the tube and bending the ends, the child glues the barrel of the gun to the tank.
- All that remains is to cut out a five-pointed red star, round wheels for the tracks and glue it all to the craft.
Children in the preparatory group of kindergarten can easily make equally original gifts for their dads with their own hands. Here is an example of a handmade gift from a preschooler.
Race car for dad

Necessary materials:
- A toilet paper roll.
- Gouache.
- Colored cardboard.
- Scraps of bright self-adhesive film.
- Glue.
Execution sequence:
- Having chosen gouache of his favorite color, the child paints the tube left over from a roll of toilet paper.

- Using a template, you need to cut out 4 wheels from colored cardboard.
 Decorate them with caps of contrasting colors.
- Using the same template, the child makes a steering wheel: just trace the edges of a circle cut out of white cardboard with a black felt-tip pen (the child can reproduce the design of the steering wheel of his father’s car from memory).
- At this stage, the child will definitely need the help of an adult: help him cut a hole for the driver in the top of the paper cylinder. For this operation it is best to use a sharp utility knife. The resulting flap should be bent to create the back of the driver's seat.

- All that remains is to decorate the hood of the car with bright stickers made of self-adhesive film, attach the wheels and steering wheel, assign an individual number to the car and place a toy figure from the Lego constructor in it.
Gift for dad on February 23rd in elementary school
People will be happy to make original gifts for their beloved dad out of paper and cardboard with their own hands. junior schoolchildren. Here is one version of such a gift.
Airplane for dad

Necessary materials:
- Matchbox.
- Blue cardboard.
- Yellow and red velvet paper.
- PVA glue.
- A simple pencil.
- Scissors.
Execution sequence:

DIY gift for dad on February 23rd made from paper
Unusual gifts for dad can even be made from paper. Most often, postcards are made from it.
Volumetric card for dad
Necessary materials:
- A sheet of double-sided colored cardboard.
- Picture on a military theme.
- Colored paper.
- Stickers with military symbols.
- Glue stick.
- Markers or colored pencils.
- Stationery knife.
- A simple pencil, ruler, scissors.
Execution sequence:
Holiday gifts for your beloved dad can be made from paper using the origami technique. A paper “shirt” received from a child on Defender of the Fatherland Day will make any dad smile.
How to make a shirt for dad

- Taking a rectangular sheet of paper, you need to bend a narrow strip at the top of it. Then, straightening the sheet, fold it in half and make a small cut from one edge directly along the top fold line.
- Let's straighten the paper and attach the upper right corner to the point of intersection of the center line and the fold line. Let's do the same with the left corner of the sheet. We will get the silhouette of a folded shirt with a collar.
- If desired, you can also make a tie using the origami technique.
- Using a felt-tip pen, draw pockets and buttons on the edges of the collar.
- You can make a postcard by sticking the finished shirt onto a sheet of cardboard and accompanying it with a congratulatory inscription, or you can turn it into a portrait of your beloved dad by painting his face and hands on it.
Gift for dad on February 23rd from his daughter
A gift to your beloved dad on February 23 can be given by his favorite. Gifts (with your own hands) from your daughter can be made using any technique: made with soul, they will certainly please a loving father.
Surprise card
Scheme for folding an accordion postcard:

Even kids can make cool gifts, especially if they love to draw. Our postcard falls into this category.
- Taking an oblong sheet of thick paper, fold it in half, and then turn one half of it into an “accordion” with fairly large sections.
- We fold the future postcard so that it consists of two halves.
- We apply a drawing to both halves of the postcard (let it be a passenger car).
- Now we unfold the sheet to its full width and continue to draw the car, only now it is a real limousine.
Such cool gifts will definitely appeal to any dad, especially if you come up with an interesting plot for a postcard: in the same way, a small puppy can grow up, turning into a very long dachshund, or a miniature snake, transforming into a giant python.
As a gift (with your own hands), unusual slippers made of felt (made using the technique of dry or wet felting of wool) or felt can be presented from a daughter who is a craftswoman: showing her imagination, she can make them in the form of funny tanks.
Gift for dad on February 23rd from his son

A creative gift for dad on February 23 can be made with his own hands by a son who loves to make all sorts of crafts. Unusual gifts are made from waste material, which is abundant in every home. To make such souvenirs, your child will need:
- Shiny tin cans.
- Bolts, nuts, nails and screws.
- Metal sponges for washing pans and dishes.
- Plastic bottle caps.
- Wire in multi-colored insulation.
By combining all these interesting components, a boy with skillful hands can make funny robot, which will decorate dad’s office.  To securely fasten the parts together, the child may need a glue gun (popularly called liquid glue).
In addition to the decorative effect, such gifts can also have practical applications. You can, for example, make a pencil holder in the shape of a robot.
A good gift for dad on February 23rd is a picture made using the embossing technique. To make it, the boy will need a sheet of thick foil, a sharpened wooden stick, a template, and a stack of backing sheets. The embossing kit can be purchased in a department that sells handicraft supplies. You can get acquainted with the technique of making coinage by looking for an appropriate master class on the Internet.
Gift ideas for dad on February 23
What other handmade gifts should you give your dad on his men’s day? Let's limit ourselves to the list interesting ideas. What can you give as a gift to your beloved dad?
- Photo frame made of twigs, collected during a walk through the forest park, made by the hands of a mother and child. It's easy to do and looks just great. Dad will be happy with this gift, especially if his favorite photo card depicting his closest people is inserted into the frame.

- A collection of flat pebbles collected by a child on the shore of a nearby body of water can be turned into dominoes for dad. Let the baby, under the guidance of his mother, mark them with acrylic paint, applying the required number of dots.
- For a grown-up son who is passionate about computers, you can suggest an idea for an interesting design for his father’s office. Having printed out his father's favorite photographs, he can hang them on the walls of the room in an original way. It might be a good idea making a unique photo collage.
- The pebbles brought into the house by your son will make excellent paperweight for papers constantly trying to slide onto the floor from my father’s desk. All you have to do is paint the stone with bright acrylic paints. Let the child show his imagination.

- A daughter who can draw well can give her dad set of “militarized” shaving brushes. To do this, she only needs a set acrylic paints, a good brush and some free time.
- Who said it's impossible? please dad with a warm sweater, knitted hat or beautiful scarf ? Let your handicraft daughter knit them for her beloved dad. Be sure that these things will warm and delight him for many years.
- Another application for my daughter’s skillful hands could be making a toy car suspension. It can be done using the technique of dry felting wool.

- Taking scraps of leather, my daughter can make set of covers for various documents, eyeglass case or funny keychain.
- The boy can make coasters for tea or coffee cups by cutting out their base from a sheet that imitates balsa wood.
Defender of the Fatherland Day is an event celebrated mainly by men. That's why a nice gift for them there will be a luxurious table, decorated in the appropriate style. 
One of the important holidays is just around the corner - Defender of the Fatherland Day. If you still can’t figure out what to give to your beloved men, then create unique gifts for them with your own hands. This article contains the easiest, but at the same time, interesting and detailed master classes DIY crafts for February 23rd that your child can easily present to dad or grandfather as a gift for Defender of the Fatherland Day. I present to you the 10 best master classes - how to make crafts for February 23rd with your own hands with step-by-step photographs.
This approach to solving the problem of finding an unforgettable gift is traditional when children give gifts to their fathers and grandfathers on February 23. How many such gifts are created by children's hands! To do this, they use not only a variety of paper and plasticine, but also candies, ribbons, ice cream sticks and many other unusual items.
The availability and convenience of such materials make it possible to constantly use them, and to use them in a new way with each new craft. It's no secret that the same materials can be used in crafts of varying complexity. There are many similar master classes, which are also aimed at children of different ages and with different skills.
Most often, children choose airplanes as a gift for February 23rd. But there are a huge number of ways to create them, as well as possible materials for this: cardboard, paper, matchboxes and much more. In this master class I will show you how to make an airplane from a plastic bottle using the papier-mâché technique.
We take a plastic bottle, in my case it is a small 0.5 liter water bottle. Cut it off with a knife just above the middle, and also cut off the spout of the bottle.

We make cuts on both sides and connect the pieces.


If you wish, you can copy our sketch and transfer it to a sheet of A4 paper, folded in half.

Using glue and tape, attach the wings and tail.


For airplane wheels you need 6 plastic bottle caps. Using tape, we connect two and four covers together.

We glue the wheels and begin to cover the plane with pieces of newspaper, having previously soaked them with PVA glue using the papier-mâché technique.


Cover the top layer with white paper or white napkins. After all the layers of the craft have dried, paint the finished plane with acrylic paint.


All that remains is to add a star-shaped applique, and cut out photographs can be glued to the portholes.

Our plane is ready to fly!


02. DIY plasticine tank
A tank made with your own hands from plasticine is an excellent craft for Defender of the Fatherland Day. You can later take it to an exhibition or give it to your grandfather, dad or brother.

For this master class we will need green, black and red plasticine, also a piece of wire, a toothpick and a pencil.
We will make the lower part of the tank body in the form of a rectangular block, sharpening one of its sides.

We prepare two black strips, pressing them along the entire length with a toothpick, 10 large cakes and 4 small ones made of green plasticine.

Press down the cakes with the back of a pencil and draw axes with the tip of a toothpick.

We put together 5 wheels and 2 small ones on each side, we wrap them around the track.

Place green protection tape on top.

Glue the tracks on the sides.

Take the second green block.

We glue it on, bevelling the front part with a stack.


We attach the barrel in front and add small parts, an antenna and a star made of red plasticine.


Our plasticine tank is ready!


In this lesson we will make such a simple plane out of cardboard.

Draw all the parts of the plane.

For the case, you can take a juice box.

We cut out the blanks as shown in the photo. Red paper stars.


Glue the tail of the plane to a matchbox.


The cardboard plane is ready!

This gift can be made for dad or brother. For this master class you will need:
- candies;
- cling film;
- toothpicks;
- scotch;
- penoplex;
- blue corrugated paper;
- silver cord;
- glue.

Cut out a circle from penoplex.

You can first draw a sketch of the steering wheel on paper, then transfer it to penoplex.


We decorate the edges with a cord.


Wrap the candies in cling film.

We attach them to a toothpick using tape.


We decorate the steering wheel with ready-made candies.


Our sweet steering wheel is ready!
05. Tank made of two sponges
This craft can be a wonderful gift from a child for the holidays of May 9 or February 23. Its production will not take much time, and the materials needed will be a sponge for washing dishes. Our master class shows the step-by-step production of a tank from scrap materials.

To work you will need:
- two green sponges;
- scissors;
- ruler;
- dark felt-tip pen;
- glue gun;
- ruble coin;
- green straw.

We tear off a dense layer from one of the sponges.

On the back side of this dense layer of sponge, using a ruble coin and a dark felt-tip pen, draw six circles.

Let's cut them out.

Then we take a glue gun and use it to attach these circles to the sides of the other sponge (three circles on each side).

Let's start making the turret of our tank. To do this, on the remaining soft part of the sponge (from which the dense layer was torn off) we mark a square with sides of 4 cm.

Cut out the tower with scissors.

Cut 8 cm from the green straw - this will be the barrel of our tank. We insert it into the tower, having previously made a small depression in it using scissors.

Apply hot glue to the underside of the tower.

We attach the tower to the main part.

If you wish, you can decorate the tank; to do this, cut out small stars from red cardboard.

Glue them to the sides of the tower. Our tank is ready.

This craft will not only be a good gift for February 26th, but will also serve as a toy for a boy.
This star is very easy to make - for it we need wire, red yarn and PVA glue.

Using pliers, we make a star out of wire.


Leave to dry.


To create this airplane you will need wooden clothespins, two popsicle sticks, a piece of cardboard for the tail, two thin wooden tubes and acrylic paints.


Using hot glue and straws, attach the ice cream sticks together.

We make a tail blank from cardboard.

Glue the tail to a clothespin.

We paint the finished plane with acrylic paints.


Instilling a sense of patriotism in children is one of the most important tasks of teachers and parents. But for the children younger age It’s not enough to just talk about the war, about battles, victories and defeats. For them, visual aids, games and activities dedicated to military topics occupy a very important place.
Therefore, a child should not only hear about the war, but also watch illustrations, filming, photographs, and also capture his emotions in drawings or crafts. Despite the fact that knitting is mainly done by girls, this applique will undoubtedly arouse interest among young defenders of the Fatherland.

To knit the “Tank” applique, you need to prepare the following materials:
- Hook No. 1;
- Yarn of medium thickness, for example, “Jeans”;
- Decorative star. If you don’t find one, you can take it from the New Year’s pendants to decorate the Christmas tree;
- Scissors
- Glue “Moment”, preferably transparent.
We start knitting appliqués with its “caterpillars”. To do this, we cast on 10 air loops.

Then we knit 3 more air loops for lifting, and after that we knit single crochets to the end of the row. In the very last loop of the row we knit 7-8 double crochets to make a “fan” of loops. If the edge bends at this point, then increase the number of single crochets, since the applique should be flat.
Next, we knit double crochets along the opposite edge to the very last loop, where we started the row. In this loop we again make a “fan” of double crochets, but in smaller quantities than in the previous case, since there are already several loops in this place. As a result, you should end up with an elongated oval like this - the “caterpillar” of the tank.

In the second row, first we knit 5 single crochets.

After this, we make 1 air loop to highlight the beginning of knitting the upper part of the tank.


Turn the knitting and knit 8 single crochets again.

To make a tank cannon in this place, we knit 5 chain stitches.

We add another loop for lifting, and then along these chain loops we knit single crochets to the end of the row, including 8 tank “cabin” loops.

Turn the applique again and knit 8 single crochets. To finish the work, use Moment glue to carefully glue the star onto the “cabin” of the tank.

The “Tank” application is ready. It can be used to make postcards for Victory Day, February 23, or any other themed crafts.
Are you preparing a gift for a man? Nothing to decorate with gift box? Or maybe you have prepared original postcard and do you need a bright accent for it? A made male flower will help you get out of any situation. To create such masterpieces, you can use candy wrappers, notebook leaves, craft paper, and anything else.

On the Internet you can find special sheets that need to be cut.

You can take any designer paper with a neutral or masculine pattern.

Some people might like this color option.


So, let's start creating. To work you need:
- The paper described above is 5x5 cm in size. Having mastered the technique, you can create flowers of any size. The paper may be neatly cut or have torn edges.
- Glue for fixing modules.
First flower option
Fold the module in half, then in half again to make a smaller square.

You need to make 8 modules in this way.

Four modules must be glued to any piece of paper with a small gap, placing the folded corner inward.

Then, in exactly the same way, only without indents, we glue four more modules on top, rotating them 45 degrees.

We decorate the middle, curl the edges a little, and the stylish decoration is ready.

If, when gluing the first four modules, you leave a larger gap between them, the flower will look different.
A more complex flower
Fold the paper squares as shown in the photo. 
First, a diagonal line is found, then the sides of the square are tucked towards it. The resulting airplane is folded in half lengthwise. We make 8 identical modules. Last step: you need to carefully insert the modules into one another, using the resulting pockets.


At the end we get an original decoration for a man's gift.

In this case, glue will only be needed to fix the finished decor directly on the gift item. If you make modules from squares with the same pattern, fold the modules exactly the same, relative to the pattern, then your flowers will look neater and acquire an additional pattern.
This cute tank can be made from matchboxes and colored paper.


We cover the boxes with green paper as shown in the photo. For the tower we take a green cap from a plastic bottle, for the barrel we wrap a toothpick in green paper.

We cut out the wheels from black paper.

All that remains is to assemble all the parts and the tank is ready!


How to make a tank out of money
If your man served in tank forces or is simply an expert in playing “tank”, then make him something like this original gift — .

DIY gift for a man
How to make another very original one, see here.


Original gift set “Grow greens”
See how to make this original one here.


Crafts for February 23rd, created by a child with his own hands with great care and attention, are of great value on this holiday.
A unique gift will bring joy not only to the parents, but also to the child himself, because with its help he will express his love for them. Let him bring joyful emotions to your loved ones!
Not all men have a positive attitude towards useless gifts, therefore, help your child create a craft with his own hands that will be useful and will not gather dust somewhere in the closet. If you think a little, the created gift can turn out to be much more surprising and practical than the purchased one.


