New Year- time for gifts, Santa Claus, Snow Maiden and of course the Christmas tree. IN Lately Many people want to see not a standard green Christmas tree in their home, but some unusual one, such as a coffee tree. Such a tree will create not only a New Year's atmosphere, but also fill the room with the aroma of coffee beans. Also, such a coffee tree will be an excellent New Year gift for family and friends.
And with children you can make a simple green one and the symbol of 2014 - .
To make a Christmas tree we will need:
- A4 cardboard sheet – 1 piece
- Newspaper – 1 piece
- Dry branch or stick (for the trunk) – 1 pc.
- Wire or easily bendable wire
- Jute twine
- Coffee beans
- Pearl colored beads
- A small piece of burlap
- Lace guipure ribbon – 0.5m
- Sisal
- Alabaster or gypsum putty
- Hot glue
Unusual Christmas tree made from coffee beans with your own hands - Master class:
So, first we need to make a base for our Christmas tree from coffee beans. To do this, roll a cone out of cardboard and fix it with hot glue. In this case, I used A4 cardboard.
 We cut the bottom of the cone with scissors so that it stands evenly on the table.
 In order for the cone inside not to be empty, but to be dense and durable, it must be filled with something. Crumpled newspaper works very well for these purposes.
 We compact the newspaper tightly into our cone.
 If the cone is not completely filled, grease the newspaper with glue and tamp down the next one so that the cone is filled to the very base. In order to hide the newspaper, cut out a circle from cardboard with a slightly larger diameter than the base of the cone, cut it along the edges and bend it upward.
 Lubricate the cut parts on the outside with glue and glue them to the cone.
 Using a knife, we make a hole in the cardboard, and also make a hole in the newspaper, but not very deep.
 Lubricate the stick with glue and insert it into the resulting hole.
 We twist a small piece of wire at the end into a spiral, and fold the second piece in half.
 Lubricate the wire with glue and insert it into the top of the cone.
 Cut out a small square from burlap. We make a hole in the center and put it on the trunk. Attach the burlap to the cone with hot glue.
 We cut off the edges of the burlap protruding beyond the cone.
 Glue twine at the base of the cone.
 We begin to wrap the cone. On the first round, we glue the twine along its entire length, then it is not necessary to glue everything, we fasten it only in a few places, after a few turns.
 We wrap the entire cone in this way.
 Next, we wrap the wire with twine, cut the twine, and secure it with glue at the end. After winding, you can change the shape of the spiral, which is what I did.
 Glue coffee beans onto the twine.
 Then we glue the beads.
 At the base of the cone we glue a lace guipure ribbon in a circle.
 Now we will make a pot for our Christmas tree. Take a small piece of burlap and place a glass in the center.
 We lift the burlap to the top of the glass and glue it from the inside.
 Glue a bow made of guipure ribbon to the pot.
DIY coffee tree
Today on tutdizain.ru there is an excellent master class on creating a Christmas tree from coffee beans.
To create a coffee tree you will need:
Coffee beans
Base (ready-made foam or cardboard cone)
Brown threads
Transparent moment-crystal glue and PVA glue
Tassels
The lower base is a stand. In this case, a candlestick was used
Transparent nail polish + semolina (optional)
Gold/silver spray paint or other
Christmas tree decor (beads, bows)
The process of creating a coffee tree:
Take a cardboard cone and generously coat it with PVA glue, then wrap it with brown thread (it is better to glue as many threads as possible).

Next, proceed to gluing the first row of coffee beans. You need to start gluing from the bottom of the tree. Generously coat the lower part of the cone with PVA glue and apply the grains to the base so that they are located as closely as possible to each other.
Leave the tip of the cone open. The first layer of coffee beans sticks quite quickly. Then proceed to the next layer. Try to place each grain in the gap between the grains of the previous layer. Generously lubricate the gaps with glue and apply the grains, twist them so that they fit like a puzzle. All grains are different in shape and size, choose suitable grains.
Now start decorating the Christmas tree itself. The author used cream bows and pearl beads. Glue the beads onto the moment-crystal in the places where there are empty spaces. Next, prick in a chaotic manner.

Leave until completely dry and start making a trunk for the Christmas tree. To do this, take thick cardboard and roll it into a pipe; select the diameter of the pipe so that it fits the hole at the bottom of the tree. Paint the trunk from bottom to center and let dry.
The Christmas tree can be left decorated only with beads, but you can use semolina and nail enamel. Coat the tree in a chaotic manner with clear nail polish, and sprinkle semolina (like snow) on top.
Now apply a drop of instant glue to the tip of the tree and insert a bow into the hole. In this case, it is made on a wire, its ends are twisted. Leave the tree to dry completely.
Take our trunk. Make cuts in the circle at the bottom and apply glue. Also squeeze the glue into the recess of our base-stand. Glue it.
Nowadays, the tendency to replace live Christmas trees with artificial ones is becoming very common. You can easily buy an artificial Christmas tree in any supermarket, but it is much more interesting to make it yourself from scrap materials.
There are quite a few options for making Christmas trees. A Christmas tree can be made from almost anything: paper, candy, feathers, pine cones, fabric, etc. And it is not at all necessary to be a professional designer in order to create your own unique, one and only Christmas tree.
Imagination and a little patience, and you can make any Christmas tree with your own hands. Those who love coffee and the aroma of coffee beans will surely like it coffee tree. Such a Christmas tree will become not only beautiful, but most importantly, incredibly fragrant. New Year's decoration interior design, but also an original gift option for friends and relatives.
Dimensions Christmas trees made from coffee beans may be different, but it is better to make small coffee trees that can be placed on a table or bedside table. As a base, you can use either a foam cone or a cardboard one.
So, before moving on to the description of the manufacturing process Christmas trees made from coffee, let’s figure out what materials you will need for your work:
- coffee beans (the number of beans depends on the size of the Christmas tree you are going to make),
- foam or cardboard cone,
- adhesive plaster,
- acrylic paint Brown(can be replaced with instant coffee mixed with PVA glue),
- brush,
- hot glue (glue gun),
- scissors.
If the Christmas tree has a curved crown, then additionally use a little wire with a diameter of 3 mm.
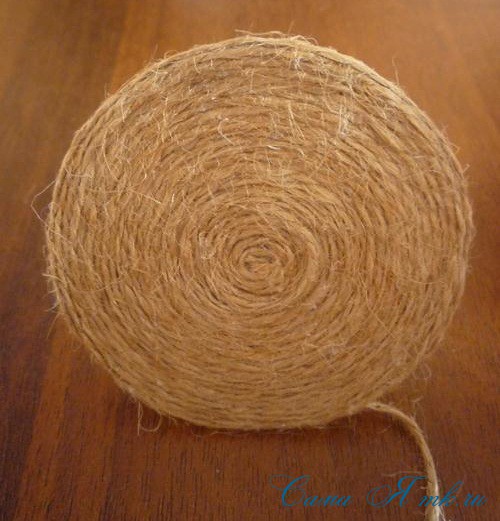
For a twine stand:
- jute twine,
- wire 3mm,
- thick cardboard.
Decorations for the Christmas tree as desired: beads or large beads, sparkles, etc.
First let's prepare twine stand for our Christmas tree. You will need: thick corrugated cardboard, twine and some wire with a diameter of 3mm.
Using any available means (a glass or a compass), draw 2 circles on cardboard and cut them out. We make a hole in one of them.
We fix 3-4 wires to the bottom circle with hot glue and bring them together in the center (as in the photo).

We coat it with hot glue and on top, bringing out a bundle of wire in the middle of the upper circle, we fix the entire structure.

Carefully wrap the entire stand in a spiral with twine.


Now you need to decide what kind of Christmas tree you will make: with a flat or curved crown. The cone can be used either from foam or cardboard.
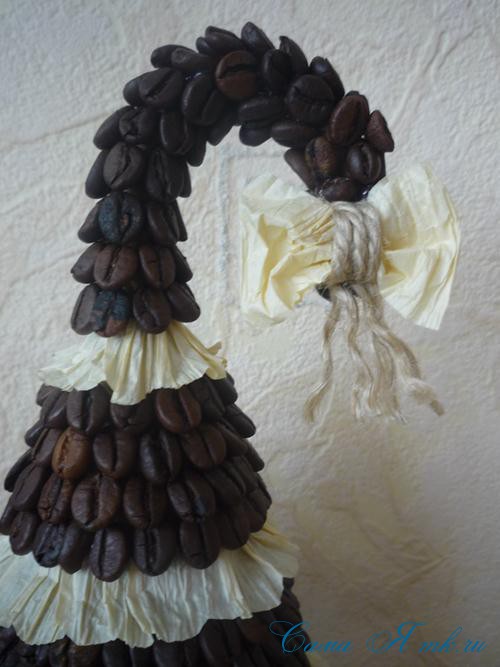
If the Christmas tree has a curved top, then fix a wire of the required length in the center of the top. The length depends on exactly how the top of the Christmas tree will be curved.
We wrap the entire cone with adhesive tape.

We make a hole in the bottom middle and carefully place the cone on the base leg.

Color the entire cone brown acrylic paint, if you don’t have it, you can replace it with regular gouache or make the following mixture (1:1 water and PVA, and generously add instant coffee). Apply all compounds with a regular brush, covering the entire cone. We are waiting for it to dry completely.

or with a curved crown... Don’t forget to make a loop at the end for attaching the decoration.

After our piece is completely dry, we can start decorating it with coffee beans.
It’s up to you to decide how exactly to glue the coffee beans; here, as in decorating the Christmas tree, it’s all a matter of taste and personal preference.
You can simply glue the coffee beans as close to each other as possible, trying to close all the gaps. Twist the grain in different directions, choosing the optimal placement option. If the grain does not fit or does not sit well, you need to take another one, since coffee beans only look the same, but in fact they have a little different shapes and sizes. If you cannot completely close all the gaps, you can later correct this when decorating the Christmas tree.

You can glue the grains like a cone, each next row is glued with a slight overlap on the previous one in a checkerboard pattern.
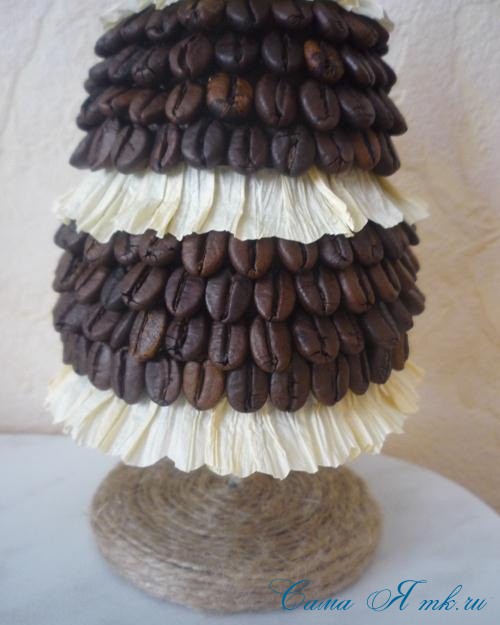
In this case, I used paper twine for decoration: I unrolled the twine and cut valanches for my coffee tree.
For decoration, you can use any decorative elements: small Christmas tree decorations, sequins, rhinestones, braid and ribbons, feathers, nuts and much more.
You can create the effect of a snow-covered Christmas tree by using semolina. The places where it will be applied are smeared with transparent nail polish, and semolina is sprinkled on top. Some grains may fall off, but the main part will stick.
Using this principle, you can make any coffee tree, and that’s the beauty of this master class. I hope that the readers of the site will like it. And you can decorate such Christmas trees in different ways. Imagine, surprising your loved ones and friends with original gifts!
Today I got something like this Christmas tree made of twine and coffee beans! All that remains is to rejoice and inhale its wonderful aromas.

This coffee tree will be a wonderful decoration. New Year's table and will create a festive atmosphere in any home. You can also give it to relatives, friends or work colleagues, I’m sure they will be pleased with such a creative gift.
I was glad to help!
Topiary “Herringbone” is a unique New Year’s souvenir that creates an elevated festive mood. This decorative tree can be decorated in accordance with the symbolism of the coming year, which will make the gift even more relevant.
A DIY Christmas tree topiary can be decorated with a variety of materials. Tangerines, sweets, Christmas tree decorations, sisal, and fir cones are suitable. There is the widest scope for imagination! You can use the technique of combining different materials in one composition, and it will only benefit from this. But for a beginner in this fascinating business, it still makes sense to adhere to the proposed step by step instructions.
Options for creating a topiary “Herringbone”
Elena 11/22/2016
The children and I made a bright Christmas tree just like in the first picture out of balloons. We bought plastic balls. We made a cone out of paper to guide this shape. We connected the balls using instant glue; you only need a drop of it and it holds well. The result was incredible beauty. Unusual and bright. Now we’ve got the idea to make a big Christmas tree like this, but here you can’t get by with a couple of sets of balls)
Ekaterina 11/27/2016IN kindergarten I had an assignment to make a craft for the New Year. I do it every year and my imagination has already run out a little. After thinking for a long time, I decided to make a three-dimensional Christmas tree. It turned out to be about 30 centimeters high. I made the base from whatman paper and used old beads to decorate Christmas trees. I also covered the entire cone with pine needles. Thin tinsel and rain entwined the entire base. My daughter and I made Christmas tree decorations from colored paper and also glued them to our Christmas tree.
Rimma 08/14/2017
I want to make such an original topiary for the New Year, I love making all kinds of crafts with my own hands and then decorating my home with them. By the way, this is also a wonderful gift.
Valeria 08/30/2017
Last year my daughter and I made a topiary Christmas tree from painted... green color spiral pasta. It turned out very unusual and beautiful, this year we want to build a Christmas tree from acorns - the material has already been prepared.
Add a commentAlmost everyone wants to make something with their own hands for the holiday. And if you haven’t practiced making topiary yet, it’s time to start. The New Year tree is traditionally made in the form of a Christmas tree. But the master class (MK) will tell you what the Christmas tree itself will be made of.
Lovers of such aromatic drink as coffee will definitely like this gift. But just a coffee topiary is too banal, let it be a coffee... Christmas tree!

To make it yourself, you will need:
- Coffee beans (about 200 grams);
- Cardboard cone and cardboard circle;
- Stick (pencil or skewer);
- Glue moment;
- Double-sided tape;
- Gypsum;
- Plastic cup for stand;
- Jute twine;
- Sackcloth;
- Ribbons and beads.
The first thing you will do with your own hands according to this MK is prepare the barrel. Take either a pencil or a skewer and wrap it with twine. After this, you put the finished cardboard cone on this trunk. This master class also offers such a solution - you can weave braids from twine, tie a thread in the middle to the braid, thread it through the top into a cone and secure it on a skewer.

Then fill the inside of the cone with napkins so that it is not hollow. This master class suggests taking napkins as a simple option, but it can be anything - cotton wool, fabric, etc.
Tape the cardboard circle underneath with tape. The base for the coffee Christmas tree is ready. Make sure it is strong enough, because the next step is to form the crown.
Coffee Christmas tree topiary: decorating master class
Glue the grains one by one, tightly to each other.
The master class continues as follows:
- The first layer of coffee beans dries in about half an hour, and only after this time can the second layer be applied.
- The crown is ready, now it, or rather the tree, needs to be planted somewhere, in some kind of pot. You can also do it yourself. Take a simple plastic cup, pour plaster into it, and place the Christmas tree in it. Make sure it is firmly in the pot.
- Now, following MK, the pot needs to be decorated, it should also be in an elegant form. You can do this like this: wrap the glass in burlap, use twine to weave another braid with your own hands and wrap it around the pot.
- You can also easily make a bow from twine, in the middle of which you can decorate with a coffee bead. Such bows can also be at the ends of a braid that you pulled out through a cone, like a Christmas tree decoration.

The main part is ready, and now you can improve this universal master class. For example, put fir cones in the top layer of the pot to cover the plaster. Or paint the same coffee beans with gold acrylic paint. This Christmas tree in the shape of a coffee tree will definitely surprise your friends and family.
Coffee Christmas tree topiary (video master class)
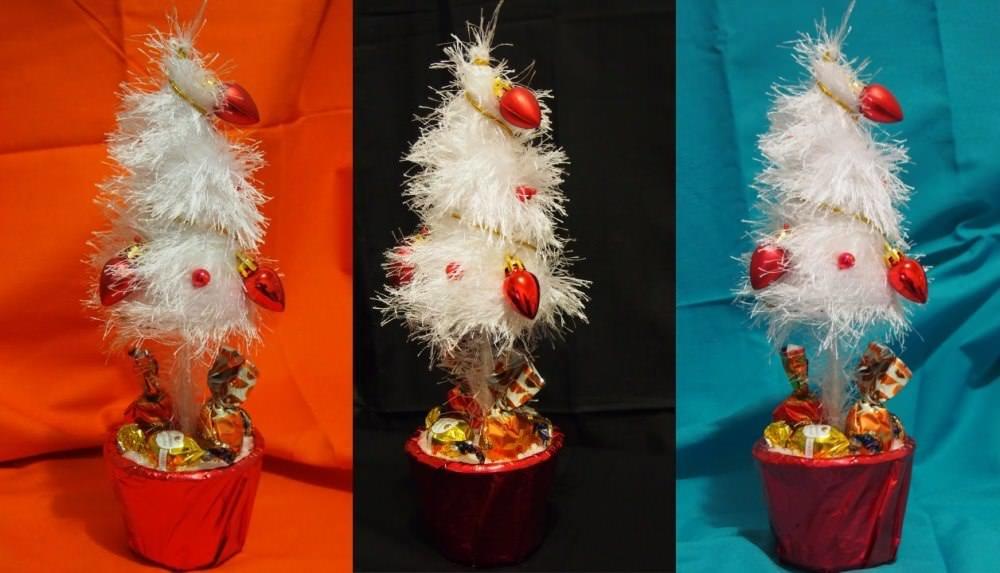
Topiary Christmas tree made of threads: original DIY decor
A Christmas tree made of threads is also, in its own way, a classic of the genre. There are many MKs that describe the process of creating such a tree. This may not be the most traditional topiary, since there is no traditionally high trunk, the pot can simply serve as a stand, etc.

Master class - Christmas tree made of threads:
- Ideal if you have a foam cone. It will be a better base and you won't have to worry about whether the topiary is durable or not. But if there is no such blank, you can make something similar with your own hands.
- Make a simple cone from cardboard or any other dense material. A papier-mâché blank will also work, although you will have to tinker with these.
- Almost no MK “undertakes” to paint a foam plastic cone, but another cone, the same cardboard one, needs to be painted to match the color of the threads (so that everything is uniform).
- The cone needs to be wrapped with thread. Which threads to take, decide for yourself - it’s better to be heterogeneous, for example, white-green, fluffy.
- Secure the ends of the threads with glue. To prevent them from “running away” during the work process, they can be secured to the base with pins. The winding goes in the “bottom-up” direction.
- When the entire cone is wrapped, secure the threads again with pins. To keep the spruce fluffy and nothing showing through from under the threads, wrap the threads in another layer.

Now the spruce topiary can be decorated. Decorative berries, beads, rhinestones, buttons - in the process of work it will become clear what will be useful.
Topiary Christmas tree made of threads (video master class)
DIY herringbone topiary: final design
It's time to make this New Year's tree look like a traditional topiary. This means it must have a trunk and a pot.
Use a wine cork as a stem. There are MKs that offer to simply paint the cork; you can wrap it with thread or twine. In a word, transform the cork with your own hands so that it looks like a trunk.
Next, the master class suggests gluing the stem plug to the cone. A heat gun will come in handy. Well, all that remains is to choose a pot. You can do this: wrap a regular plastic cup with sisal. Sisal has a pleasant texture, and you can choose any color. And then the master class is up to you: ribbons, lace, twine, mini-Christmas balls, tinsel... You can decorate the pot with your own hands in the way that suits your spruce, which should blend harmoniously into your interior.

Here are a few more ideas from different MKs:
- Such a spruce also requires gifts at its foot! A small case with elegant decoration is the best master class for giving gifts for the New Year.
- Some MKs suggest combining the same threads and candies, or threads and coins as the top layer of a pot, so that financial success does not pass you by in the new year;
MK with spruce, the top of which is slightly twisted, is also popular; an aluminum cable will help create such a bend.
Decorating a Christmas tree topiary (video master class)
Such a tree will not only decorate your home. You can create something similar as a craft in kindergarten, the child will definitely be happy! And it will take only one evening to complete not the most difficult task.
Topiary Christmas tree for the New Year - design