Giving gifts is as pleasant as receiving them, but in addition to the prepared surprise, packaging is also important, which will give it a complete and presentable look. But to understand how best to pack a gift in gift paper, you should study several features and options for this procedure in order to choose the most optimal one for yourself.
Paper selection
The most common way to decorate a gift is gift paper.
It comes in several types, each of which has its own differences:
- Sheet glossy paper. The paper can be of different colors, both plain and multi-colored. The density of the sheets is minimal, which allows them to be used in various interesting options wrappers.
Most often, this type of paper is used for packaging boxes in the shape of a square and rectangle.
- Craft. Characterized by increased wear resistance and density. To the touch, kraft paper is much rougher than the previous version and has a ribbed surface with a cross section.

Great for gifts in retro or Provence style, as well as large sizes. Such packaging requires additional decoration on top.
- Silence. This type of packaging is papyrus Whatman paper. Its thin airy structure allows you to give the gift an elegant and elegant look.

Tishyu is also used as a filler in a gift box. It is convenient to wrap objects of complex geometric shapes in this paper, which gives them additional volume.
- Polysilk. It is a stretchy film onto which a metallic shade is applied. It only comes in a single color version.

Used for wrapping objects with sharp corners, as well as toys. The gift is placed in the middle of the packaging list, and the edges rise up and are decorated with a bow made of the same material.
- Corrugated paper. For packaging gifts, material with large embossing is used. Often this look is complemented with polysilic bows, which gives the packaging a sophisticated look.

You can wrap any objects in this paper: boxes, bottles, tubes.
- Mulberry. Designer look of crinkled paper. Available in a variety of colors, and in some cases also has an ornament or design.

Used as a wrapper for objects of any shape. If necessary, the gift is complemented with a small decor on top.
Choice of colors
How to pack a gift in gift paper, as well as give it sophistication and presentability, will help you study the features of using different shades of the material.
The packaging and the item inside must be in harmony with each other, since color mismatch can ruin the overall impression of the surprise.
Primary colors:
- Yellow. Sunny color, reminiscent of a ray of sunshine. Gift wrapping made in this tone gives a warm and cozy touch. Ideal for adding childlike spontaneity and playfulness to a surprise. It is not recommended to mix with other colors. But you can add purple, brown, blue or green decor on top.
- Orange. A shade that personifies strong positive emotions and also sets one up for admiration. But it is important not to overdo it, since this particular color can both decorate a gift and ruin it. It is ideal to combine orange wrapper with green, yellow, brown, purple, blue and red.

- Pink. Great for gifts for women, as it evokes touching and joyful emotions. It is best to combine it with all shades of red and purple, and additional white decor will help to effectively emphasize the tone.
- Violet. This option is ideal for a mysterious and extraordinary gift, as it symbolizes secrecy, mystery and fantasy. It is best to combine this tone with white, silver, yellow and pink for gift wrapping.
- Red. This packaging tone signifies fiery feelings and passion, and sometimes symbolizes irritation and anger. Therefore, when giving preference to this color for gift wrapping, you should weigh everything if we are not talking about surprises on New Year, since for this holiday the red tint is very relevant.
It is ideal to combine red packaging with silver, gold, white, pink and gray tones.

- Blue. It is recommended to use this tone for gift wrapping for a man, as it is associated with success, nobility, and fidelity. Dark blue color harmonizes perfectly with blue, silver, white, yellow, and for lighter tones it is recommended to choose pale shades of yellow and pink.
- White. This tone is universal, as it can be combined with any bright color. But you should not give preference to it as the main color for packaging, since it is cold and therefore the impression of the gift will be the same. It is best used for contrast, using details in this shade, which will give the surprise a festive feel.
- Green. It is considered a neutral shade that is appropriate for any occasion. The variety of tones of this color allows you to choose the appropriate option for packaging. The green tone symbolizes wealth and respect. It is recommended to combine dark shades with yellow, orange, white and gold, and light shades with brown, gray, yellow.

- Grey. Used for gift wrapping, symbolizing nobility and restraint. And to add sophistication, it should be combined with red, pink and purple shades.
- Brown and black. These tones are rarely used, although they are recommended for formal gifts. But in order to dilute the tone, it is recommended to complement the wrapper with details in silver, purple or gold.
- Silver, steel and gold. It is best to use these colors as a complement to the main color. But it should be taken into account that steel and silver are cool tones, and therefore should set off packaging made in the same palette.
But it is better to decorate a gift made in warm shades with details in a golden tone. In addition, these colors combine well with white and black.
If you choose multi-colored gift paper, the details should be made from the tone that is present in the package, but not dominant.
This will allow you to unobtrusively highlight the gift and give it a sophisticated look.
Standard size box packaging
How to pack a gift in standard size gift paper: following certain rules for the procedure will help. For the first time, you should practice on a newspaper, and after working out the procedure, use the prepared material.

Step-by-step instruction:
- Measure out the required amount of paper. To do this, place the box in the center face down and leave a few centimeters of paper on the sides so that there is enough paper on all sides.
- Make a fold of the vertical side of the paper measuring 1 cm and glue double-sided tape to it without removing the protective layer on the other side. Connect both sides so that they fit snugly against the box. After this, glue them together according to the established principle, so that the junction is exactly in the center. If everything is done correctly, the seam will be almost invisible.
- On the side, fold the top edge of the paper to fit the size of the box. Then screw the flaps on the side. And stick tape on the edge (1 cm) of the bottom side without removing the protective layer. Fold it over and make sure that the seam is exactly in the center. Only after that glue it.
- Turn the box seam side down and make sure the packaging fits tightly.
- Decorate the box with a ribbon or bow, choosing them taking into account the characteristics of the main shade.
Square or rectangular
Most often, gifts already have their own factory packaging in the form of a square or rectangular box, but to give the surprise a more sophisticated look, you need to wrap it in beautiful gift paper.
How to wrap a square or rectangular gift:

- Spread the prepared material on the table, back side up.
- Wrap the box with paper on all sides and leave an additional margin of 4-5 cm. After this, cut a piece from the roll.
- Make a 1 cm bend along one of the long edges and glue double-sided tape over it without removing the protective layer on top.
- Also secure the second long edge with a small piece of adhesive tape 1.5 cm further from the center of the box.
- Place the prepared fold on top, but so that it runs exclusively in the center. Once you are sure of this, remove the protective layer and glue it.
- To wrap the remaining two sides, you should initially bend the side flaps tightly.
- Then make a 1 cm fold along the edge of the bottom side of the paper, and glue double-sided adhesive tape on top.
- Press the top edge tightly against the box and secure it in the center with a small piece of tape.
- After this, place the prepared bottom edge on top with a fold so that it runs exactly in the center of the side.
- If everything matches, remove the protective layer of tape and stick it tightly.
As a result, the central seam can be hidden using a satin ribbon of the required color.
Long shaped box
 To give a gift in a long box a presentable look, you must adhere to a certain procedure:
- Measure the length and width of the box.
- Cut a strip of paper according to the calculations obtained, adding a margin of 3 cm.
- Spread the prepared sheet, wrong side up, on a hard surface.
- Place the box in the center.
- Make a 1 cm bend along the bottom edge and glue double-sided tape to it on top.
- Fold the top side tightly over the edge of the box and secure with a small piece of adhesive tape.
- Place the prepared fold on top and glue it evenly.
- On the remaining sides, you need to bend the side flaps inward to form a triangle.
- Then secure the top edge tightly along the box.
- Make a 1.5 cm bend on the bottom and stick tape on top.
- After this, fix it on top of the previous layer.
Round or oval
How to pack a gift in round or round gift paper oval shape, these recommendations will help you figure it out, since in this case the procedure is carried out a little differently.
 How to pack a gift in gift paper if it is round: step-by-step instructions
 Step by step steps:
- Measure the height and width of the box and, adding 3 cm to the results obtained, cut a strip of gift paper.
- Turn the box on its side, wrap it completely, leaving a margin of 1.5 cm at the top and bottom, but first remove the lid.
- Carefully fold the remaining edges in and down the box, securing them with tape.
- Cut a circle from gift paper, the diameter of which will be 0.5 cm smaller than the bottom side of the gift, and glue it.
- Make a circle similar to the size of the lid, but at the same time, increasing its diameter by 1.5 cm, glue it, and bend the resulting stock down with decorated folds.
- Cut a strip 1 cm wider than the lid of the box, glue it to the side, and tuck the remaining stock into the middle and secure it with tape.
Flat
To pack a gift in a flat box, it is better to use the following optimal option:
- Measure the height and width of the box.
- Calculate the required size of a piece of paper by adding the length and the double result of the width of the gift.

- Place the gift crosswise on the back of the paper.
- Glue a small piece of tape to the bottom corner of the paper and secure it in the center of the box.
- The opposite corner of the paper should be fixed on top using the same principle.
- Fold the ends at the sides and make 1.5-2 cm inward bends along the remaining sides.
- Alternately secure the remaining 2 sides with adhesive tape in the center.
- Mask the place of fixation with additional decor.
Custom size
Sometimes gifts have a non-standard shape, which makes the packaging process a little more complicated.
In this case, you can resort to the following tricks:
- Cut out a base from thick cardboard, the size of which should be equal to the diameter of the gift.
- Using the same principle, cut a strip of corrugated paper or polysilic, adding a margin of 2 cm.
- Make a 1 cm bend along the side edge, and glue double-sided tape on top without removing the protective layer from the top side.
- Secure the bottom edge of the paper at the bottom in the center of the prepared base with adhesive tape, creating decorated folds.
- Place the box with the gift inside and seal the edges on the side, placing the prepared fold on top.
- Tie the top of the wrapper with a colorful ribbon.
How to pack a big gift
Sometimes the size of a gift can significantly exceed the standards - it is enough to simply cover the original packaging with the material you like and decorate it with a satin ribbon or bow on top.
In the case of a huge gift, it is enough to wrap it in film or cover it with gift paper, and decorate it with additional decor on top. Such packaging can be easily removed later when presenting a gift.
If the gift is small
If the gift fits in a small box, then you shouldn’t overly burden it with wrapping.
It's better to use the following packaging option:
- Cut a square from gift paper, the length of the sides should be 2 times the height and width of the gift.
- Place the box in the center across the paper.
- Raise the ends of the material up, connecting them in the center.
- Secure with thin tape and carefully straighten the edges.
A few more ideas on how to pack a small gift.


Packing without box
You can pack a gift in an original way even if it does not have a box. In this case, you can make a special bag out of gift paper that will give the surprise a special look.

How to wrap a gift:
- Cut a strip of gift paper based on the size of the gift, adding 5 cm in length and width.
- Make a fold of 2 cm on top and 1 cm on the side.
- Place double-sided tape on the side fold and connect the edges.
- On the opposite side, move your hand to form a uniform fold.
- Wrap 3-5 cm of paper at the bottom, depending on the width of the gift.
- Straighten the resulting top and bottom sides, and fold the side flaps into the middle.
- Make a 1 cm bend on the bottom edge and stick the double-sided sticky tape.
- Secure the edges together by placing the side with tape on top.
- Reach your hand inside the bag, straightening the bottom and folding the sides inward.
- Use a hole puncher to make holes for the handles on top and make twine through them, securing them with knots at the ends.
How to wrap a gift in an unusual and creative way
How to pack a gift in gift paper in an unusual and creative way, the options below will help:
- Package in the form of a shirt. This method will help you present a gift to your beloved man in a rather original package. The shape of the packaging resembles men's shirt made from wrapping paper.
- In the form of candy. This packaging method is especially relevant when the gift needs to be packed very quickly. But at the same time, the unusual shape of the packaging can give it a sophisticated look.
- In the form of an envelope. This type of packaging is suitable for small, flat-shaped gifts. If desired, you can write the addressee of the future recipient on the top of the envelope.
Packaging in the form of a shirt
This gift wrapping option is suitable for a small men's gift.

To use it, you must follow these steps in a specific order:
- Cut a sheet of paper twice the width and length of the gift and add a margin of 2-3 cm.
- Turn the material over to the reverse side.
- Bend the sides so that they meet exactly in the center. This will be the front side of the shirt.
- Turn the future shirt over and fold the top edge of the paper towards you.
- Turn the package over with the front shelves and bend the corners, imitating a collar.
- Turn the bottom edges of the halves outward so that they protrude beyond the edges of the shirt.
- Fold the entire product in half, placing it behind the resulting collar.
- In this case, the edges turned outward will be on top and will act as sleeves.
If desired, the packaging can be supplemented with small details.
In the form of candy
An excellent option for packaging a gift without a box can be the shape of a candy.

Even a child can do this method:
- Take the required sheet of gift paper, the width of which is equal to the gift, adding a margin of 2 cm, and the length exceeds it by 1/3.
- Wrap the gift and tie the side tails with ribbon or twine.
Envelope
Sometimes it is enough to pack a surprise in a decorated envelope made of gift paper.

To do this, you need to perform several basic steps:
- Unfold the paper and fold it in half.
- Place the gift on top, but there should be a margin of 3 cm on all sides.
- Cut according to the received parameters.
- Unfold the paper in one layer and place it face down.
- Fold the sides inward by 1 cm and the top edge by 2 cm.
- Glue the sides together, leaving the top fold unchanged.
- Place the gift and make a hole on the top side with a hole punch.
- Thread the ribbon and tie the flap of the envelope into a bow.
Box design
You need to pack a gift not only in gift paper, but also add an unusual design. But how to do this correctly and what to use from available means needs to be figured out.
Most original ideas box decoration:
- Tags. This addition looks very stylish and, moreover, you can write your wish and the name of the recipient on it. To do this, you need to cut out tags from thick cardboard and make holes in them with a hole punch. You can attach it to the box with ribbon or twine.

- Newspaper. If you don't have gift paper, you can create a unique design using an old newspaper. This will help you design a gift in a retro style.
- Butterflies. This decor will help give the gift an unusual romantic look. In this case, cut out butterflies from cardboard of different sizes. Bend their wings upward and secure them to the packaging using double-sided tape.
- A ball of thread. A small box can be placed inside a multi-colored ball of thread. To do this, you will need to wrap the gift and attach a tag with necessary instructions and wishes.
- Buttons. The unusual nature of the packaging can be emphasized with the help of these accessories by pasting them over the box on one or several sides. To do this, you need to choose buttons of different sizes, but of a suitable tone.

- Pompoms. Gifts in winter can be decorated in this way. This will emphasize warm feelings and will give the box an original look. It is best to make pompoms from woolen threads, choosing the optimal shade to match the main tone of the box.
- Pictures. You can add a certain charm to a gift with the help of photographs. They should be glued on top of the box on the sides and on the lid.
- Geometric figures. Place several types of figures on the sheets, using paper of different shades. Cut them out and stick them at a distance of 5-7 cm on top of the twine. Decorate the box by wrapping the resulting thread lengthwise and crosswise.
- Natural flowers. This option is an excellent addition to the main gift. It is best to use flowers of small diameter, placing them in the form of a bouquet in the center of the box and tying them satin ribbon suitable tone.

- Sprigs of pine needles. By adding such decor to a gift, you can give it an unusual, original look. It is best to use freshly cut branches that emit a pleasant pine aroma, securing them with a gift ribbon.
The recommendations outlined will help you master the principle of wrapping gifts in gift paper. But everyone decides for themselves how to use them, since you should always use your own original ideas. Only in this case can a gift bring positive emotions and set one in a positive mood.
Article format: Natalie Podolskaya
Video about decorating gifts with paper
Video on how to wrap a gift in gift paper - three simple and quick ways:
Any gift will look more impressive if it is wrapped in beautiful gift paper. This can be done by contacting a store representative in the gift department or by completing simple steps on one's own. In this article, we will take a closer look at how to pack a box.
Tools and accessories
The easiest way to make a beautiful and memorable gift is to pack a ready-made box in a stylish wrapping paper. To do this you will need the following tools and accessories:
- roll of gift paper;
- spectacular decorative cords and ribbons;
- regular scissors (you can use small nail scissors);
- transparent double-sided tape.
You can also either make or purchase a ready-made bow to decorate the middle of your ribbon on your gift. But how to pack a box if it is square or rectangular in shape? How to correctly calculate the required amount of wrapping paper?

How to take accurate measurements of packaging material?
So, take the original material in which you will pack your box, lay it out on a flat surface and place your square or rectangular gift in the center.
Attention! Before packing the box in gift paper, you should initially rehearse on a regular newspaper or a small piece of wallpaper. This way, you will understand how correctly you calculated the size of the paper, and also see possible shortcomings when working with tape.
Next, on the right or left side (meaning the vertically placed edges of the paper) of the holiday wrapper, fold one edge and glue a small strip of double-sided tape to it. Then fold the second edge and small pieces of paper placed horizontally, remove the protection from the tape and carefully smooth the ends. It will turn out that large areas of the wrapper will be secured with tape.

How to pack a box in paper: fold the edges and glue them together
At the next stage, we recommend turning the box over with the glued sides down and folding the corners on the sides of the box (it should look like when wrapping chocolates). Then stick tape onto the free area of paper and lean it against the end of the product.
Smooth the ends with your hand. Repeat the same on the opposite side of your box. The holiday wrapper for a standard rectangular container is ready. Now you know how to properly pack a box in beautiful gift paper.

How to decorate a gift wrapped in paper?
There are many options for decorating a paper-wrapped box. For example, you can take a small strip (about 5-8 cm) and wrap it right in the middle of your gift. Moreover, carefully fasten its ends with tape. And then once again go along this strip, which should have a color different from the wrapper, with decorative ribbons and cords. You can also stick butterflies, flowers, rhinestones and bows on top of them if desired. As an alternative, you can take a beautiful braid or ribbon and use it to decorate the corners of the box. Moreover, you don’t have to limit yourself to just a ribbon of one color; the more there are, the better.

Packing the box in double-sided gift paper
Don't know how to beautifully pack a box using double-sided gift paper? Start by choosing a side. For example, if your wrapper contains a bright side and a duller side, decorated in pastel colors, then it would be best to place the first one inside and leave the second one on top of the gift.
Moreover, for a greater effect, you can leave a small allowance in width (the brightest part of the paper is best for this), fold it along the line and smooth it.
After this, wrap the box in the above-mentioned manner. However, unlike the previous option, you will no longer need to cut out an additional strip to create a special contrast in the center of the gift. Here's how to pack a box beautifully using holiday decor and double-sided paper.
Recall that instead you will already have a fold from the inside of your wrapper. Next, all that remains is to complement the decoration with festive ribbons. You can also use white lace, braid and other small decorative elements.

How to pack a round or oval box?
The gift wrapping process will be a little more complicated if your box shape is round or oval. How to pack a box in gift paper in this case? First you need to measure your gift in height. Then cut one strip of the holiday wrapper, which should be about 2-5 cm wider than the height of the box.
After this, turn the container on its side and wrap it with paper around the entire perimeter. However, do not forget to leave an allowance of 1 cm for the bottom and 1-2 cm for the top. In this case, you should first remove the lid of the box.
At the next stage of our step by step instructions Codenamed “How to Pack a Box,” you need to carefully glue the ends of the paper together. And then cut out a circle or oval from the wrapper, the size of which will be slightly smaller than the diameter of the bottom of the box. Next, glue the cut circle to the bottom of your package so that the paper allowance is not visible.
Next, take the lid and cut out a circle slightly larger than its size. And then glue this circle on top, creating spectacular decorative folds on the sides. After this, cut a small strip of paper that will exceed the height of the lid by about 1 cm.
Glue it flush with the top of your lid, and the resulting allowance should be tucked inward. The top of the packaged round or oval box can be decorated with ribbons and other decor. By the way, it is much more convenient to wrap such gifts in corrugated paper. And knowing how to pack gift box in corrugated paper, you can easily wrap a round or oval-shaped container.
A few tricks for properly decorating a gift
When decorating a gift of any shape and size, you should know certain tricks that will help facilitate the process and give your product a special zest. For example, if you prefer regular colorless paper with a thick base, then it needs to be supplemented with a bright touch. So, its role can be played by a large and bright flower or bow.
Themed gifts are best complemented with appropriate decorative items. So, New Year's gifts can be decorated with small Christmas trees, snowmen or snowflakes. Gifts for children are best packaged in the form of a large candy, which will cheer up little sweet lovers.
In a word, use your imagination, and your efforts on the topic will not be in vain. After all, now you know how to pack a gift box. Surely they will have the desired effect on the recipient and will be appreciated.
We offer ideas that can decorate any gift, plus flower packaging options.
CLASSIC PACKAGING IN A SHEET OF WRAP PAPER
happygreylucky.com
The simplest packaging method, suitable for a voluminous or flat rectangular gift (for example, something already sold packaged in a box) is gift paper. For packaging you will need a suitable size sheet of fancy printed or plain craft paper, tape or glue.

Bowsandbands.net
Wrap the gift in a piece of paper and secure the long edges with tape or glue. Fold the short edges of the paper to form corners. Bend the corners inward and also secure with tape or glue.
GIFT BAGS
A bag made of fabric or paper can be of any size - accordingly, it can hold almost any gift.PAPER GIFT BAG

Abeautifulmess.com
“Unformatted” gift - very small, very large, unusual shape? You can pack this in a paper bag made by yourself. By the way, you can write or draw whatever you want on it.
You will need: the gift itself (for the template) or suitable size cardboard box, craft (or any other thick) paper, scissors, glue (a glue stick will do), hole punch, ribbons for pens. If you will be making inscriptions or drawings, also paint, brushes and/or a stencil.

Abeautifulmess.com
STEP 1

Abeautifulmess.com
Trace the bottom of the box on paper. Cut it out. Also cut out two parts equal in width to the width of the box (and the future package) - then you will need to use them to strengthen the places for the handles.
STEP 2

Abeautifulmess.com
Place the box flat on the paper. Cut the sheet so that there is enough paper to wrap the entire gift, plus there are significant allowances left. Bend one of the edges and fold it inward - the handles of the bag will be attached there.
STEP 3

Abeautifulmess.com
Wrap the box in paper and glue the edges.
STEP 4

Abeautifulmess.com
From the bottom of the box, fold the remaining edges of the paper as shown in the figure, fold and glue the corners.
STEP 5

Abeautifulmess.com
If you wish, add drawings or messages to the bag.
STEP 6

Abeautifulmess.com
Glue parts into the bag to strengthen the place for the handles.
STEP 7

Abeautifulmess.com
Place a piece inside the bottom to make it tougher. Punch holes for the handles with a hole punch and insert ribbons into them, tying each end with a knot inside the bag.

Master Class:
PAPER AND CARDBOARD PACKAGING
You can put a souvenir, decoration or any other small gift in handmade boxes.PAPER “CHEST” WITH CLASP
This colored paper box is suitable for hiding a small or medium-sized gift. The size of the chest may vary - if necessary, change the dimensions of the pattern accordingly and take a larger sheet.You will need: a sheet of thick colored paper, a ruler and pencil, scissors, a breadboard knife.
Draw in advance and cut out two patterns from rough paper, one with a valve, the other with a slot for it. Draw a square on a sheet of paper, trace the patterns, cut out the blank and fold the box.
CARDBOARD PACKAGING - “PILLOW”

artsycraftsymom.com
Making such packaging is quite simple, but it is universal and can look both strict and romantic - depending on the choice of paper.
You will need: a piece of colored paper or cardboard with or without a pattern, paper glue, a pencil, a ruler, a protractor or any round object that can be used as a template, scissors, ribbon or string for decoration.
STEP 1

artsycraftsymom.com
Prepare cardboard or paper of the required size. The length of the sheet will correspond to the length of the future packaging, the width of the sheet will be twice the width of the box. Leave room for “seam allowances” on three sides.
STEP 2
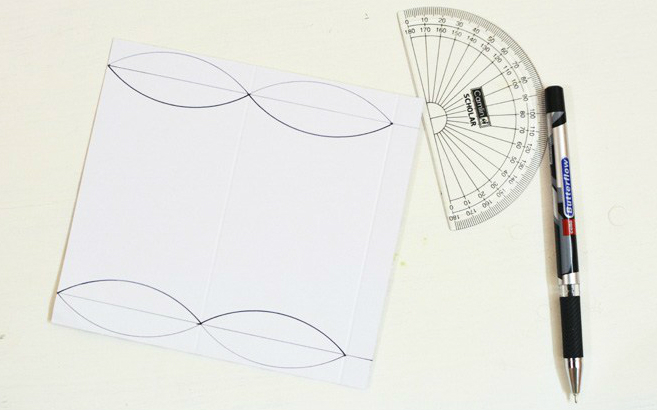
artsycraftsymom.com
Draw fold lines on the back of the sheet. To draw rounded lines, use a protractor (saucer or something suitable). Using the blunt end of the scissors, trace the outer edges of the future package along the ruler and template - this will make it easier to fold.
STEP 3
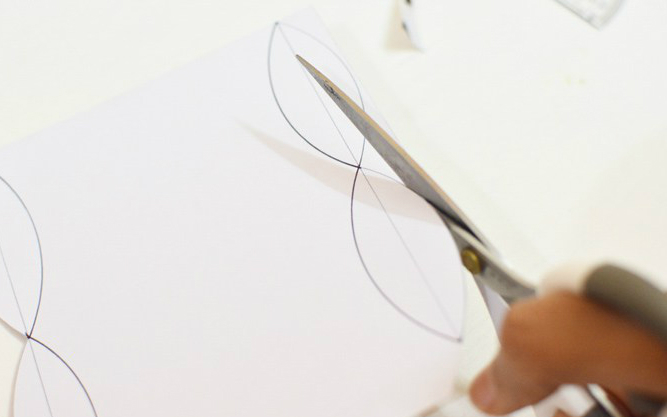
artsycraftsymom.com
Cut along the outer edge.
STEP 4

artsycraftsymom.com
Fold the workpiece along the marked lines.
STEP 5

artsycraftsymom.com
Glue the box together side seam. After hiding the gift there, tie it with a ribbon or cord.
PACKAGING - “CAKE”

This kind of packaging is more suitable for giving something to a girl, girl or woman - for example, in the video, one of the “pieces of cake” hides a ring in a case. But if your loved one or dad has a sweet tooth, you can hide a gift for him in such a “cake”. If you need to give gifts to a whole family or company, you can hide one gift in each “piece”.
You will need: 12 sheets of thick colored paper “chocolate” or other “confectionery” color, scissors, glue, white ribbon, flowers for decoration, paper napkin or cake box for serving.
ROSE FROM SATIN RIBBON
Ribbon flowers can replace a bow on gift wrapping. This romantic decoration option is more suitable as a gift for one of the fair sex.

You will need: a fairly wide satin ribbon about 1 m long, a needle and thread, superglue.
STEP 1

Fold the edge of the tape and make a seam. Without cutting the thread, twist a small tube from the ribbon - the base of the flower. Folding the edges of the tape, make turns around the base and secure at the bottom using small seams.
STEP 2

Wrap the entire ribbon around the base, making the petals more and more voluminous. Cover the last turn with glue, having first cut the thread and made a small knot. This will help hide seams and blemishes.
DRY FLOWER JEWELRY

secondstreet.ru
A small bouquet of dried flowers, wrapped in paper, can replace the bow on the package.
WE PACK FLOWERS
If you are giving a bouquet, a “single” flower or a plant in a pot, you can also come up with packaging for such a gift that adds a festive mood and makes it special.The simplest option is to wrap the flower in a sheet of double-sided colored paper and tie it with a ribbon at the bottom.
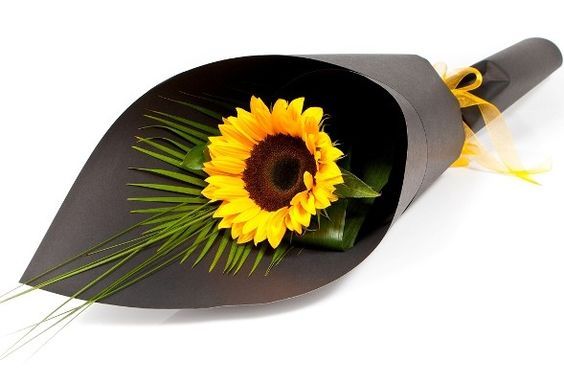
Expressionsflorist.co.nz
A more rigorous option is to use craft paper and coarse rope.

flaxandtwine.com
To package flowers this way, first tie the bouquet at the bottom, then place it on the wrapping sheet with the flowers toward the corner, wrap the stems around the bottom of the sheet, and tie the package with string, ribbon, or string.
ecinvites.com
We give gifts to loved ones, friends, colleagues on birthdays, New Year, and other holidays. Those who believe that content is more important than form think that it is quite possible to do without a beautiful wrapper. Candy with or without a wrapper is equally delicious! However, even a very serious and respectable person will be sincerely delighted to receive an elegantly and inventively packaged gift.
The most popular “container” for it, like hundreds of years ago, remains paper. Let's see how to wrap a gift in paper.
Paper like the ancient Chinese never dreamed of
The choice of paper is enormous. In stores they offer wrapping paper thin and durable, glossy and matte, corrugated and embossed.

Sheet glossy paper
The most convenient for our purpose. Comes in a variety of colors and patterns.
Craft
Craft is intended specifically for gift wrapping. This type of paper is slightly ribbed to the touch, with transverse embossing. Produced in rolls of ten meters in length.
Silence
Quietly thin, light, airy. Therefore, it is also used as a filler. Objects of complex shapes are wrapped in silence, which this type of packaging fits elegantly and prominently.
Polysilk
Gifts of non-standard shapes are often packaged in polysilk. Large decorative bows are made from it. Resembles a thick film, stretches a little. For these not-quite-paper-like properties, polysilk is loved by designers and stylists.
Corrugated paper
Plain rough corrugated paper is familiar to everyone as an element of packaging flower bouquets. It is often used to decorate souvenir bottles and other gifts of narrow elongated shape, packaged in boxes and tubes.
Mulberry
Mulberry - a type of paper self made made in Thailand. The color range is extensive. It often has a pattern or ornament, sometimes with inserts of floral materials (dried flowers, fragments of stems, leaves).
These types of wrapping paper do not exhaust the entire selection. There is also mother-of-pearl, silk, crinkled, embossed, gel... The ancient Chinese inventors of paper never dreamed of this!
We pack a square or rectangular box

First, let's learn how to properly pack a gift with your own hands if it is in a square or rectangular box.
We will need:
- packaging paper
- ribbons, cords for decoration
- tape measure or centimeter
- scissors
- tape (preferably double-sided - ordinary tape will be too noticeable, and it remains to be seen whether it will be possible to disguise it accurately enough).

We pack a round or oval box
Let's figure out how to pack a round gift. Hats, tea or coffee sets, sweets, cookies, and tea are sold in a round or oval box. Not every professional packer can handle a box of this shape, so again, practice on scrap paper first.

We measure the box in height. Cut a strip of gift paper 2–3 cm wider. We paste this strip around the box, not forgetting to tuck 1 cm under the bottom, 1-2 cm inward. Naturally, remove the lid. Cut out a circle or oval from wrapping paper slightly smaller than the bottom. Glue it to the bottom of the box so that the folded seam allowance is not visible.
With the lid it's the other way around. Cut out a slightly larger circle or oval, glue it and the seam allowance on the sides, making neat folds. We cut out a strip of paper 1 cm wider than the height of the lid. Glue it flush with the top of the lid, folding the protruding seam allowance inward.
Here is another master class in pictures using corrugated paper

The final touch is the box design
We have figured out how to properly wrap a gift in paper. Now you need to decorate it in an original way. Let's look at a few ideas.
The box can be tied with a ribbon or ribbon. No, it's too banal. What if with several ribbons or ribbons of different colors and textures?

If you chose plain, unpatterned wrapping paper, tighten the box with thin thread or ribbon and attach a flower or bow on top. This bright accent will give plain paper a special charm.

For a man's gift, more discreet packaging is more suitable. You can tie tiny plastic ones to New Year's Christmas balls; for a birthday party - small bows or other decorative decorations. Anyone can do this in an hour, it will look spectacular!

It is better to put a children's gift in a bright textile bag or arrange it in the form of a large candy. Kids love to discover all sorts of interesting surprises from packages.

Gift shops sell ready-made packaging boxes. If your gift is large, look there: maybe you can guess the size?
In general, it is useful to go shopping in search of fresh ideas on how to successfully complement gift wrapping. Among various cute little things you can sometimes find something that will be useful to you. Brightly colored natural bird feathers or miniature butterfly brooches, for example. Or you can rummage through your household supplies and find original ribbons, decorative laces, and miniature souvenirs that just need to be glued to a gift box. For those who know how to crochet, making a round flower is a matter of minutes, and glued together with ribbons to the package, it will look like a designer exclusive.


Use your imagination, and your efforts and experiments on how to wrap a gift will not be in vain, but will be appreciated.
A beautifully and tastefully packaged gift looks more presentable than a boring box or bright package. The most common packaging material is gift paper. Wrapping gifts with your own hands will be a joy if you learn all the subtleties and nuances of this process.
Types of gift paper
An impressive assortment will allow you to choose packaging for any occasion and in accordance with any preferences:
- Corrugated. Textured packaging obtained by creating artificial folds on a dense sheet:
- Pros: it takes and holds its shape, it is easy to work with, there are many colors in the range, low price.
- Cons: high-quality ones are not cheap, packaging requires skill.
- Creped. Flexible and airy variety of corrugated. It has a relief texture and holds its shape perfectly:
- Pros: environmentally friendly material, easy to use, crepe protects the gift from damage due to its texture, large selection of colors.
- Cons: not always easy to find on sale.
- Glossy. The most popular wrapping material. In retail you can find not only rolled, but also sheet glossy paper:
- Pros: inexpensive type of packaging, many colors and designs available, sold everywhere, easy to work with.
- Cons: easy to damage.
- Papyrus silence. A very thin, pliable material, it is often used for packaging non-standard gifts:
- Pros: it can take any shape, decorative elements can be made from it, a large selection of colors.
- Cons: due to the low density, packaging requires a lot of material and breaks easily.
- Mulberry. The voluminous and dense material is made from the bark of the mulberry tree. There are many varieties: smooth, crinkled, embossed, melange, with natural plants:
- Pros: large assortment, easy to work with, takes and holds any shape, original packaging gift.
- Cons: high price.
- Polysilk. Plastic paper, you can not only make a gift wrapper, but also beautiful knots, bows:
- Pros: suitable for creating decorative elements, has unusual paper properties.
- Cons: wrinkles a lot, sold in retail only in rolls.
- Craft. Durable paper made from shredded wood, virtually undamaged:
- Pros: does not tear, is an environmentally friendly material, holds its shape well, is sold everywhere and is inexpensive.
- Cons: craft paper is not suitable for wrapping gifts of non-standard shape.
How to wrap a gift in wrapping paper
Gifts come in different forms, and therefore
Simply wrapping the box in gift paper will not work.
Ready-made wrapping patterns will help you do everything carefully and correctly.
Gift in a box
- Cut a rectangular sheet from the packaging material. The width of the sheet should be 3 cm greater than the sum of the measurements of the four sides of the box. The length of the sheet is 2 box heights + 1 length.
- Place a box in the center of the sheet. Fold the sides along the length of the box over each other and secure with transparent tape. Stretch the paper well to avoid creases.
- Next, secure at the ends: fold the top piece of packaging, then press the sides. Fold the bottom piece too, secure with tape in the middle.

Round gift
- Cut out a rectangular sheet. The length is 3-4 cm more than the diameter of the gift, and the width is 3-4 cm more than the height.
- Wrap the gift and secure it in the middle with a piece of tape.
- Fold the edges at the bottom one by one (top, sides, bottom), secure in the center with tape.
- Fold one top free corner inward and begin folding the free edge like an accordion toward the center. When folded around the entire circumference, secure with tape.
Custom packaging
- For shapeless items like clothes or bulky scarves, use a square piece of cardboard. Place the item on it, place the cardboard on a sheet of packaging material. Carefully gather the edges so that the gift takes the shape of a bag. Tie with a large ribbon in a contrasting color.
- Wrap the gift in thin paper. Place on the edge of a rectangular sheet of packaging. Grab the paper, wrap the gift, and secure it with glue or tape. Fold the remaining edges at the bottom and top and secure with glue.
- If a gift oblong shape, prepare a cardboard tube for it. Hide a present in it. Cut a piece of packaging - 6 cm longer than the tube, two turns wide. Wrap the gift in paper and secure it with tape at the edges of the tube. Wrinkle the remaining paper at the top and bottom into a bundle and tie it with ribbons, creating a semblance of candy.


