Corrugated paper has almost become the subject of a massive craft craze. This is, of course, a joke, but the popularity of crepe paper cannot be ignored. More than one photo and video master class is dedicated to crafts from corrugated paper: flowers, berries, leaves, stylish packaging and, of course, topiary. With your own hands, from this textured paper you can make a tree of happiness with flowers, or a tree-heart as a gift to your loved one.
Any topiary starts with the fact that you need to make a sphere or ball. The ball is the basis of the crown of the future tree. Of course, you can just buy a foam blank and not worry. But if you are interested in the purity of the experiment, you can do almost all the stages that make up the master class yourself.

How to make a ball - step by step instructions:
- To make the base ball you will need balloon and polyurethane foam.
- The balloon needs to be slightly inflated and placed on the tube of the foam balloon.
- You fill the ball, monitoring its size, and then wait for the foam to harden. After five to seven hours you can see the result.
- If you try to moisten the inside of the ball with water, the process of foam hardening will speed up.
- When the foam has dried, you need to remove the top layer from the ball. In every MK, this work is compared to peeling an orange - you really have to cut off the top layer, as if you were peeling a fruit.


Removing the top layer of the ball is necessary in order to give it a more regular shape and remove all irregularities on the surface of the sphere.
Master class: corrugated paper asters (video)
Topiary heart made of corrugated paper: step by step
Since the master class will further develop in almost the same direction, it’s worth immediately talking about how to make a heart base. If your crown is held not by a ball, but by a heart, you must create this shape with your own hands.
Instructions: how to make a heart base:
- This MK suggests following the good old papier-mâché technique. Tear the paper into pieces of different sizes, and then soak it in a mixture of water and PVA glue.
- Wrap the film around a heart-shaped shape - a soap dish, powder compact, children's toy, etc.
- And you work according to the rules of technology - you paste the paper layer by layer, covering the joints of one layer with the paper of a new one.
- The greater the number of layers, the better, although, of course, the instructions do not require fanaticism.
- Next, the structure must be allowed to dry thoroughly. If you have already seen a similar photo or video master class, then you probably noticed how the masters are in no hurry to proceed to the next stage.
- Using a stationery knife, very carefully cut the structure in the middle, take out the object used for the base, and see the two halves of the heart that you made with your own hands.

Roses made from corrugated paper (video master class)
Crepe paper topiaries: delicate decor
Most often, flowers are made from corrugated paper. Roses and peonies are the favorite choice of craftsmen. Of course, making flower arrangements is a separate issue. If you want to do beautiful roses, watch more than one video, or let the photo instructions guide you in the technique.

So, let’s say you watched a video or photo master class and learned how to make roses. With your own hands you need to make at least a dozen flowers that will decorate the crown of the topiary.
As for color, such paper topiaries can be either cheerfully variegated or delicate. For example, cream or greenish-white topiary will be relevant in a light, soft interior. In a girl’s room, pink shades will certainly be appropriate, and if you want freshness, deep cornflower blue will bring it.
MK: corrugated paper topiary: forming a tree

For this:
- Prepared roses one by one, very carefully, row by row, glue them onto the ball base with hot glue.
- Leave a hole for the barrel in advance. This is a durable tube that can also be wrapped in corrugated paper. And not necessarily green. For delicate topiary it can be white or pale pink. The barrel is inserted into the hole in the ball and fixed with glue.
- The tree is ready, all that remains is to make the same beautiful flowerpot for him. You can, of course, buy ready-made - from exquisite decor, stucco, etc. You can go further, today even on a flower pot you can print a photo, for example, of you and your significant other. Why not an option? Well, you need to fill the pot with plaster, into which the tree is planted.

Such paper topiaries can also be decorated with small candies wrapped in the same paper and scattered over the top layer of plaster in a pot.
You can also create an entire composition from crepe paper. For example, hang a beautiful ballerina next to the topiary. It is done simply: the silhouette of a ballerina is twisted from wire, and it is carefully covered with a mixture of thin toilet paper and glue. And then the ballerina needs to be dressed in fluffy dress from corrugated paper.
She can stand by a tree, sit down next to her, in a word, the situation can be played out. If you decide to create such a composition, film the process and don’t hide your master class - it can inspire others!
Corrugated paper topiary: video master class
This master class will show in detail how you can make a topiary from corrugated paper with your own hands.
Part 1: crown decor (video)
Part 2: supporting structure of the topiary (video)
Part 3: Final design (video)
Promotional videos or videos dedicated to creating topiary motivate beginners in this business to try themselves in this technique. And if you doubt whether you can create such a topiary yourself, rest assured that the process is fascinating, the interest only increases, and the result will delight you for a long time.
Corrugated paper topiary (photo)


Topiaries are often made from various available materials: coffee beans, small accessories, beads, cones and other similar details. In this master class I will tell and show how to make a topiary from corrugated paper with your own hands with roses.
What you need to make topiary.
The following materials and available tools are required:
- corrugated paper of two colors (you can take more);
- jute twine;
- wallpaper glue;
- thread;
- scissors;
- hot glue gun.

Step 1. We make flowers from corrugated paper.
Since our topiary will be made from flowers, we need to make them first. Let us consider in detail the technology of their manufacture.
To make one flower we will need a corrugated paper ribbon approximately 10 cm wide and about 50 cm long.

We begin to make a blank for the flower by folding the upper right edge of the ribbon.

We put thumb with your right hand on the bent corner and cover it (the finger) with the edge of the corrugated paper.


Using the thumb of your left hand, bend the edge of the paper, unscrewing the element. That is, we twist the edge the way we would twist a candy wrapper.

We get this “bow” on the edge of the corrugated paper.


Using this principle, we twist the edge of the tape along its entire length.


We tie it at the base with thread.

We cut the leg to the very “root”.

We get this rosette from corrugated paper.

We make two colors.

You need quite a lot of roses. For one topiary - about 80 pieces. You can make it smaller, but then you need a smaller ball for the topiary.

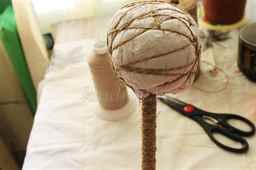
Step 2. We make a ball of thread.
We will use a ball of thread as a base. It is very easy to make using jute twine: inflate the balloon, wrap it with twine, coat it with a solution of wallpaper glue, leave to dry for 2-3 days, pierce the balloon and remove its remains - in the end we get such a spherical frame.

Step 3. Glue the roses to the ball.
Using hot glue, we fix the roses on the thread frame.

We glue all the roses tightly to each other, and we get these two-color balls of roses made from corrugated paper. We attach the ball to the vase - the topiary is ready!


These can be used to decorate the interior or, for example, a wedding table.


“Holiday tree” made of crepe paper. Step-by-step instruction.
Gift for the Day national unity with your own hands.
Natalia Vladimirovna Pukhanova, additional education teacher, Zheleznogorsk Social Assistance Center, Zheleznogorsk, Kursk region.
Description: The master class is designed for older children school age, additional education teachers, educators, parents, creative people.
Purpose: interior decoration, gift to loved ones, relatives, friends.
Target:
- making a holiday tree from crepe paper.
Tasks:
- develop creativity, interest in work, aesthetic taste, patience, accuracy;
- cultivate care and love for others.

RUSSIAN FLAG
Multi-colored flag of Russia –
White, blue, red.
The most beautiful for me,
There is no more beautiful flag in the world.
There is honor and truth in this flag,
Blood shed in battle
Courage, valor and bravery,
Faith in my Motherland!
M. Bebina
Peter I is recognized as the legal father of the tricolor. On January 20, 1705, he issued a decree according to which a white-blue-red flag should be hoisted “on all kinds of trading ships,” he himself drew a sample and determined the order of the horizontal stripes.
In different variations, the three-striped flag adorned warships until 1712, when the St. Andrew's flag was established in the navy. Alexander II in 1858 approved the drawing “with the arrangement of the emblem black-yellow-white colors of the Empire on banners, flags and other items for decoration on special occasions in the streets.” And on January 1, 1865, a personal decree of Alexander II was issued, in which the colors black, orange (gold) and white were directly called “the state colors of Russia.” On April 8, 1883, a decree from Alexander III was announced, which stated: “So that on those solemn occasions when it is considered possible to allow the decoration of buildings with flags, only the Russian flag should be used, consisting of three stripes: the top - white, the middle - blue and the bottom - red flowers." In 1896, Nicholas II established a special meeting at the Ministry of Justice to discuss the issue of the Russian national flag. The meeting came to the conclusion that the flag “white-blue-red has every right to be called Russian or national and its colors: white, blue and red are called state.” The three colors of the flag, which became national, received an official interpretation. The red color meant “sovereignty”, blue - the color of the Mother of God, under whose protection Russia is, white - the color of freedom and independence. These colors also meant the commonwealth of White, Little and Great Russia.
On December 25, 2000, Russian President Vladimir Putin signed a Law, according to which the State Flag of Russia is a rectangular panel of three equal horizontal stripes: the top is white, the middle is blue and the bottom is red.
The colors of the Russian flag have many symbolic meanings. Currently, there is no official interpretation of the colors of the State Flag of the Russian Federation.
Since ancient times in Rus', white, blue and red colors have meant:
white color - nobility and frankness;
blue color - fidelity, honesty, impeccability and chastity;
red color - courage, boldness, generosity and love.

Materials and tools:
crepe paper 4 colors,
stapler,
scissors,
glue gun,
plastic or paper ball,
plastic cup,
satin tape,
white paper napkin,
ruler,
white threads.

Glue gun safety rules.
1.Do not touch the hot nozzle. Be careful!
2.Do not touch the melted glue, let it cool for 5 minutes.
3.The gun is not intended for outdoor use. Keep the tool out of the reach of children.
4. Use a safe stand for the glue gun when working.
5. If the power cord is damaged, have it repaired at a service center.
Progress:
Let's make flowers from crepe paper.
1. Take crepe paper of three colors (white, red, blue).

2. Cut strips 4.5 – 5 cm wide.

3. Place one strip on top of the other, fold them in half and cut along the fold.


4. Fold in half again and cut into four equal parts.

5. Staple the squares in the middle crosswise and cut out a circle.


6. Let's make a flower from the resulting blank.
To do this, lift each layer of the napkin or two layers up and squeeze it a little with your fingers.


7. Let's prepare 6 flowers white, 10 blue flowers and 10 red flowers.

8. Take a plastic ball, place it on a white napkin and wrap it.
A plastic ball can be replaced with one made of paper.

9. Wrap white threads around it, securing the napkin.

10. We begin to glue the prepared flowers onto the ball with a glue gun. Glue 6 white flowers.


11. Glue blue flowers to the second row. First through one, and then add more in between.


12. The third row consists of red flowers.


13. Let's start our pot.
We glue double-sided tape onto the cup in several places to secure our packaging.

14. Take silver crepe paper measuring 30 by 30 and place a plastic cup in the center of the paper.

15. Wrap the cup in paper, wrap the edges of the paper inside the cup, gluing them with glue.


16. Glue a satin ribbon of blue color to the potty.

17. Let's coat the rim of our pot with hot glue.
Insert the ball and press it to the pot.
Topiary - a decorative product self made, externally resembling a tree. It is also called the “tree of happiness” or “money tree”, symbolizing wealth and prosperity in the family. It is a ball on a base fixed in a flowerpot or pot.
In ancient Rome, the art of topiary was the cutting of garden trees, and the slave who monitored this and maintained their ideal appearance was a topiary. Later, the fashion for topiary tree trimming appeared in Europe. To this day, interest in topiary continues. We offer you a master class on how to create this unusual item for interior decoration with your own hands. The most popular options are topiaries made from napkins, multi-colored corrugated paper and cotton cotton pads. Step-by-step photos will help you recreate the masterpiece yourself.
Master class on creating topiary from paper napkins
The simplest and most inexpensive option for creating a decorative tree is to use paper napkins as the main material. This method is suitable for beginners who want to try their hand at creating topiary with their own hands. It’s okay if the first time you don’t get a masterpiece like the one in the photo. Experience comes with time, and you won’t mind spoiled napkins, because this is an accessible material that many have in abundance.

Using paper napkins, using your imagination, you can create real masterpieces
But in addition to paper napkins of different sizes, you will need the following materials and tools:


Topiary kit: tree base
The size of the tree flowers depends on the size of the paper napkins. The larger they are, the larger the flower will be. So let's get down to business.

Advice. You can make small cuts around the napkin with scissors. This is done to give the petals a velvety texture.

Advice. To disguise the plaster in a pot, you can pour transparent decorative stones onto it.
Making a “money tree” from corrugated paper
Another equally interesting activity is making topiary from multi-colored corrugated paper. To create a tree you need to prepare:
Styrofoam ball or balloon and construction foam.
- Pins or heat gun.
- Corrugated paper.
- Wire.
- A stick.

Corrugated paper topiary set
- Satin ribbons.
- Moss, tinsel (for decoration).
- Pot.
Almost every topiary creation begins with the purchase or self-made basics. Of course, the easiest way to buy it is in a store. But in our master class we will clearly explain how to do everything yourself. Follow the step by step instructions.
- The newspaper version has already been successfully tried. It's time to create the base of the topiary from polyurethane foam. To do this, you will need a regular balloon; you need to moisten it a little with water inside. After slightly inflating the balloon, place it on a container of construction foam and release the required amount. The hardening process will take about 12 hours, perhaps a little less. After drying, remove the ball, leaving an excellent round base.

Ball for topiary made of polyurethane foam
- The next step is to make flowers from paper. You can use one shade of corrugated sheet or several different ones for all flowers.
- Cut a strip of paper 3 cm wide and fold it in 2/3 of the way from one edge.

Making roses from strips of corrugated paper
- Carefully twist the ribbon into a spiral. It should be tighter in the middle, but looser on the sides. You should get a very beautiful delicate rose. Secure the free edge with glue or thread. You will need a lot of these flowers. Therefore, it is necessary to make them for future use.
Advice. To make roses look natural, you need to straighten the petals a little with your hands.
- Using pins or a heat gun, the flowers are attached to the base. There should be no free space left on the ball.
- The trunk of the future tree should be wrapped satin ribbon white. To ensure that it holds well as you screw it onto the barrel, fix it with a heat gun or regular glue.

Installing a topiary trunk on foam plastic
- We connect the barrel to the ball and place it in the pot. First you need to put a piece of foam in it so that it fills the entire inner surface of the pot. Mask the foam base on top with moss or tinsel.
- Another magnificent tree is ready.

Corrugated paper topiaries
Making a “tree of happiness” from cotton pads
Every girl who takes care of her appearance always has cotton pads in stock. So, why not make your own topiary from them? Prepare the materials necessary to create the tree:

Let's move on to the next creation. This option is as popular as creating a topiary from paper napkins. The master class will appeal to both beginners and experienced craftsmen.
Attention! Cotton pads are usually sold white, but if necessary, they can be painted with special paints or improvised means. So, you can get green material by dipping a disk in a solution of brilliant green. Brown, respectively, in iodine.
- First, let's make the flowers. Roll the cotton pad into a roll shape and fasten it at the bottom with a stapler or tie with thread. Unfold the top of the roll and shape it into a flower. Make 10–15 of these roses.

Making roses from cotton pads
- Another option for making a topiary base is to use knitting yarn. The ball of thread must be wrapped in plain paper. It is advisable to make several layers. Then wrap the resulting ball well with tape. The base is ready and you can proceed to further actions.
- Fasten the ball and the trunk, and secure its base in the pot with plaster.

Base ball for topiary
- The ball must be decorated with roses made from cotton pads. They are attached to it with glue.
- The tree trunk is decorated with a satin ribbon. It can be replaced with wrapping paper or foil. Instead of a wooden stick used as a trunk, you can use strong wire, well bonded in several layers.
- The plaster base is decorated with decorative greenery or tinsel. It is best to attach it with glue.

Options for topiary made from cotton pads
- Instead of a pot, you can use improvised materials: a paint can or a plastic mayonnaise bucket. Give them a proper appearance You can use fabric or wrapping packaging. And tie a satin ribbon bow on top.
Advice. To make the roses on the ball look different, cover them with a small layer of hairspray with a glitter effect, and glue on beads or seed beads. Decorative figures can be placed on the crown of the money tree or its trunk.
Topiary care
Topiary is just the kind of tree that requires absolutely no maintenance. It does not need to be watered, fertilized or replanted. It will delight you with its appearance regardless of the season. Caring for it involves placing it away from direct sunlight, as the material may fade. It won't be necessary to blow off or shake off dust very often.

Caring for topiary involves removing dust
A decorative “tree of happiness” made by yourself will become a talisman for your home. It is also suitable as a holiday gift for family or friends. For some time now, topirary has become widespread in wedding floristry. Bridal bouquets are made not from fresh flowers, but decorative materials. Their advantage is that the flowers on them will not wither during the day or freeze in winter. In general, creating topiary is a fascinating process that captivates many, regardless of age and gender. Simplicity of action, inexpensive and beautiful materials and excellent results are the main motivators for learning a new hobby.
DIY corrugated paper topiary: video
DIY topiary: photo


What is topiary? Topiary is either a figuratively trimmed hedge (which is also very interesting, but not within the scope of this master class), or an original small tree made from natural (and not so natural) materials.
Making it is a wonderful opportunity to have fun and useful time with your child. After all, working with corrugated paper develops fine motor skills and instills a sense of beauty. Moreover, if in kindergarten or your child will be faced with a similar task at school, it will no longer cause much stress and will bring much more pleasure.


How to make topiary from roses? You will learn this from the master class, and step by step photos and an explanation of each step will help you complete the product at the highest level.
This is what the finished craft looks like:

Materials for corrugated paper topiary
1. Corrugated paper.
2. Transparent glue “Moment”.
3. Stick for the trunk.
4. Rope for wrapping the trunk.
5. Thread for tying roses.
6. Plaster (If there is no plaster, then you can use alabaster or cement).
7. Pot (or any other container in which a tree with roses will grow).
8. Scissors.
9. Newspaper (paper) for the ball.

Progress:
1. Cut out strips of corrugated paper 3 cm wide, bend the end twice and twist it like a candy wrapper, repeat until the end of the strip.

2. We twist the strip loosely and fasten it with thread. You will need about 20-30 of these roses.


3. Let's make a trunk. In our master class we will use 4 sushi chopsticks. Wrap them with thread and glue them with PVA glue, as in photo.

4. Let's make a crown. You can use newspaper, paper or plastic balls. Shape the paper into a ball and wrap it with string for strength. Make a hole in the center, fill it with glue and insert the barrel.

5. Let's create the foundation of the future product - take alabaster or plaster, dilute it until it becomes sour cream, and then fill the pot with it and insert the barrel into the middle.

6. Now let’s glue the roses to the ball.

7. Beautiful, but something is missing. Perhaps leaves? Let's make them from green paper and glue them between the roses.


The lovely tree is ready. It can serve as an original and unusual gift that will delight both the fairer sex and the stronger sex, who are not prone to sentimentality. As an interior detail, topiary will fit perfectly into any style - from Provence to Art Nouveau; it has a place in the bedroom, in the study, in the living room or hallway. At the same time, your child will have great pleasure working with corrugated paper, and you will be able to spend time together not in front of the TV, but as if in a real art workshop.
Video selection on this topic
They will help you cope with the heaviest part of topiary - the flowers - and help you master the technique of working with corrugated paper. step by step videos master classes covering in detail aspects of working with the material.


