Good afternoon, dear readers and guests of the blog! On the eve of the rather significant day that we celebrate in May, I want to offer you a selection of ideas and master classes on crafts for Victory Day.
We all treat May 9 with pride and respect, go to the memorial and lay flowers at the monuments. But in schools and kindergartens all kinds of exhibitions on this topic are organized. Plus there are events and, of course, competitions for the best work.
Therefore, I certainly wanted to help you with such a difficult task ahead, and in order for you to complete it beautifully and quickly, I went through the Internet and collected a lot of magnificent and creative gifts, which I am happy to share with you.
We have already made various kinds of souvenirs, because there are a lot of holidays a year. By the way, some ideas can be taken and dedicated to this topic, I mean mine for Defenders of the Fatherland Day. Why not, because you and I made tanks in it, military equipment and the like, if you haven’t seen it, please come and visit).
Very beautiful DIY crafts for May 9th
I’ll start with perhaps the simplest, but at the same time popular and super nice option. After all, on this day the symbol will definitely be the red star and the St. George ribbon. I propose to make such a masterpiece out of paper.
Take a look at this layout and template. It is made of thick paper, or rather A4 sheet, you can also take photo paper and then it will turn out even brighter and richer.

To build this, you need to print the blank that you see now on your screen. I have it in large format, so if anyone needs it, write to me, I’ll send it to your email.


The next option is plasticine fantasies.


You can add something else to the plasticine, for example flowers, namely carnations, but see how to make them and from what.

This is such a wonderful work with birds and symbolism.

And this is more complicated, a whole composition that could even be exhibited at an exhibition. Instead of plasticine, you can use special modeling dough.

Look, here are some other options made from salt dough.

Badges and medals are presented here.

This work deserves applause, made of dough in the shape of a photo frame. Bravo to the author! It was taken from the Country of Masters.

You can make holiday surprises in the quilling style, and origami can also be used here.

The method of trimming from ordinary napkins will also work well here. Look at the torch, the fire of glory is made in exactly this way.

Let me remind you that to do this you need to cut out a square and wrap it around a rod or pencil, and then glue it.

Or this dove, well, it looks great, and most importantly, it’s simply simple and accessible to anyone.

The main thing is a little patience and you will certainly succeed.

First, draw the plot with a pencil, and then cut out squares from a napkin, and using a pencil and glue, glue all the details.

The star and flowers also look cute together. And most importantly, the background you need is orange and black.

You can also post the date. And then continue the thought and create something unique and inimitable.

Of course, you can’t do without fireworks. Tadam, there's a roar in the sky!

Regular discs are very popular among preschoolers, junior and senior schoolchildren. But what if you turn them upside down, it will be brilliant and original.

Place any symbols of Victory Day on it, and then show everyone your work.

You can specify the date or how many years have passed since that day.

I also propose to dwell on such a funny product, namely a tank. Cut strips of corrugated cardboard paper, and then follow the step-by-step instructions.


You can even assemble it from matches, imagine, and this video from the YouTube channel will help you with this.
It turned out nice, but it’s not enough to complete the star, isn’t it? Let's make it using the origami technique and it will serve as a stand.


It turned out great, what do you think of this charming idea? And then it will only get more interesting.
You can also make such military equipment from dough; for this, make a stiff dough from water (1 tbsp), vegetable oil(0.5 tsp) salt (1 tbsp), flour (1 tbsp).

Then start creating. It is best to do it from a picture or from a ready-made toy tank.

Then paint it the color you want.


Craft in the form of the Eternal Flame with a template
The easiest thing that comes to mind is this applique; schoolchildren and preschoolers always really like this idea. After all, they all love to work with paper and glue.

To begin, draw a fire, or use ready-made blanks, then a star and symbols, cut it out and glue it onto the postcard.

I also liked this model, but based on this star template. The dotted lines are the fold lines.

Transfer this to a piece of cardboard and draw clear outlines on the back side.

Start folding along these lines.


All that remains is to add the missing note, the red fiery flame.

Here is a similar idea, I have a sample of a large star, write at the bottom of the article, I will send it.
By the way, this craft can be made from plasticine balls.

The main thing is to outline the contours for the child and tell him what is required of him. You can also paint the background with watercolors.

Well, make a small applique, in general, come up with it, take this idea for inspiration.

Well, I couldn’t pass by this creative work.

We will need:
- cardboard candy box
- colored paper or colored cardboard (red, orange, gray, yellow)
- PVA glue or double-sided tape
- blue wire
- paper cupcake pans
- full length photograph of a soldier

Stages of work:
1. Cut out stars of different sizes from cardboard.

2. Cover the candy box in the desired color.

3. Saddle a corrugated paper fire from different colors so that it seems to be on fire.

4. Now make triangle stands from strips of cardboard and place the soldiers on them.

5. Plus these semicircular columns behind them.

6. Well, all that remains is to make flowers, you can make any flowers, I have one for this case, because you can make roses and tulips. In this version, it is supposed to be made from cups and decorated with paints, and chenille wire will act as stems.

7. And here’s the result: it turns out it’s not all that complicated.

Here's another model.

Postcard made of paper and cardboard for Victory Day for students in grades 1-4
Probably the most common, and also very charming, miracle is, of course, flowers. There are so many of them, it’s simply not honorable, I’ve already given you ideas, but I didn’t show you how to make a carnation. Therefore, I am correcting myself, because most of them are given to veterans on postcards on this day.
Fold a piece of paper in half, then again and again. Red is best for this purpose. paper napkin. You should have 6 rectangles.
Works well from corrugated paper. Afterwards, put all the rectangles in one stack and fold them like an accordion, and then tie them with wire, as shown in this picture.

Make the ends in the form of triangles and fluff the flower. But that's not all, you can experiment and take for example White color, and circle the ends with a felt-tip pen.

There are many options, and they are all similar to each other.

Now you can take and decorate holiday cards with them.
Let's do this again. Fold the sheet in half and on one side draw what you want to impress.


Roll them into balls.

But that's not all, you also need long strips, roll them into flagella.

Now, using glue, start decorating the product.

It will turn out great, don’t you think so?

Looks pretty cool and very stylish. 
Here's another nice job.

Master classes of work for kindergarten (preschoolers)
For the little ones, I can suggest making flowers from ordinary cupcake molds. They will cope with this type of activity with a bang.
We will need:
- cups
- chenille wire
- paints
- tassel

Stages of work:
1. Take multi-colored paper molds, if you have white ones, then paint them in any bright color with a brush, let them dry.
Make a hole with a pen or an awl.

2. Carefully insert the wire and bend its end into the base.
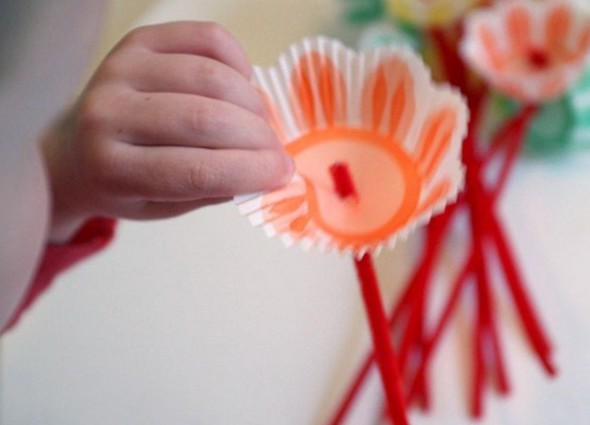
3. This is such an elegant bouquet.

Or a fun craft in the shape of a fireworks, using the blowing method, drop a drop of paint on a sheet, and then let your child blow into the tube.

The air will cause splashes and splashes in different directions.

You can draw an entire city this way.

Or use more bushings.

And the same molds only in a different role.

You can invite the kids to make an airplane out of ordinary plasticine.


Of course, they will need help, but they will clearly cope with this task.

You can organize collective activities together with your parents.

The main thing is to convey the symbolism of the upcoming holiday.

Pupils of the senior, middle and preparatory groups even made postcards.

Well, here is another masterpiece, very stylish and beautiful.

You can, if you want something more serious, create a machine from toilet paper rolls. Of course they will need to be painted in the desired color, black.

Then tie it off with masking tape.

And cover it with colored or wrapping paper.


Then all that remains is to complete the gun and cockpit.

We make crafts very quickly for the school competition on May 9
The first thing that came to my mind was a stand newspaper. In my time they were very popular, we did them for every event, why not resume this tradition again.


You might find this video useful.
I would like to present to your attention these small blanks in the form of coloring books, take pencils and markers and start working on these posters, it will turn out really super and cool.


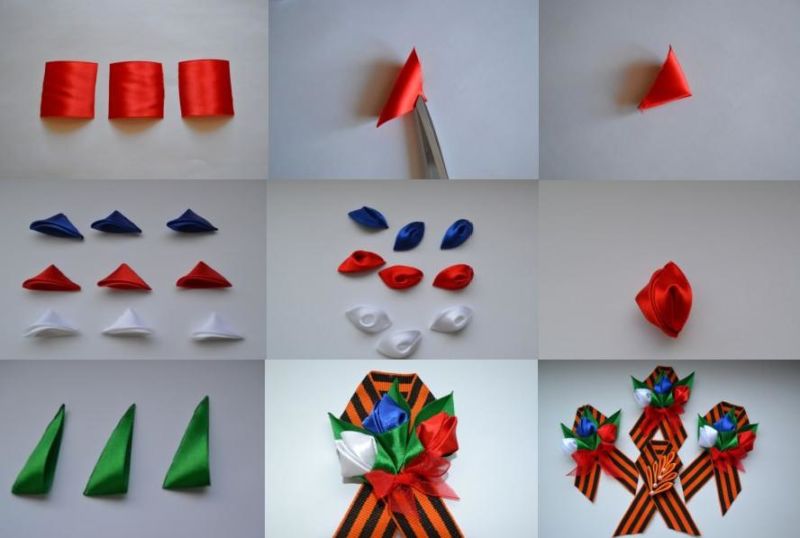
In general, if you want to somehow stand out from the whole crowd of your peers, then make a hanger from foamiran. Take a look at these flowers on ribbons.

I offer a small master class on this topic.
We will need:
- foamiran
- glue gun
- a pin or better yet a brooch with a pin
- St. George Ribbon
- wire

Stages of work:
1. Take the ribbon and carefully cut it with scissors, about 25 cm long. The edges can be scorched with a candle or lighter so that they do not fringe.

2. The next step is to glue the blank like this.

3. Mark the parts on a regular sheet of paper. Since this is a clove, it means they will be as follows:

4. Make these blanks from foamiran. That is, these will be petals and leaves.


7. Glue in some places, use a gun.

8. Secure the finished flower to a ribbon.

9. Glue the brooch on the back side.

This craft using the quilling technique also looks original and excellent. You will need to first make the triangular parts, and then insert them into each other in a certain sequence.

I hope you are familiar with this technique, here is some hint for you.


You can create any shape yourself.


These pictures are taken from the land of masters. What a hand, a torch of victory.


Well, and of course, decorate it with symbols to your taste, for example, write the Patriotic War.

Here's another creative masterpiece in the trimming style.

It is impossible to do without vytynankas on this day.

This sample looks lovely and very cute.

Fantasize and you will definitely succeed.


Here are some samples for this purpose.


Here we have a Memorial of Glory made of birch trees. The main thing is that he also added living branches.

You can paint pictures with stained glass paints.

Or decorate it with threads.


And if you know how to embroider, then go ahead and make such a product.

And finally super idea, this is beading.

Of course, if you don’t understand this, then it will be difficult for you to disassemble this circuit. But the result will be a very delicate red rose. And the orange and black ribbon will go perfectly with this masterpiece.


Souvenirs and gifts for veterans on this day
For kindergarten children, I offer the simplest option; in my opinion, this is to make badges and orders.

You must first find and print the template.

Well, then get to work, color them as it should be.

First, paint the surface with white paint and let dry. Apply PVA glue to the purchased badge.


And stick them on the badge. Paint with acrylic paint.


Then go ahead and do St. George's ribbon.

From the opposite side it looks like this.

You can also make such a holiday note from paper in the form of a triangular letter.

Of course, all sorts of Victory cards!

For example, you can arrange it like this.

Or place flowers on them.

Here are more works, take your pick.

Like this extensive work deserves attention, lightweight fabric is used here.

In the next article I will show this one step by step to make it easier to recreate. In the meantime, you can subscribe to my group in contact or add the site to your browser bookmarks.

Here's another super masterpiece.

Or take this one as a basis.

Write wishes and congratulations inside; veterans will be very pleased to receive such a letter.

You can make and give a book that you wrap in a special way.

Scrapbooking style, as you may have already noticed.

You can also bake a delicious cake.

Making a St. George ribbon from satin ribbons with children
This year, as usual, you and I will decorate our clothes with St. George’s ribbons, which will symbolize and remind us of this important event in history (this is one of the main attributes of this celebration). If you look at it, these two colors mean the eternal flame of fire (orange) and smoke (black), which arose when the cities and towns of the Russian population of the country were burning.
All of you have probably seen brooches from satin ribbons points and now it has become fashionable to decorate them with flowers in the kanzashi style.

Do you want to learn this skill? Then look at these instructions from left to right and repeat step by step, you will succeed, use a glue gun.
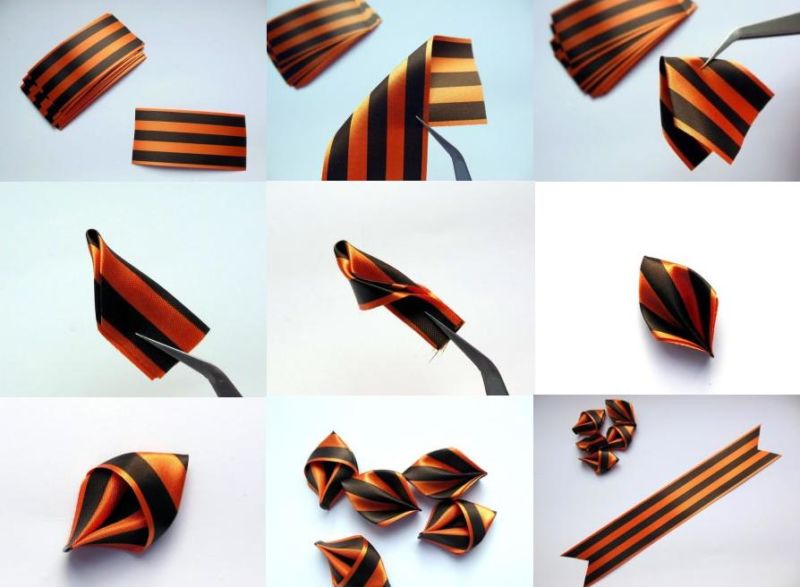

Choose any option and act.

All these masterpieces are fantastic and very attractive.
How gentle and cool it looks.

Here are more ideas on this.


For those who find these schemes complicated, I have selected a video with detailed instructions for you. Thanks to him, you will definitely learn this work of art.
Competition works from the Country of Masters
Well, now, as promised, the works that I saw from this famous site. You can use them to recreate such wonderful images.


Craft Dove of Peace from paper
Another symbol is doves. You can also do them using improvised means that you have in your apartment.

To make them look voluminous, make a lot of feathers, and then connect them with glue, or you can also use foam rubber.

Also take threads and make a base from them, this will be the body, and all other parts of the body will be made of another material, as in this photo.

Templates can be obtained on the Internet or requested from me.

Look, you can also create a composition on sticks.

I also liked this dove, it looks like it’s real.

In principle, you just need to print it on paper and cut it out, and then bend it along the fold lines.


And then enjoy the craft. Cool.
Or maybe you’ll like this one, the traditional version.

From plastic utensils, namely plates, look what happened.

Who would have thought, but this is also an imitation of real bird wings, if you have a cup with such ribbed rims.

And finally, does a bird in the style of vytynanok, or kirigami, really look great?

How can you make a three-dimensional star?
In principle, in this article at the very beginning, we have already seen various kinds of stars. But, here I also want to offer one more video for viewing.
Plus such handmade products.


You can try first using the origami folding technique.

Well, this one will simply shock you; it will turn out to be such a magical star.

Use cardboard corrugated paper and glue for work. Do the preparatory work, cut out all the necessary parts.

Glue all the parts together, and then decorate with simulated leaves.

Fold the roses out of corrugated paper, twist them in a spiral, then secure them.

Holiday cards for the Great Victory Day
I would like to touch upon this topic a little more, although soon I will write a separate note on this subject. Now I suggest you watch the video, and maybe you will make just such a charm for this Victory Day.
Even more ideas
Or take it and follow this example. It turns out voluminous and not at all difficult.
Or I offer a simple master class for viewing. Cut a circle out of corrugated paper and fold it like this.

Then cut the ends.

There should be at least 3-4 such blanks per flower. Lubricate the center with glue.

And then put it on a postcard.

And add stems and leaves, as well as inscriptions and ribbon.

If you don’t like this option, then take this one or the next one.
They both look really good live.
That's all friends, this is where I end this post. I hope you liked these ideas and ideas and you will definitely take something to note. Bye everyone and see you soon! Good luck and have a great sunny mood. Bye!
Sincerely, Ekaterina Mantsurova
is an important and significant holiday for all citizens of our country, because almost every family keeps the memory of their ancestors who contributed to the great victory over the fascist invaders. The memory of this event and respect for those who fearlessly fought for the future of their people should be instilled from an early age. Today's children are the last generation to see veterans alive and it is very important that they value these people. In order for children to feel the solemnity of this moment, the set of events dedicated to May 9 should include the making of postcards for veterans with their own hands.
The undoubted advantage of such activities is that, in addition to developing creative abilities, children are instilled with respect for the history of their country, patriotism and respect for elders. And a postcard and a handmade craft as a gift to a veteran, given by a child, will once again remind you that the feat has not been forgotten.
We bring to your attention several simple master classes with detailed description making greeting cards for veterans.
How to make a three-dimensional postcard for a veteran?
To make a postcard we will need:
- colored napkins red or Pink colour;
- yellow and green paper;
- a sheet of white cardboard;
- office glue;
- pencil;
- scissors.
Progress
- Fold a white sheet of cardboard in half to form the base for the card.
- We use only the top, colored layer of the napkin, cut it into 4 equal parts.
- Fold a piece of napkin in half twice.
- Fold the resulting square onto the corner twice.
- We cut off the sharp edge in a semicircle and make several transverse cuts along the edge.
- Unfold the flower. We make 3 more of the same ones and glue them on top of each other - we get a carnation.
- We also cut off the straight edge of the cut tail and make transverse cuts, then unfold the napkin, fluff it up and roll it again along the fold lines. Glue the resulting buds.
- From yellow paper we cut out the number 9 and the letters M, A, and Z. From green paper we cut out the stems for the carnations.
- The DIY postcard for the veteran is ready.
 |
 |
|
 |
 |
 |
 |
 |
 |
 |
 |
 |
Craft for veterans - postcard
This craft postcard is made using mixed media – origami and paper rolling.
Statistics show that the number of veterans is decreasing every year. Naturally, this factor cannot please us in any way. After all, such people deserve great attention. On holiday Great Victory Veterans of the Great Patriotic War are pleased with gifts. At the same time, you can always make a gift for a veteran on Victory Day with your own hands. In this case, it is not necessary to spend money and look for something suitable in stores. Read our article, where we can offer you the most interesting ideas gifts that are easy to make with your own hands.
Craft ideas for a gift for a veteran
Flowers.
As a rule, all gifts should be prepared in advance. Therefore, in many schools, children make interesting products. For example, children in kindergarten or first graders can freely make flowers. In this case, you may need colored paper, glue and cocktail straws.
Progress:
- First of all, take some cardboard yellow color and cut a circle out of it. This circle should have a diameter of 3 cm.
- Strips of 8 pieces are cut out of white or red colored paper. Their length should be 10 cm and width 2 cm.
- To make flowers you will need St. George's ribbon. If this is not available, then make it yourself. Take orange paper and stick a couple of black stripes on it.
- Now they will involve you in picking a flower. Strips bent in half are glued onto the yellow circle. They will be petals, so they are glued in a circle.
- Then apply a cocktail straw to the outside of the core. Place another circle coated with glue on top and press down.
- If the flower is ready, then trim the ends of the St. George ribbon in order to get two cloves. Glue the tape to the stem. Such actions are performed with paper tape, but if you take textile tape, then it is simply tied to a tube.

A gift for a veteran - slippers.
Of course, it’s nice to give and receive all kinds of flowers and cards. But most of all, veterans value practical gifts, which are also very easy to make. For example, you can make slippers without any difficulty. To make it you will need felt. Slippers are cut according to the pattern. Of course, the product needs to be given a more festive look. The easiest option is to sew on a button. You should choose a large and bright button. Even a first grader can sew it on. You can also decorate slippers with rhinestones or other elements. In general, he will like to receive such a gift for a veteran on May 9, which you make with your own hands. The product will remind people of this joyful day for a long time.

Another useful gift- mobile phone stand.
A simple plastic shampoo bottle can also be used as a craft. If you cut a hole in this bottle and make holes, you can get a stand that will be hung on the wall. The finished product is decorated with paints or other elements.

A nice gift for a veteran.
Absolutely everyone likes to receive flowers. But on Victory Day you shouldn’t limit yourself to a simple bouquet of flowers. You can always make an original composition for a WWII veteran with your own hands. This composition will have the shape of a star. Well, you can follow the further progress of the work further.
Progress:
- So, you will need a floral sponge to make the star. A star with five ends is cut out of it.
- To make this element look aesthetically pleasing, it is decorated with leaves. A stapler is used in this work.
- After that, take large red carnations. These flowers are fixed on the surface of the star. They are fixed so that the sponge is impossible to see.
- Finally, the composition is decorated with a St. George ribbon.

Postcard.
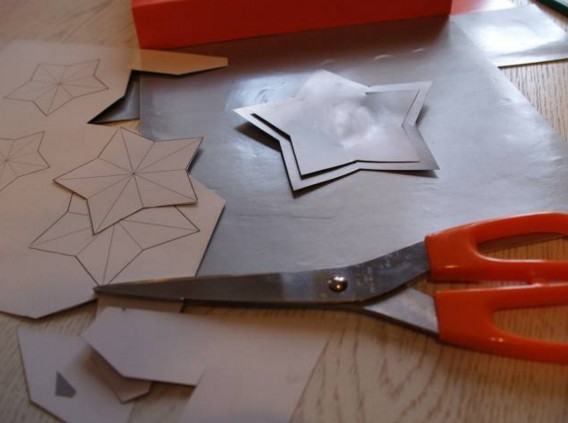
If you decide to make a gift to a veteran with your own hands, then the following master class will help you with this. The most common gift for May 9 is a postcard. Of course, there are many options here. And each of these options is quite simple to make. To make a postcard, prepare the following:
- Colored cardboard and stationery glue;
- Scissors and a piece of foil;
- A simple pencil and ruler.
Progress:


Finally
We hope that today you were able to learn about how to make a gift for a veteran with your own hands. Don’t think that making such gifts is difficult and expensive. In fact, everything is simple here. If little children make such products, then of course they may need help. So don't deny them this. Don’t forget that creating crafts can only bring positive emotions to both of you.
Master class “Gift for a veteran”
Suslova Natalya Viktorovna teacher primary classes Municipal educational institution secondary school No. 7 named after. Admiral F.F. Ushakov, Tutaev, Yaroslavl region.Description: This master class is intended for children over 10 years old, primary school teachers, and parents.
Purpose: gift, work for an exhibition.
Target: Creation greeting card.
Tasks:
develop practical skills in working with paper;
production of the main elements of a postcard using the paper-plastic technique using technological maps;
consolidate skills in handling tools - scissors, paper:
develop artistic taste, Creative skills, fantasy, imagination;
develop fine motor skills of the hands, eye, spatial imagination;
to form a work culture: teach accuracy, the ability to use materials carefully and economically, and keep the workplace in order;
instill an interest in art, arts and crafts;
cultivate independence, patience, perseverance, a sense of satisfaction from the habit of finishing things; patriotic feelings.
Dear colleagues, I present to you a master class on making a greeting card “Gift for a Veteran” using the paper-plastic technique using technological cards.
Victory Day is a famous holiday!
Famous throughout the country
Happy Victory Day,
Those who gave their lives for us, won the war!
On the ninth of May to all veterans of the country,
We must say thank you loudly.
For our freedom and peaceful life,
Because they fought without sparing themselves.
They fought against fascism and took care of us,
For this, honors and may flowers to you.
Thank you for a future without a terrible war.
Much health to you and our love.
May this holiday bring
Joy and happiness to everyone,
May kindness always live,
And bad weather will be behind us!
This version of the postcard was taken from the Internet. He attracted attention with his unusualness, non-standard nature, interesting manufacturing process, and desire to give just such a postcard to a veteran.
I suggest step-by-step master class for making postcards. I will be glad that this material is in demand.
So, let's begin…
Material: colored cardboard, office paper, colored paper, St. George's ribbon, glue, scissors, pencil; tea bag, boiling water, wide brush, iron.

Step by step description works:
1. Base.
For the base of the postcard you will need a sheet of A4 size office paper. Let's create the impression of an old triangle letter by aging the paper. To do this, you need to prepare strong tea in a small amount (0.5 cups of boiling water and 1 bag of black tea is enough). Using a wide brush (or, with a slight squeeze, the tea bag itself), apply tea stains on both sides of the paper.

Dry thoroughly. Iron. The base is ready!

On one side of the sheet write a congratulation to the veteran (you can print the text and paste it).

Variant of congratulatory text:
Expensive ______________ !
On this day, memorable both for all of you and for us, your children, grandchildren and great-grandchildren, I would like to express my deep gratitude and low bow to you for the fact that you, without sparing your life and your health, defended our Motherland and did not give it up to be torn to pieces by the fascists. Your merit will be in the memory of everyone who lives on earth.
Happy Victory Day, dear veterans!
You have experienced both grief and separation.
Let wars be unhealed wounds
Your great-grandchildren will not recognize you.
So that your feat, so priceless,
Descendants have never forgotten.
So that our native land, our families,
Like you, you defended it with dignity!
We wish you health and peace,
To live easily and well,
And live every day and hour with love,
So that everyone finds youth again!
Sincerely, …
2.
By technological map № 1
Fold the letter envelope with the text inside.

1. Connect two adjacent sides of the rectangle.
2. Fold the top corner according to the photo.
3. Fold the edges of the lower rectangle according to the photo.
4. Fold the entire rectangle up and open it.
5. Place the bottom rectangle between the folded sheets.
6. The envelope letter is ready! The base of the postcard.
3. Postcard design.
Position and glue the St. George ribbon as follows...


Using the template, translate or print the star.

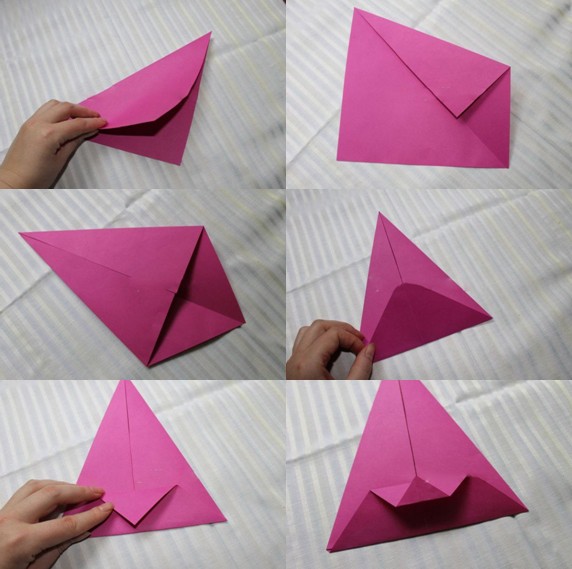
According to technological map No. 2 make a three-dimensional star.

1. Cut out a star from colored cardboard.
2. Punch (press along a ruler with scissors) all the lines. Bend the fastening parts.
3. Glue the corners of the star and secure with the remaining cardboard.
4. The star is ready.
Glue the star onto the card.

According to technological map No. 3 make a voluminous sheet.

1. Cut out the sheet. Fold the sheet in the center.
2-4. Bend the workpiece like an accordion.
5. Open the sheet. Ready!
Glue the sheet onto the card.

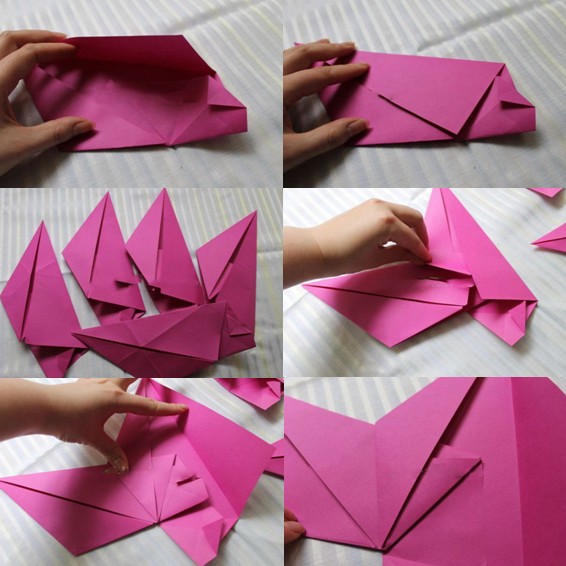
According to technological map No. 4 make voluminous flowers.

1. Fold the rectangle according to the photo. Cut off excess.
2. Fold the double triangle in the center.
3. Fold the resulting triangle again in the center. Secure with a paper clip.
4. Draw the leaf shape of the flower.
5. Cut.
6. Unfold the workpiece.
7. Twist the edges using scissors.
8. Make 2 blanks.
9. Glue the blanks in the center with a drop of glue, arranging them in a checkerboard pattern.
10. Decorate the yellow center.
11. Cut white paper thinly.
12. Glue a snowflake in the middle.
13. Glue it to the center of the flower. The flower is ready!
Make 3 flowers.

Arrange the flowers on the card. Glue it. The postcard is ready!

2nd version of a volumetric star.
Using the template, translate or print the star.

According to technological map No. 5 make a three-dimensional star.

1. Cut out a star from colored cardboard, cut along the dotted line.
2. Punch (press along a ruler with scissors) all the lines.
3. Make a cut through one of the lines from the photo.
4. Apply glue according to the photo.
5. Glue the parts according to the photo. Fold back the edges.
6. The star is ready!
Appearance of a postcard with 2 variants of a three-dimensional star.

Postcards are ready! The choice is yours.

Spring holiday - Victory Day.
So that flowers bloom in the fields,
Peace and happiness to our grandfathers
Brought to this land.
So that trouble never happens again,
So that the bright day to come comes,
About people who gave their lives for the sake of peace,
We know, we always remember and mourn.
I wish you creative success!
On the eve of Victory Day, many of us are thinking about how to congratulate veterans. Perhaps you are about to meet with veterans, or one of them is your relative. Of course, a gift to a veteran should be special, and you can make it yourself. Such a souvenir can bring a lot of joy and warmth, and with the help of such a gift you can express your gratitude to the person for his deeds, respect and my sincere congratulations Happy holiday!
Important: when choosing what gift to give to a veteran with your own hands, take your time and choose carefully. The gift should be beautiful and sincere, and it should be done carefully so that it turns out really well. If you have to congratulate several veterans, then do not take anything too complicated - you may simply not have time. There are simple crafts that are quick to make and look very decent at the same time. Well, you can give your grandfather something more serious and spend more time on the gift!
Postcards
The best souvenir is a postcard. With its help you can express many feelings that are not enough simple words, and congratulate from the bottom of my heart. You can make a postcard with your own hands from decorative paper and decorations of your choice. There are several options - from simple to more unusual, and this is an excellent option if there are a lot of people to congratulate.


Souvenirs
You can make these unusual and beautiful little things with your own hands. They are very original and all in the theme of Victory Day. Such a souvenir will evoke many pleasant emotions and will not leave anyone indifferent!


For the only one
If there is a veteran in your family, making a worthy gift for him with your own hands is simply a must. You can choose something more complicated, and won’t regret spending one or two free evenings creating a beautiful souvenir. This should make him really happy!


When making gifts for veterans, think about their unimaginable feat - try to put at least a small part of your soul and gratitude into your souvenirs. Heartfelt souvenirs and sincere congratulations will help you give joy and happiness!


