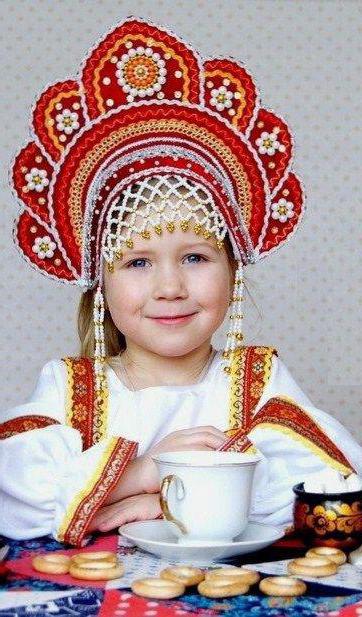
The Snow Maiden costume is one of the most popular outfits for the New Year holiday. Many girls dream of trying on the image of the granddaughter of Santa Claus. The main attribute of such an outfit is a beautiful kokoshnik. Making it with your own hands is not as difficult as it might seem at first glance.
What is needed for a kokoshnik 
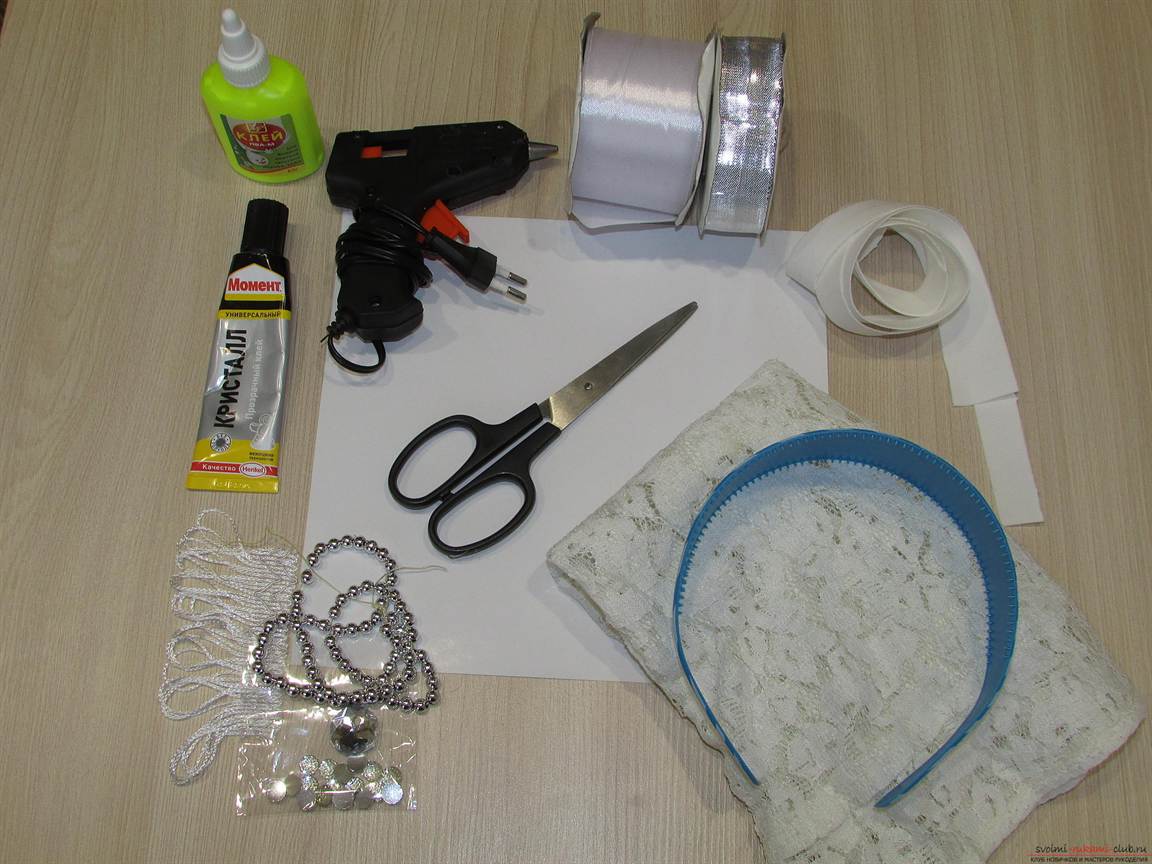
Kokoshnik can be made in various ways. Therefore, the list of necessary materials is varied. In most cases, the following materials and tools will be required:
- Paper and cardboard. An ordinary newspaper can also be used as paper for creating a layout. Cardboard is selected depending on the type of decorations with which the product will be decorated;
- A piece of blue fabric. Guipure with New Year's patterns is good;
- Hoop. You can use a regular wide plastic hoop;
- Pencil, eraser and scissors;
- Metal strips or wire of different lengths. It can be given the desired shape, in addition, it holds its shape well;
- Satin ribbons of various widths;
- Glue or glue gun (PVA, Moment and others);
- Decorative elements (rhinestones, beads, sparkles, beads, etc.;
- Candle or lighter;
- Foam rubber.
Important! The cardboard must be prepared and straightened in advance, because... Some types of cardboard are stored rolled up. We need to give him time to rest under the influence of the load.
General recommendations for making the Snow Maiden's kokoshnik
First you need to decide on the shape, size and design features of the future product. To do this, you need to look at the Snow Maiden’s outfit in specialized literature or on thematic websites. The kokoshnik can have the shape of a classic dome, a flower and the edge of a snowflake. Ultimately, much is determined by the author’s imagination and personal preferences. Even if you have a ready-made pattern, the kokoshnik will still have to be adjusted to fit your head or your child’s head so that it fits perfectly and holds well on the hoop. Therefore, the most important point is the process of making a pattern and fitting the resulting workpiece.
Attention! Carefully consider the size of the future kokoshnik, because... first of all, it should be comfortable, light and not create discomfort during the event.
How to make a Snow Maiden kokoshnik with a hoop 
When all the necessary materials have been prepared, you can begin making the outfit. Let us consider step by step the process of making one of the popular types of kokoshnik with a hoop:
- First you need to model the shape of the future product. To make it symmetrical, the paper should be folded in half and the outline of the kokoshnik should be drawn. You can make several options and choose the most suitable one;
- The resulting workpiece must be unfolded and the rim attached to it. The outline of the rim should be marked with a dotted line;
- We cut a hole for the head and adjust it to the required parameters by fitting. It should be cut a little larger, because... in this case the product will be attached to the hoop. You can also measure the workpiece on an already worn hoop;
- The strip where the rim will be attached is cut into equal sections 2 cm long;
- The resulting pattern should be transferred to thick white cardboard;
- Cardboard can be wrapped in elegant blue fabric or painted;
- When pasting with fabric, you need to cut out two parts according to the shape of the template. One of the elements should be 1 cm larger. After gluing, the fabric should dry thoroughly. We also glue the allowance on the back side. In the future, decorative finishing will disguise it;
- We are preparing a hoop. To do this, we wrap it with a narrow ribbon and grease it with glue in places;
- By bending the remaining teeth on the kokoshnik, we glue it to the inside of the hoop;
- The headdress is ready and you can start decorating it.
Reference! Instead of a hoop, you can use a strip of foam rubber. It is glued to the front and back of the product. In this way, the kokoshnik will be securely fastened and will not cause unpleasant or painful sensations. They should be beautifully decorated.
We create various versions of the Snow Maiden's kokoshnik with our own hands 
There are other ways to make a kokoshnik. Let's look at the features of making a kokoshnik with an artificial braid. You will also need white satin, an elastic band and a false braid. To sew a product, follow the step-by-step instructions:
- After making the main part, you need to start making the cap on your forehead. It is necessary to measure the distance from the base of the product to the middle of the forehead, as well as the length of the rim;
- You should consider a dart so that the part fits better on the forehead;
- The outer part of the product is decorated in various ways;
- The resulting part is connected to a kokoshnik and a hoop;
- Next, you should prepare the braid. It is better to sew it onto a piece of material exactly the same as the headdress and secure it to the back of the product;
- Cut out the back of the craft. To do this, we cut out a semi-oval, having previously measured the distance between the ears and from the beginning of the kokoshnik to the shoulders;
- The edge of the back hat is folded and an elastic band is inserted into it for ease of dressing and a better fit of the product on the head;
- Next, the back part is attached to the kokoshnik;
- You should make blanks for bows. To do this, cut out a rectangle measuring approximately 60x40 cm and a strip of 60x10 cm, bending the edges. A bow is made from these parts. It can be made in any other convenient way;
- The bow is attached to the base of the braid;
- The headdress is ready. All that remains is to decorate it, if possible hiding the seams from connecting the parts.
You can also make a headdress without a hoop. To do this, you need to prepare a beautiful ribbon two or more centimeters wide. The wider the tape, the better. It is sewn to the kokoshnik and tied at the back of the head. This method is universal and the product is suitable for any head. Also, in addition, the kokoshnik can be attached to the head with invisible ones.
How to decorate the Snow Maiden's kokoshnik 
When it comes to decorating a product, the craftswoman can have complete freedom. Various decorative elements are suitable. Many of them can be taken from old or unnecessary things and decorations. The most common kokoshniks in museum collections are richly decorated with pearl mesh. At the same time, strings of pearls descend onto the cheeks of the snowy beauty. You can repeat this pattern yourself by adding regular ones with white pebbles. Let's consider one of the simple ways to decorate a kokoshnik blank with fabric. Follow these steps:
- The cardboard blank can be wrapped in a piece of tulle. To do this, cut out a kokoshnik from paper or thin plastic. Next, we wrap it in fabric;
- Let's start sewing on the machine. The first line is made without affecting the workpiece. The second line is laid along the outer contour, moving the workpiece towards the first line;
- Next, we cut out the resulting part along the edge, leaving allowances of 1 cm on each side of the outline;
- Patterns must be applied to the resulting part. If you used transparent plastic, you can first draw patterns on a piece of paper. Then place it under the plastic and simply trace the patterns with gold glue along the finished markings. If a sheet of paper is covered with tulle, then the patterns can be applied using stencils or randomly;
- Next, add additional decorations.
Reference! The kokoshnik should be beautifully decorated both on the outside and on the inside.
To make the top edge of the craft look impressive, a thread of beads is sewn to it. It is better to sew beads, seed beads and glass beads rather than using glue. You can glue the fringe along the bottom using a special heat gun. The places where the parts are attached are decorated with white tinsel or other elements. You can make spectacular petals using the kanzashi technique. To do this you will need to do the following:
- To make them you need to take two ribbons of white and silver color. We cut out squares with a side of 2.5 cm from silver material, and from white with a side of 5 cm;
- We bend each square first diagonally, and then in half and in half again;
- We hold the resulting element with tongs, cut off a couple of millimeters from the tip and scorch it until it is completely glued using a candle or lighter;
- We also cut off the lower part of the petal and cauterize it, thereby protecting the tissue from possible scorching in the future;
- Do this with all the cut out squares. Next, silver petals are glued inside the white ones;
- You can leave the white petals separately and glue beads to them;
- Next, we begin to decorate the kokoshnik with the resulting elements. You can place a large flower in the central part, and two small ones on the sides. You can come up with a composition yourself;
- It is better to place large, visible beads in the middle of the resulting flowers.
Important! It is better to place petals using the kanzashi technique on the product in a checkerboard pattern. In this way, you get a peculiar effect of drowning each next row between the petals of the previous one.
For decoration, foil, pieces of brocade and other spectacular fabrics, Christmas tree rain and other decorative elements are suitable. You can use lace stripes. Of course, snowflakes cut from fabric or paper will look impressive. You can buy ready-made snowflakes in the store, and also paint them with acrylic paints. Often a beautiful addition to the kokoshnik of Santa Claus's granddaughter is a light web shawl or silk ribbons.
You can make an exclusive kokoshnik for the Snow Maiden with your own hands. Do not forget about the manufacturing standards of this headdress, so that it is as close as possible to the models from fairy-tale illustrations and films. By following simple recommendations, you can do it yourself in one evening.
Russian women, which had the shape of a comb. The name comes from the Old Slavonic word “kokosh”, which translates as rooster or hen. The kokoshnik crest can be different: in the form of a round shield, a crescent, a high pointed one, a wide cylindrical one, a low one with a cap, or in the shape of a crown.
Nowadays, this type of headdress is often used by girls and little girls who wear national costumes for holidays, for folk dance classes, and for matinees in kindergarten and school. This is a very beautiful product, which is traditionally worn by the Snow Maiden, the granddaughter of Father Frost, on New Year's Eve. For the holiday, your child can make a life-size kokoshnik from a pattern for the role of a snowflake, the Snow Queen or the Snow Maiden.
Necessary materials
To sew a kokoshnik you need to have thick cardboard for the comb itself and material for gluing it, for example, brocade or satin. It should be bright and shiny so that the Snow Maiden does not sparkle in the light of the lights. Some craftswomen use a wire frame when sewing so that the life-size kokoshnik according to the pattern does not fall, but maintains its shape. If the headdress is not too high, then only a cardboard structure will be enough.
You also need to take care of decorating the kokoshnik. It was always beautifully decorated with beads, embroidery, sewn piping, and stones. Now in sewing accessories stores you can select a huge amount of modern materials so that a life-size kokoshnik sewn according to a pattern is the most beautiful and elegant.

After the headdress is ready, it needs to be secured with something on the child’s head. To do this, prepare either a wide elastic band or ribbons to match the main color of the kokoshnik or dress of a fairy-tale character. To make a pattern, you will need to draw a template on a piece of whatman paper. You will need a compass, a simple pencil, an eraser, and patterns.
Drawing a pattern
A life-size kokoshnik needs to be drawn after the silhouette of the comb has been selected and measurements have been taken. To make the pattern even and symmetrical, it is better to fold the paper in half and make a template for one half of the headdress. The article presents the average dimensions of the pattern. After the pattern is drawn, you need to draw decorative elements with a simple pencil and roughly think through their placement on the ridge. Then they transfer it along the cut out onto thick cardboard. Then cut out with scissors.
Snow Maiden's Crown
The life-size kokoshnik pattern for the Snow Maiden is drawn in the shape of a crown. This is a special form of comb with beautifully carved symmetrical elements. Here you will need a compass, or you will need to completely redraw the pattern given in the article. When work on decoration is underway, the tops of the crown are decorated with the same elements.

The remaining parts of the ridge are also symmetrical. You can lay out the pattern on the table and try on all the elements, arranging them beautifully over the entire surface. Then the pattern is transferred according to the cut out template onto thick cardboard, and each element is carefully cut out.
Cardboard blank
In order for the life-size comb of a Russian kokoshnik to stay on your head according to the pattern, you need to cut out a support hoop for it. It can be placed both in front of the ridge and on its back side. To draw support, you need to measure the distance from one ear to the other along the line of the forehead. According to these measurements, a crescent moon is drawn on cardboard. You need to step back two centimeters from the inner semicircular line and draw a semicircular line parallel to it. This strip will serve as a support hoop.

You can simply sew cardboard with thick cotton threads, or you can make a frame out of wire, as in the photo above. Then a life-size Russian kokoshnik pattern made from paper will hold its shape well, and the Snow Maiden will be able to move and dance freely, without fear that the comb of the kokoshnik will be deformed.
Different forms of kokoshniks
The article showed patterns for a life-size kokoshnik for a girl, namely a comb. Readers also understood how to draw a support hoop. But there are also other types of kokoshniks, for which it is enough to cut out the long ends and sew satin ribbons to them, with the help of which the headdress will be held on the child’s head. You can also accurately measure the circumference of your head and sew on a wide elastic band, then the kokoshnik will be put on quickly and easily.

There are also options for holding the comb on your head. This is done with the help of a cap, which is sewn around the circumference of the comb and pulled together at the back with an elastic band. You can also imagine support in the form of a scarf, preferably made of organza or a plain thin fabric. It is also sewn on the inside around the circumference of the kokoshnik and tied at the back under the hair in a knot.
Sewing a kokoshnik
When the life-size kokoshnik pattern is made from cardboard according to the diagram, it is covered with fabric on both sides. A support or cap is made, ribbons or an elastic band are sewn on. They do a fitting on the child's head. The kokoshnik should not be cramped and uncomfortable. After all, the holiday lasts a long time, and the child should feel comfortable throughout the entire event. The back side remains in its original form, and the front part of the product is decorated.

Decorating the kokoshnik
As can be seen in the photograph, kokoshniks often cover the frontal part of the head using a mesh of beads. You can buy it separately in the store, and if you wish, weave it on a fishing line from beads of different sizes and colors. It is advisable to purchase oval and elongated elements so that the decoration is flatter. The side bevels at the bottom are also decorated. Long identical pendants made of threads with shiny beads or balls are sewn there. You can use plastic pieces of Christmas tree garlands in silver or blue colors. On the kokoshnik itself, you first need to draw a pattern with a simple pencil, which will subsequently be applied with pebbles, rhinestones or half-beads. You can trim the edges with piping.
Decorating the crown
When making a kokoshnik using a pattern for cutting and sewing in the shape of a crown, you will have to design all the elements of the tops the same way. Only the central part may differ. Also, the strip around the forehead and the support, if there is one, on the frontal part of the head, in front of the crest, should stand out separately.
- In order to tightly glue the fabric to the cardboard, use transparent “Crystal” glue. It doesn't stain fabric and is very durable. Dries quite quickly.
- You can decorate the kokoshnik using applique. To do this, you need to make elements on adhesive non-woven fabric for compaction. An artificial material is taken, usually satin or crepe-satin. The elements are cut out using a burning machine. The edges are heated and the fabric does not fray.
- The individual elements are glued onto the kokoshnik using an iron and adhesive tape.
- The braid and rhinestones are glued using a glue gun. Gold braid of different shapes looks beautiful. Along the edges of the kokoshnik, the braid is covered with coins (with round identical elements), and the frontal semicircle is covered with braid with tassels. They hang over the forehead, and then there will be no need to make a net of beads.
- On the back side, instead of ribbons that need to be tied, you can sew a wide elastic band, onto which a large satin bow in the color of the kokoshnik with hanging long ends, cut at an angle, is attached.
The article provides life-size patterns of various kokoshniks, and describes in detail the types of different kokoshniks, both semicircular and crown-shaped. The methods and secrets of original kokoshnik decorations are given. It is told how best to decorate it and what glue it is advisable to use. We hope that after reading the recommendations and tips, a novice master will be able to easily make such a beautiful headdress as in the photographs above. Good luck!
A crown or kokoshnik for the Snow Maiden is the completion of the fairy-tale image of the snowy beauty and Santa Claus' assistant. You can, of course, get by with a hat, but a hand-made kokoshnik will turn its owner into a unique and charming snow queen! You can make a beautiful kokoshnik for the Snow Maiden by spending a minimum of money. Using my detailed master class and step-by-step photos, you will get the job done quickly.
To make a crown you will need:
- blue satin fabric measuring 35 by 30 cm,
- satin ribbon 2 - 5 cm wide, 1.5 m long (you can sew an organza ribbon),
- candy box,
- poster size 80 by 40 cm (whatman paper can be used),
- tools: scissors, pencil, transparent superglue,
- all sorts of things for decoration: sequins, snowflakes, tinsel.
How to make a kokoshnik for the Snow Maiden with your own hands
Fold the poster in half and draw half of the future crown. You can draw the outline yourself or print it from the Internet.

Cut out 2 identical pieces. They should look like in the photo.

Unfold the candy box and glue the top and bottom of the box together, making double cardboard.

Glue the paper pattern to the cardboard, cut it along the contour.
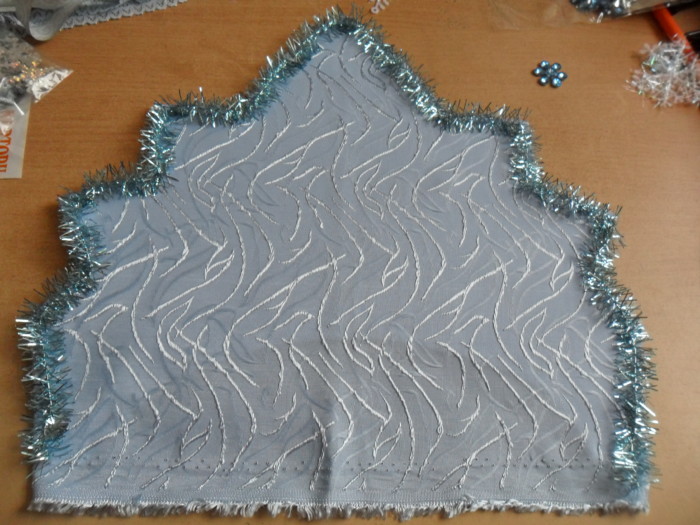
Apply glue to the cardboard outline of the pattern and glue the fabric chosen for the craft to it. Let it dry.

Cut out the outline of the kokoshnik on the fabric, leaving an allowance as in the photo.

Apply superglue to the edge of the cardboard pattern and glue the fabric allowance to the inside.

We turn it over and we get such a beautiful base.

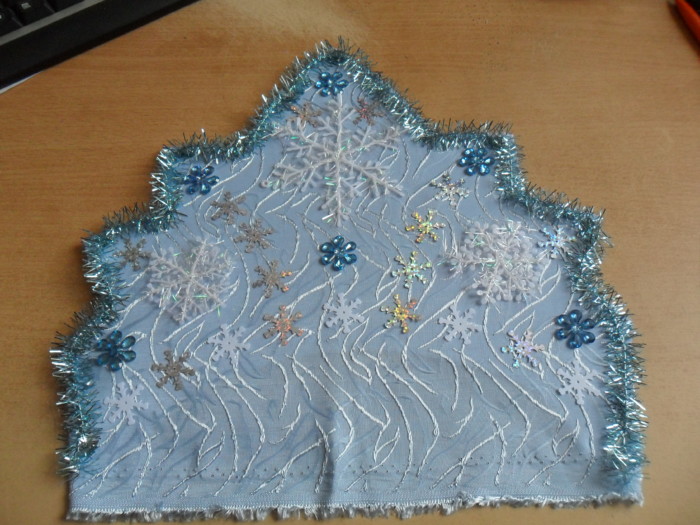
Now, how to decorate the kokoshnik for the Snow Maiden. Showing your imagination, this can be done easily and simply. This is what we will do now step by step.
Lay tinsel along the outer contour of the kokoshnik and secure with a stapler.
Place a large snowflake in the center, two smaller ones at the edges, and then decorate with what you have: snowflakes, rhinestones, sequins. Glue everything well with superglue. You can see in the photo how I managed to decorate it.
Cut the fabric on the kokoshnik along the contour of the head and sew on a ribbon tie. It can be sewn from organza or used ready-made.

Cover the reverse side with the second part, cut out at the beginning from whatman paper or a poster.

Glue a piece of fur or tinsel along the line of sewing the ribbon to the crown.

The beautiful kokoshnik crown for the Snow Maiden is ready!

This kokoshnik is suitable for the Snow Maiden of any age and will stay well on her head.
Who doesn’t know Santa Claus’s faithful companion, Snegurochka? It came to us from folklore through the centuries. Her image symbolizes purity, lightness, tenderness, kindness. It is not for nothing that Snegurochka usually serves as an intermediary between children and her grandfather. Every girl at least once dreamed of attending a holiday dressed as a snowy granddaughter. And, like any Russian beauty, Father Frost’s assistant is often depicted wearing a kokoshnik. We offer you several simple ways to make a kokoshnik for the Snow Maiden with your own hands and make your daughter happy or make your childhood dream come true.
Diversity on a common basis
Creating an original kokoshnik does not require any special skills. All you need is a standard basis and the indefatigable imagination of the craftswoman.
For the template you will need:
- paper (regular newspaper will do);
- a simple plastic hoop (preferably wide so that it doesn’t put pressure during the holiday);
- tape from 2 cm;
- glue (PVA, Moment Crystal, glue gun. Choose any to your taste);
- cardboard. Its thickness depends on the materials with which you want to decorate the kokoshnik. Many people perfectly adapt a candy box as a base;
- blue fabric/guipure, possible with winter patterns (if you use non-colored cardboard);
- narrow ribbon (1 cm);
- scissors;
- pencil;
- materials for decoration (beads, rhinestones, tinsel, beads, etc.).
General steps
First of all, you need to decide on the shape and size of the kokoshnik. These could be flower petals, the edges of a snowflake, a classic dome - whatever your imagination tells you.
It is better not to make the workpiece too large, as it will end up on the child’s head or your own.


To make the product symmetrical, fold the paper in half and cut out the main part of the kokoshnik.

If it is more convenient for you to use a hoop, then attach it to the middle of the workpiece and circle it. Then step back 2 cm from the drawn line and draw another one, parallel to the previous one. Using it we cut out the core of the kokoshnik, and then cut the “teeth” 2 cm long. The result is a template for the headdress. All that remains is to trace it on cardboard and cut it out.
If you used colored cardboard, you can immediately proceed to the next step. Otherwise, the workpiece should be covered with cloth. Cut out two pieces from it according to the shape of the template, with one piece being 1 cm larger. Glue the craft on both sides, let it dry, bend the allowances of the part and glue it too. Now the first part of the product is ready.

Headdress with hoop
Wrap the headband with a narrow ribbon (1 cm), securing in places with glue.

Then bend the “teeth” of the craft and attach the kokoshnik to the inside of the rim.

Mark the petals with a pencil as in the picture and cut them.
Starting from the center, glue the edges of the petals together, slightly tilting the entire structure back. It is more convenient to perform this procedure if the kokoshnik is worn on the owner’s head.

Now the fun part is decorating the headdress. Give free rein to your imagination here. You can lay out snowflakes with rhinestones, place tinsel around the office, hang fringe. The main thing is that it is bright and festive. You can see examples in the photo.


To finish the job, so that the headdress does not fall off at a crucial moment, sew a ribbon of 2 cm or wider to tie at the back of the head. That's it, the original kokoshnik for the girl is ready!
Option with ribbon
You can do just fine without a hoop. Just immediately after the “general steps” move on to decorating. We assure you, it will turn out no worse! Such a kokoshnik will be more universal and suitable for any head.
A little advice - take the ribbons for tying as wide as possible and, to hold the headdress tighter, use bobby pins.

Kokoshnik with a braid
We offer a master class on an improved version of the Snow Maiden’s headdress. For this we will need additional materials:
- white satin;
- synthetic hair braid;
- braid;
- elastic band.
After you have made the first part of the product (see “general steps”), you need to cut out the forehead cap. To do this, measure the distance from the base of the kokoshnik to the middle of the forehead and the length of the rim. To make the forehead fit better, make a groove in the center. Decorate the outer edge with patterned braid.

Glue the part to the rim and edge of the kokoshnik.

Sew the braid onto a piece of fabric used earlier and secure it to the back of the product.
On a note! Please note that when wearing a headdress, artificial hair should start at the base of the neck.

Cut out a semi-oval from satin for the occipital cap. To do this, measure the distance between the ears and from the base of the kokoshnik to the shoulders. Fold the long edge of the piece and insert the elastic.
Irina Khursulova
For work we need:
4 sheets of white paper (A4 format, tape, pencil, scissors, plywood, small nails, hammer, pliers, wire, white fleece (mesh, white organza, sewing needles, large beads, beads, threads, silver braid, hot gun, various materials for decoration crowns.
Let's get started:
1. Glue together 4 sheets of white paper (A4 format) with tape between each other.
2. Fold the sheet in half and draw that shape crowns what you want to do (having previously measured the length of the headband adjacent to the head).

3. Cut along the contour.

4. Trace the resulting template onto the plywood.
5. Drive small nails along the contour at a distance of 1 cm. from each other.

6. Place the wire along the contour of the driven nails.
7. We make additional jumpers from wire so that the frame does not bend.

8. In order to crown lay comfortably on the head, you can make an additional fastening.

9. We take two fabrics (in this case, white fleece and white matte organza), put them on top of each other, secure both materials with sewing needles. We apply the finished frame to the fabric and trace it around the perimeter of the frame with a margin of 1.5 cm for hemming.

10. Cut along the contour.
11. Sew along the rim, pulling the fabric very tightly.

12. We also cover the additional fastening with fabric and trim it.

13. We trim all edges of the frame with white bias tape.


14. We decorate the additional fastening with a woven mesh made of large beads and beads.


15. From white fabric, cut two meter-long sheets of 40 cm wide.

16. Finished fabrics, folded three times in length, are hemmed on the reverse side crowns.

17. Cover all edges of the frame with wide silver braid on both sides using a hot gun.

18. All that remains is to decorate crown.


19 The crown is ready.


