IN modern world There are so many types of napkins that sometimes you can get lost in their diversity and attempts to find a use for them. Not every person will be able to answer what the rules are for using table napkins, whether there is a fundamental difference between wet wipes and intimate hygiene wipes, and certainly few people know how to use self-tanning wipes. Let's find out what these features are.
Table napkins
A mandatory element of table setting is a napkin. This is not only an element of table decoration, but also a hygiene item that allows participants of the meal to keep their hands and mouth clean and protects them from accidental food getting on their clothes.
There are certain table manners, which include how to use table napkins.
The napkin you see on your plate should be unrolled and placed on your lap. If the napkin was served in a ring, then it should be placed next to your plate, in the upper left corner.
Such a napkin, laid out on the lap of the host of the evening, serves as a signal for the start of the meal - before this, the guests do not start eating.
If you need to leave your seat, you leave a clean napkin on your seat. The used napkin should be folded to the left of your plate or put back through the ring, folded so that the stained areas are not visible. 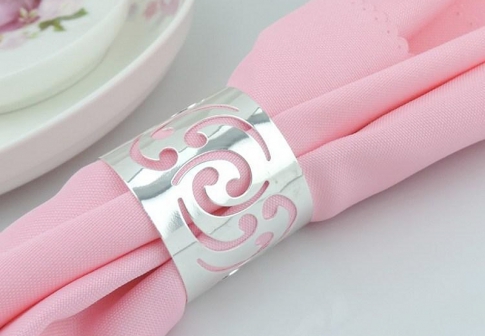
When the meal is completely finished, the napkin should be left on the table to the left of the plate or in place of the plate if it has already been taken away. There is no need to fold the napkin into its original shape, just place it carefully, folded so that it is not visible dirty spots.
If necessary, you can wipe your fingers and blot your lips on the top of the serving napkins, especially before taking a sip from the glass. But wiping your hands too dirty with such a napkin will be unsightly.
To wipe away too greasy stains, it is better to use paper napkins. Use them to remove bones, cartilage and other inedible waste from your mouth.
It is paper napkins that most people prefer to use - in homes, in cafes and even in some restaurants, but you most likely will not see fabric napkins in everyday use. However, this does not mean that etiquette allows you to treat such napkins as you please. 
Paper napkins should not be crumpled into a ball - just folded. We place the used napkin under the edge of the plate - there is no need to unfold it on the table or put it in the plate.
How to use table napkins under no circumstances:
- do not use a dropped napkin;
- do not wipe your mouth with rubbing movements - you just need to blot it;
- do not use a textile napkin for painted lips - take a paper one;
- do not wipe your face with a napkin;
- Do not use the napkin as a handkerchief.
However, people are interested not only in table napkins, which we were initially accustomed to, but also in their other counterparts. What are they and how to use them?
Wet wipes
In addition to textile and paper napkins for lunch, the popularity of so-called wet wipes, a modern universal hygiene item, has also grown. How many people have not learned to use these napkins: they wipe their hands in the absence of water, after using the toilet and being in other public places such as transport, shops, etc., with their help they remove makeup, remove fresh stains from clothes, wipe shoes, wipe furniture, mobile and computer equipment are placed on the forehead as a compress, and a dried napkin is used as a handkerchief. 
To avoid allergic reactions, you need to use high-quality wet wipes. They should not tear or stretch easily. It is best to purchase them at a pharmacy.
Intimate hygiene wipes
Many women are interested in how to use intimate hygiene wipes. Baby wipes are also popular for hygiene and baby care.
Before using them for intimate hygiene, make sure that they are really intended for this purpose - many manufacturers offer the most ordinary wet wipes under this guise. 
Make sure that these wipes do not contain alcohol - it is harmful for caring for intimate places. There must be the presence of natural ingredients and extracts: chamomile, calendula, aloe, etc., and sometimes milk protein and whey. Choose wipes without any fragrances, preservatives or with a minimum of them to avoid possible allergies in both your children and you.
However, doctors advise using such wipes as rarely as possible so as not to destroy beneficial microflora along with harmful microorganisms. With daily long-term use, skin irritation is also likely, especially in children.
Matting napkins
Girls in Lately I'm interested in how to use matting wipes. They are able to absorb secretions from the sebaceous glands, as well as particles of dust and dirt, without damaging the skin. They act on the top layer of the skin, that is, the base of the makeup will not be damaged. 
Use them by blotting oily areas on the face. There is no need to rub the skin.
A matting napkin is usually made of thick paper, similar to tissue paper. Mattifying wipes should not contain alcohol.
To avoid possible allergic reactions and irritation from wipes, buy those without fragrances.
Self-tanning wipes
Recently, such know-how as self-tanning wipes has appeared - few people have even heard of them, and even fewer people know how to use such wipes.
These napkins can be used by those people who cannot sunbathe and go to the solarium, and those who want to protect themselves from diseases caused by the sun. The tan lasts for several days and at the same time looks natural, and fades gradually and unnoticeably. The downside is that one napkin may not be enough for the whole body, and applying a tan yourself will not be so easy. 
Before applying tan, gather your hair into a bun to avoid getting in the way. The skin must be cleansed. You need to use self-tanning wipes as follows: start wiping your face with a napkin in smooth movements, avoiding the area around the eyes, just as you would apply cream. Then move on to your neck, shoulders, arms and other areas you want to tan. Do not linger on one area for too long with the napkin so that the tan goes on evenly.
After applying the tan, you should wait at least 10 minutes to avoid staining your clothes. You should wash your hands, as they have been in contact with the napkin for the longest time and will become too tanned. The full shade appears after a few hours and may intensify a little more during the day.
Remember that these napkins cannot be reused. They also do not contain a protective component against ultraviolet radiation, so in order to protect from the sun, you should still apply a special product.
Scheme:
If you want to get a “Twisted Tent,” then roll the resulting figure into a tube, then place it on the table without straightening the edges.
If you want a simple “Tent” for two, then simply fold the top left corner to the middle down in a napkin folded in half, then the right one, then fold it in half and you’re done.


Scheme:
Answers on questions:
1. Do I really starch napkins (just like our grandmothers, in a tank, with starch)? No, I don’t use starch (I’m still sane), but 100 years ago I bought a wonderful thing - starch aerosol (like hairspray, only starch). It lasts a long time. Sometimes I starch my husband’s shirt collars. So “not just a napkin”)))
2. Do I really make all this beauty on fabric napkins? No. Almost never. I always use paper ones.
3. And often does this happen to me? No, not often. Only sometimes, when someone comes to visit, in front of whom you want to show off (for example, my husband’s friends. My friends and family already know everything about me)))
Dear beginning decoupage artists, I propose to talk about what we glue: napkins, decoupage cards or rice paper (rice decoupage cards) and what the pros and cons of each material are.
Let's start with napkins - because, firstly, they are classics (remember, decoupage is often called "napkin technique") and, secondly, because it is with napkins that most decoupage artists begin their acquaintance with decoupage.
So, what napkins can be used in decoupage?
1. Ordinary three-layer ones, which are sold in packs in regular stores or hypermarkets (standard sizes - 33x33 cm). Sometimes you can find really beautiful napkins in such packages (especially before the New Year"). Packages of napkins come with one motif (all the same) or with different ones (4 different designs, 5 pieces for each type. So, I treasure one package with incredibly beautiful autumn napkins like the apple of my eye - the motifs are so successful, they can be glued to any blank, and they will look beautiful everywhere.
A significant advantage of such packaging is price(1-1.5 dollars per package in Belarus). Considering that in craft stores 1 napkin is sold for 8-10 Russian rubles, then this is really a significant plus.

Well, a significant disadvantage is little choice. By the way, be careful when buying a set of different napkins. They usually put beautiful napkins on the front and back, but inside you often find all sorts of napkin nonsense that is almost of no use in decoupage :)

I’ll write separately about perforated edges, because some beginners are afraid to glue the perforated areas of the napkin. Don’t worry, all this will smooth out when wet if the napkin is of high quality. Well, if it’s of poor quality and something remains after gluing, you can press these bumps into the surface with your fingernail (before varnishing), and they should disappear.
2. Four-layer “handkerchiefs”. Also sold in stores and also very cheap, dimensions - 21x21 cm. The pros are the same, the cons are the same. By the way, sometimes in such large packs and in “handkerchiefs” there are identical pictures, only different in size. From such a collection you can make some kind of set, for example, several boxes of different sizes or several items for the kitchen - naturally, all in the same style.

3. Very beautiful napkins that are sold in craft stores especially for decoupage (three-layer). They are sold individually, at 8-10 Russian rubles per piece. Standard sizes are 33x33 cm, sometimes you can find 25x25 cm.
Plus - big choice. Indeed, a beginner’s eyes widen from such a choice, and he wants to buy everything at once (this is exactly what you don’t need to do!!!). The downside is the price (10-20 rubles). In principle, if you do several jobs a month, it comes out inexpensively, but you need to take into account that brushes, paints, and varnishes also cost a lot...
By the way, beautiful napkins can and should be brought from abroad. There they are much cheaper, and the choice is huge! Therefore, if your friends ask what to bring you from Europe, feel free to answer: “of course, napkins!”
Single-layer napkins can also be glued, but beautiful ones are rare among them. In any case, the technique for working with them is the same as with all the others, you just don’t need to layer them.
Which napkins should you pay attention to?
1. Napkins on a plain background(especially on white), designs with clear edges, do not overlap or are not cut off.
2. Background napkins– striped, with small patterns in one color scheme. These napkins are great for gluing the sides of blanks or the insides of boxes.
3. Napkins with beautiful collages or designs that can be glued entirely(in quarters, halves or a whole napkin), and not in fragments.
By the way, pay attention to the second layer of napkins - sometimes there are The designs of the first layer are faintly imprinted– they can also be used, for example, on the back of a lid or door.
Properties of napkins.
1. The napkin, if you layer it (remove all the layers and leave only the layer with the pattern), is very thin, and if you handle it carelessly, it will easy to tear. In particular, many of my students accidentally tore the napkin at the stage of applying glue, when, it would seem, everything was almost ready. But it is the thin napkin that is easiest to merge with the surface with just a couple of layers of varnish. Thicker paper takes longer to hide.
2. The napkin is not only very thin, but it is also stretches and forms folds. It is because of this that we cannot glue a napkin directly onto the workpiece - we have to soak it in water, use a file, or come up with other methods for gluing napkins without folds.
3. Napkin takes background color. When glued, the napkin becomes almost transparent, and everything underneath is visible. If there is white primer or white paint underneath, the napkin becomes bright and the pattern on it is clear. If we glue it on a bright, saturated background, the napkin takes on this shade, the design is lost and becomes faded (that’s why you can’t glue the napkin on a dark background). But we take advantage of this property when implanting a napkin into wood stained with acrylic or stain, and then it shines through under the napkin motif. beautiful pattern wood, and the design appears to be scorched or drawn directly on the wood.
Pros and cons of napkins for decoupage.
First plus: big choice, beautiful combinations of colors and shades, variety. There are vintage, retro, nautical, children's napkins, simply bright and beautiful - in general, for every taste.
Second plus: small thickness. The napkins blend easily with the surface and after a couple of layers of varnish and a little sanding, their borders are no longer noticeable. Thicker paper (decoupage cards, tracing paper, and even more so office paper) is much more difficult to hide.
But napkins have many more disadvantages.
First minus. Napkin motifs and patterns are very common cut off, intertwined, and it may be impossible to tear out one fragment without violating the integrity of the other. There are always beautiful napkins in which part of the motif is cut off (for example, half a leaf or a petal), and this too will have to be painted on. About extraneous background I’m not saying at all - stripes, inscriptions and curls have to be torn out or painted over, and it’s good if they do not affect the motif itself. But often they are printed right on top of the motif! 
Second minus. Napkin motifs have a certain fixed size, and we cannot change it (unless we scan the napkin and print a reduced or enlarged copy on the napkin as well).
Third minus. The quality of napkins is not always satisfactory. Sometimes paint may bleed. Sometimes you can meet defective napkins– the contours of the drawings on them are unclear and double, because the second layer of paint shifted during printing and did not completely cover the first.
The fourth minus. If suddenly we want to repeat the work or do another work with the same motive, and we no longer have such a napkin, we have to look for it around the city or even ask for this napkin to be sent from another city. In this case also the output is scan your valuable tissue before starting work.
Fifth minus- quite significant. The fact is that the napkin is printed dotted, and when painting the background you have to redraw it all, because the difference between the background of the napkin and the background drawn with a brush is very noticeable. The brush gives a continuous stroke, and The background of the napkin is dotted. Therefore, either we remove almost the entire background of the napkin, or we leave it and additionally draw it with a brush.
Despite a large number of disadvantages, sometimes using a napkin is easier than making a printout or gluing a decoupage card and then leveling it with the surface. And then we are faced with the biggest problem for beginning decoupage artists: how to glue a napkin without folds.
So, methods for gluing napkins.
The main thing in all methods is to glue only the top layer with the pattern (it should be translucent). It is not worth gluing two layers - they are less saturated with glue and whitish spots may remain where the glue did not get.
1. File method. From the very beginning I began to use it and, frankly, I don’t understand why other methods are needed. The file method is universal, it allows you to transfer a napkin to a flat surface, adjacent faces, relief, round surface, for example, a bottle (but not to a convex surface, but to a flat, cylindrical one).
How to glue a napkin without folds using the file method - watch the video.
The most important thing here is, firstly, not to spare water, and secondly, to coat the top with glue very carefully and gently.
2. Method with glue stick and iron.
Suitable for a flat surface that we coat with a glue stick (some people use regular decoupage glue or even PVA glue, but the glue needs to be completely dry). Then a napkin is applied there, covered with baking paper and ironed. The glue heats up and sticks the napkin to itself, then coat it with glue on top again. To be honest, I have doubts about this method, because when applying glue, the napkin will still get wet and begin to stretch. But I can’t say for sure because I haven’t tried it.
3. Fan brush method. Not a bad way, but only for neat and diligent people (I don’t consider myself one of those: I like to do everything quickly). The method is that we apply a napkin to our surface, pour a puddle of water into the center, then with a fan brush we begin to gradually stretch this puddle, you can add water little by little. At the same time, we constantly carefully lift the napkin by the edges to straighten out the folds. By the way, this method is well suited for slightly concave or convex surfaces - the napkin stretches, gently hugging the uneven surface.
I am a sincere supporter of the file method, but you can try all the methods and choose what suits you best.
And finally, I’ll make you laugh a little.
How different is the attitude towards napkins between a normal woman and a decoupage artist (I deliberately used the word “normal”:)
A normal woman buys beautiful napkins and sets the table with them. She calmly throws away used napkins.
And then she becomes a decoupage artist. Now she buys beautiful napkins wherever she can, and even if someone tries to wipe their hands on them, there will be a scandal! And when visiting and even in a restaurant, she tremblingly puts precious napkins in her purse and takes them home. To the collection.
P.S. Just yesterday, my friend told me that she literally snatched a napkin from her colleague’s hands shouting “Stop!” when she was about to wipe her nose...
Did you like the article? Share it!
In contact with
You may also be interested in:
Comments
Comments: 24
Natalia, nothing surprising! The fact is that glass and paint have no adhesion; the slightest ingress of moisture causes the paint to wrinkle. For glass, you need special primers with high adhesion: for example, primers for glass and metal, or my option is an aerosol varnish, for example, Bosny, construction. Apply a thin layer, then you can paint with any acrylic, everything will stick. I decided to wash off one bottle - I soaked it in water overnight, then scraped it off with my fingers for another half hour - not like just acrylic, which crawls from a damp wipe!
Natalya, have you watched the video? the napkin begins to wrinkle, this is natural - it stretches. But if there is a lot of water, then it straightens itself. I wrote that I use the file almost always) For prints and photos too. Watch the video and try it. I really want you to master this method - it is really very convenient!
Evgeniya, thank you so much for such detailed and sensible explanations! Tell me, please, this is the moment. I coated a bottle of champagne with two layers of white (with drying, of course). Everything was white and beautiful. Then I started gluing the napkin onto the bottle using the file method. While I was ironing the napkin, my paint began to bubble from the wet file!!! Where is the mistake? Did the bottle need to be patched after painting? Help with advice, please. Thank you!
I didn’t make friends with the file right away. For some reason, the napkin on my file immediately begins to wrinkle. I use the file if I need to paste photographs or printouts. It’s more convenient for me to use a fan brush, and I dip it in glue and immediately brush it along the napkin from the center to the edges; and a flat brush, if the elements are small, is also good for gluing.
Evgenia, thank you for the wonderful lessons and very important comments! They are invaluable for beginners! Good luck in everything. I received aesthetic pleasure from your video! Everything is simple, clear, understandable! We look forward to your next lessons.
Thank you! I learned a lot of valuable things for myself. I got really carried away - I decorated all the scrap metal in the yard. But there are still a lot of wrinkles. After the first layer of varnish, I removed it with sandpaper and was somehow afraid of the file method. But after watching the video, I really liked it. Thank you so much! I wish you happiness and creative discoveries in the New Year!!!
Today, decoupage napkins are one of the most common materials used to decorate the surface of a product. This material is relatively cheap, beautiful appearance and allows for easy application to the surface. Napkins for decoupage can be purchased in specialized stores for needlework, scrapbooking, and can also be ordered online. A wide selection of pictures allows you to choose the one that best suits the imagination and idea of the needlewoman. Often the napkins themselves inspire you to do decoupage.
Today, decoupage napkins are used as a material for decorating the surface of products. Basically, these are three-layer napkins, but only the top layer is glued to the surface to be decorated. Using napkins compared to plain paper makes the job much easier. This decorating technique is especially convenient for beginners. Napkins can be used to decorate the surfaces of both small and large products. Often, boxes, caskets, business card holders, napkin holders, notepads and even pieces of furniture are decorated with napkins.
An interesting use of napkins for decoration is decoupage on stone. A useful master class on this technique can be found on the Internet.
Making decoupage with napkins is very convenient. Therefore, everyone can decorate with their own hands, even if they have never done needlework before. You need to decide on the designs for decoupage in advance. A variety of surfaces can be decorated. Today, decoupage is done not only on wood, plywood, and glass. Sometimes the most unexpected materials serve as the basis. For example, a popular trend today is decoupage of nail discs.

Decoupage step by step:
- Surface preparation. If it is wood, it is sanded and covered with putty and primer. If it's chipboard, just wash it. Glass - wipe with alcohol.
- Preparing napkins. Separate the top layer from the two bottom ones. Cut out the necessary images.
- Glue is applied to the surface to be decorated.
- Napkins are glued on.
- Allow the product to dry.
- Cover with varnish.
Every day new napkins appear with a wide variety of bright images that inspire creativity. Thin paper allows you to do the job neatly, so that the image looks drawn directly on the surface of the product. Decoupage must be done carefully, without nerves, then the result will be highly artistic.
Decoupage with napkins: example images
Since decoupage with napkins is one of the most common ways to decorate a surface, we will talk about it. Decorating is quite easy if you follow detailed instructions professionals, it is also important to be careful and careful. When gluing napkins, it is important not to overdo it with glue - otherwise the work will look sloppy.
It is important to apply a sufficient amount of PVA to the previously cleaned surface of the product, otherwise the napkin simply will not stick to the surface, and the whole work will go down the drain.
You should not use ordinary napkins to decorate the surface. Today, manufacturers offer a wide range of napkins, individually and in packs, which makes your eyes wide open. Beautiful pictures will allow you to create real masterpieces.

Possible images on napkins:
- Flowers (rose, peonies, poppies, hydrangea, sakura);
- People;
- Lovers;
- Bride and groom;
- Gzhel;
- Khokhloma;
- Various ornaments;
- Animals (birds, cats, dogs, cute piglets);
- Scenery;
- Children's motives.
Do-it-yourself decoupage will be an excellent gift for any occasion: birthday, anniversary, wedding, birth of a child. The choice of picture depends on the event to which the creative gift is dedicated. Tissue products presented in wide range, allows you to create both large and small works.
How to make decoupage from napkins
Decorating with napkins is easy and simple. Beginners should choose small size products. Since even the most simple work needs practice - it is this that affects the quality of the work performed. The technology for applying napkins to the surface of the product is simple.
Today, craftswomen almost always use three-layer paper napkins– excess layers easily fall away from them, thus leaving a thin top layer with which work continues.
Rice paper is becoming quite popular today. It is not inferior in subtlety to napkins, but it fits well on the surface to be decorated. On such paper you can print a drawing on a printer. However this type work requires special preparation. Napkins do not require any preparation, except for detaching two extra layers. When the blank for decoupage is ready, you can start gluing it.

What materials are needed:
- Product for decoration;
- Napkins;
- Glue;
- Putty;
- Primer;
- Tassels;
- Sponge.
The number of decorating tools may vary depending on the material of the product: wood, chipboard, glass or ceramics. For gluing, it is best to use a special glue for decoupage, but PVA will also work. The shape of the decorated product also affects the complexity of decoupage work: round; square, rectangular, diamond-shaped.
Decoupage for beginners from napkins
Beginning craftsmen can safely start decorating the product and transferring the plot they like onto it. To stick napkins correctly, you need to familiarize yourself with the nuances of decorative work. The dimensions of the product affect the complexity of the decorative process. It is better for beginners to start their experiments by decorating small objects.
It is interesting to choose napkins that depict rare paintings - this makes the product unique.
Stores sell a special set of decoupage for children. They contain small blanks and materials that allow children to complete decoupage on their own from start to finish. Children can complete more complex types of work with the help of adults.

The simplest steps:
- Prepare the surface;
- Separate the top layer of the napkin;
- Cut out the image;
- Glue the napkin;
- Coat the product with varnish.
A special procedure may be additional varnishing in order to make the surface of the product more durable. There are times when the image you like is located on a postcard that is made of thicker cardboard. Then a special delamination technique is required, which allows you to separate the top layer from the postcard without damaging it. This technique is convenient to practice on wallpaper. Among beginners, an important aspect of gaining experience is sharing knowledge. Visiting forums and specialized sites quickly turns a beginner into an experienced decoupage master.
Decoupage technique from napkins
You can make crafts from napkins using a special technique called decoupage. The napkin decoupage technique involves performing step-by-step actions that will turn an ordinary object into a real work of art. Anyone can use this technique.
Very often, the inspiration for work comes from images on napkins. It is this that sets the tone for the entire work.
A very interesting technique - the image on the boxes various countries and cities. Such things can be made in memory of a visited country or as a visualization of a dream city. Very often, such motifs are used to decorate wedding souvenirs.

Possible images:
- Germany;
- Paris;
- Prague;
- Barcelona
- NY;
- Moscow.
With the help of simple technology, you can give your family and friends a whole world - a world of creativity. The decoupage technique with napkins allows you to transfer any image onto the product. In this case, the main actions are: separating the top layer of the napkin, cutting out the image and gluing it onto the surface of the product to be decorated.
Decoupage from napkins: master class in the bathroom
If the bathroom is decorated with ceramic tiles, it can be decorated in an original way with images using the decoupage technique. Images made from napkins are easily glued to the surface of the tile. Many people are afraid that the image will be smeared in the bathroom due to exposure to moisture and water.
Varnishing the product allows the design to retain its original appearance.
New images on napkins always delight those who follow fashion in the world of decoupage. A wide variety of images are suitable for the bathroom. It is important that the owners like them. Using special materials and paints, the pattern on the floor and wall tiles can be made convex.

Possible images:
- Owls;
- Gapchinska (cute works by the author);
- Butterflies;
- Marine theme.
Decoupage napkin holder: simple techniques
The kitchen is a place where decoupage will look stylish and very beautiful. The presence of a variety of stands, boards and napkin holders allows you to choose many items that can be decorated with napkins. Any home is a treasure trove of products that can be turned into real masterpieces.
Newspaper boxes, bread bins, and napkin stands are perfect for decoration - they will acquire a stylish, original appearance.
You can easily replace old things with new ones, but this can be done without losing money and your favorite, albeit aged, interior items. Decoupage of a napkin holder will allow you to turn ordinary coasters into decorative kitchen elements. Napkins from any manufacturer are suitable for decorating a napkin holder. The main thing is that the layers of napkins are easily separated from each other. A photo of a napkin holder will allow you to visually imagine what the product will look like after decoupage.

Simple techniques for decoupage:
- Clean the surface of the product.
- Provide napkins.
- Cut out the image.
- Stick to the surface.
- Let it dry.
- Cover with varnish.
Napkin holders will look beautiful and stylish if they are combined with a tablecloth on the table or in harmony with the curtains or the color of the dishes in the kitchen. It is important that they do not get lost among other items. Using the decoupage technique, you can decorate the dining table, then the kitchen will become a masterpiece that will delight guests at home with its beauty.
In order not to overpay for the purchase of materials, you can look for napkins for decoupage on free advertisement sites. Often on alkh and other platforms they sell napkins at a cheap price or give them away for free. Decoupage allows you to realize interesting ideas and inhale new life into old interior items. Interesting items and materials for decoupage can be purchased at Leonardo - this is a godsend for those who love handmade. If the materials are not only beautiful, but also have high quality, then the completed work will look expensive, like a real work of art.
Decoupage for beginners from napkins (video)
The decoupage technique is becoming increasingly popular today. Decoupage is usually done with paper or fabric. The technique of decoupage with napkins consists of two main stages: preparing the surface and gluing images cut from napkins onto it. Before you start cutting out the necessary designs, you need to separate the top thin layer from the other two. Decoration must be done very carefully and carefully - this is the only way the product will look stylish, expensive, beautiful and original.
Table etiquette is a set of rules of behavior at the table, including many written and unwritten laws. The use of napkins is only part of these rules, the part is essential and significant. What's easier - take a napkin, wipe your lips, face, hands with it... And give yourself away!
Good manners and an elegant combination of all elements of dining etiquette make meals an important part of communication. The napkin plays an important role in this. Failure to properly use this table setting item can turn dinner into torture.
A napkin (French serviette) or (Italian salvietta) is a small piece of fabric or paper that allows you to keep your face and clothes clean during a meal; a table napkin also serves to decorate the table.
Historical excursion
 The napkins are quite old. The ancient Romans ate with their hands, and special slaves played the role of napkins: they wiped their dirty hands on their hair. A little later, the ancient Egyptians used fig tree leaves as napkins. In Greece, napkins were made of alabaster; in order to clean them, they were not washed, but thrown into the fire.
Elegance of manners and refinement of morals were cultivated back in the Middle Ages. Italy is considered the birthplace of table etiquette. Tablecloths and napkins, as integral parts of a cultural feast, penetrate into Europe from this ancient country. Table cloth napkins appeared more than three hundred years ago in Italy and played a decorative role; they were decorated with complex, magnificent patterns painted by hand. Napkins were made from thin, elegant fabrics and lace; they were a luxury item available only to the wealthy.
Napkins came to Russia during the time of Peter I; before that, hands were wiped on the edge of the tablecloth. In Russian villages, the art of decorating and embroidering linen napkins was passed down from generation to generation.
A book on etiquette published in 1729 describes the purpose of napkins:
- “For wiping lips, mouth and fingers if they are dirty with grease, for wiping a knife before cutting bread, for cleaning a spoon and fork after use. If your fingers are too dirty, first wipe them on bread so you don’t have to use too many napkins.”
- History has preserved for us exactly the date of the appearance of paper napkins - July 9, 1887. Manufacturer John Dickenson, at a gala dinner on the occasion of the annual meeting of paper manufacturers, proposed the use of paper napkins for the first time.
- In the east, thin pita bread served as napkins. In Japan and China - sheets of rice paper. They kneaded it, used it and threw it away. Such wastefulness seemed blasphemous to guests from Europe, since paper was expensive in those days. It was this habit of the Japanese that laid the foundation for the production of disposable napkins.
Rules for using napkins at the table
The rules are simple and easy to remember. A personal napkin, usually folded nicely on or near a plate, is used to keep clothes clean. This napkin should be unfolded and placed on your lap. The napkin is not tucked into the collar of clothing, nor is it laid out on the chest.
While eating, do not wipe your lips with such a napkin: there are paper napkins on the table for this purpose. At the very end of the meal, you can lightly blot your lips and place the napkin on the table to the right of your plate. There is no need to refold the used napkin. They don’t put a napkin on the seat of a chair or hang it on the back.
It is not customary to wipe your face with napkins; it is better to clean yourself up in the restroom. Before eating, women should carefully and discreetly remove lipstick with a paper napkin so as not to leave bright marks on glasses and cutlery. This is not just unaesthetic, it is bad manners.
It is unacceptable to use a napkin as a handkerchief and wipe very dirty hands on it. It is indecent to wipe cutlery with a napkin; this can offend the owners by doubting their cleanliness.
If a napkin falls from your lap to the floor, according to the rules of etiquette, the guest himself must pick it up, even if it is a woman. Those sitting nearby should pretend that they didn’t notice anything. If you are dining in a restaurant, you can ask the waiter to bring a clean napkin.
Paper napkins are disposable napkins, that is, they cannot be reused multiple times. The used paper napkin is slightly crumpled and placed under the edge of the bottom plate. You need to blot your lips not only after a meal, but also before each drink: greasy marks on the glasses can spoil the appetite of those gathered. As soon as the meal is finished, all used napkins should be piled up on your dirty plate.
Without a napkin, it is impossible to maintain neatness at the table. It doesn’t just decorate the feast, it creates mood, cleanliness and even creates a sensation. Catherine the Great skillfully manipulated alabaster tablecloths and napkins. During sumptuous palace dinners, in a fit of anger, she tore such a tablecloth or napkin from the table and... threw it into the fireplace. The servants then took out an absolutely snow-white tablecloth, untouched by fire, and the guests were indescribably delighted, and quickly spread rumors around the world about the super capabilities of the Russian Empress.
Zhanna Pyatirikova


