The simplest craft made from fresh flowers is a bouquet. Even a child can make it from wild or garden flowers. A more complex option is “toys” made from fresh flowers. Such a gift will be pleasant for both adults and children. In this article we will talk about crafts made from fresh flowers, made .
Crafts from fresh flowers photo
When planning to make crafts from fresh flowers, first of all stock up on such material as “oasis”. A floral sponge, with proper care of the arrangement, will help flowers maintain their freshness and beauty for up to three weeks. Most often, compositions are made in the form of some kind of animal - a bunny, a bear cub, a snail, a fox.

At the very beginning, make a sketch of the work, it will help you in designing and distributing colors. According to the sketch, cut out the frame of the future craft from the “oasis”. Each detail, depending on the size of the final result, can be completed separately. Use a utility knife to shape the sponge into the desired shape. Try to work carefully, since the final appearance of the composition will directly depend on the shape of the sponge.

Soak all parts in a container of water for two to three hours, then allow excess water to drain. Fasten the design parts together with wooden skewers or wire.
It is necessary to select flowers based on the desired image and color scheme. You should not take too large buds if this is not necessary. A large inflorescence can decorate a craft by adding a bright detail. Most often, bush chrysanthemums are used to cover a large area of the toy. The flower should have a stem about 3 cm long; it is better to cut it at an angle. In this case, the flowers will absorb moisture better and retain their appearance longer.

Bring the animal to life by making eyes and a nose from special elements sold for making soft toys. Or make them yourself from beads or cardboard. Additionally, you can decorate the craft with ribbons and beads.

Place the finished product on a waterproof stand or in a wicker basket, having previously covered its bottom with cellophane.
Place the finished craft in an open space under the rays of the sun and water every day only from above. Wilted flowers in such a composition can always be replaced with fresh ones. Now crafts from fresh flowers you can make it yourself at home and surprise your family and friends with your talents.
Greetings, dear readers and visitors! I have already written several times that I really love decorating gifts in the most unexpected ways. And today I suggest you make paper flowers with your own hands. As many as twenty-odd methods, by the way.
Now, unfortunately, I rarely get around to mass gift wrapping. Moreover, every year there are more and more acquaintances and friends who need to be congratulated along with their relatives. This is very joyful! I love giving presents. But if I choose them very carefully, then lately I pack them in organza bags, since I only decide on detailed packaging for single holidays (like birthdays).
However, my passion for all kinds of packaging beauty is difficult to overcome, so today, together with you, I will practice making beautiful flowers using step-by-step schemes.
DIY paper flowers: simple and clever
There will be a lot of master classes, get ready. Good news for all rose lovers: there will be as many as 4 of them.
Aster
Guys, honestly, I'm not very good at naming colors. So if you see a discrepancy that is obvious to you, write in the comments.
So, first in line is the aster. For it, cut out five circles: two large, two medium and one very small. Fold each circle in half three times, then decorate the edge as in the 4th photo. After unfolding the structure, squeeze each petal to give it volume. Stack all the circles and decorate the middle.
Almost calendula
This flower looks much more like a packaging bow. Prepare a square of paper of the required length for it and cut the edges according to step 2. You will need several such blanks. Place them one on top of the other and squeeze them in the center, tightening them with wire or thread.
Now the most important thing is to straighten the petals so that you get a beautiful resemblance to a flower. Accordingly, the more layers, the more petals and the more magnificent the flower in the end.
Tip: make several of these flowers of different sizes and glue them on the packaging next to each other, then you will get a beautiful bouquet.
Calla
To create calla lilies, you can use either regular double-sided paper or foam rubber (I wrote about what it is in the section about the minion).
For calla lilies, take a stamen (you can crumple it out of paper or make it out of polymer clay) and a petal made in the shape of a heart. Place the stamen in the petal, fold the edges of the petal over the stamen, gluing them together. All that remains is to unscrew the edges to get maximum resemblance to a calla lily.
Such flowers are well suited for decorating postcards, packaging, and as an independent gift in the form of a bouquet.

Bell
The master class for the bell is very simple and straightforward. Cut the blank according to the first photo. Glue the edges together and carefully straighten the ends. To make everything look natural, make a center of several elongated stamens, which will need to be glued inside the flower.
By the way, these bells would be great to decorate packaging for March 8th or just a spring birthday.

Lilies of the valley
Well, or something similar. For one flower, take a long rectangle and bend its edge, as in the photo. Cut the wide part so that you get many small strips. Using scissors, twist the strips (to do this, you just need to run the sharp side of the scissors along these strips, lightly pressing the blade against them).
To prevent the flower from falling apart, take a rod and wrap a green stripe around it. Then start carefully twisting the “flower” part, previously coated with glue, on top. Apply the layers tightly so that the greenery does not show through.
But making green leaves is not at all difficult - for them, just fold a rectangle of green paper like an accordion and trim the edges into a triangle. When you unroll, you will get a lot of green leaves ready to be glued to the base.

Poppy
Now we use corrugated paper. Cut out about ten teardrop-shaped petals from it. Stretch the wide part so that the blanks resemble mushrooms.
Take a thin wire and wrap some paper around it - this will be the core. Wind the petals onto this core so that each one slightly overlaps the previous one. When everything is ready, the structure can be pulled together at the bottom so that it does not fall apart.
The master class shows how this flower can be attached to a holiday cap, but believe me, the poppy will look great on a gift box.

Red flower
What is its species? No associations came to mind. But that’s not the point - to create it you will need about ten petals (corrugated paper is used, by the way). Their shape is almost teardrop-shaped. but with a cut end.
Cut out a base circle from thick cardboard. Glue all the petals in layers to this circle, slightly crumpling (doubting? God, how right :_D) the bases, thus forming folds - then the flower will be more voluminous and “fluffy”. Decorate the center with some button or bead.
Such a flower, by the way, will look great made of soft felt - this way it will gain durability. And if you attach the base for the brooch at the back, you get two in one - a decoration for the gift and the gift itself.

Extravaganza of color
There are only two flowers, but the bright combinations create a very unusual effect. Take the crepe paper again, cut out a circle and fold it into a “doll” shape. Cut a “skirt” for it, which you wrap around the doll. Attach the petals on top, gluing them in a circle. Glue two wide leaves at the base.
The second flower is very simple - cut the fringe and twist it into several layers. The flowers are very simple, they can make a very interesting gift arrangement.
Unseen flower
To prepare the base for this flower, I advise you to look here - here the base for the second Christmas tree is created in exactly the same way. But then the differences begin - each of the corners needs to be wrapped using a thick wire or knitting needle so that it turns out to be a spiral.
You can leave this design alone, but I suggest you connect several (say, three) pieces using the existing spirals - the wow effect is guaranteed. Then you can also experiment - connecting elements with spirals into unprecedented designs.
Tip: Are you going to a Japanese-themed party? Then make such a very large flower and take it with you - it will serve as an excellent decoration for a chandelier.

Peony
“Pio-, pio-, peonies are given by a new acquaintance...” - words from the song of the underground group “My Michelle” (I’ve been listening to it often lately, inspired by it). We will make from corrugated paper. You will need five sizes of petals, approximately five copies of each (appearance as in the photo).
Stretch the petals so that you get something like a wave (for both large and small ones). Then form a stamen from the same corrugated paper by folding the paper and further compacting it. You can do this on a wire skewer, or you can do it without it.
Glue the petals onto the finished stamen, each one overlapping the previous one. Do not pull the petal too tightly. In the end, all that remains is to cut the green leaves and stick them around the peony.

4 in 1: dandelion, clove, aster, chamomile
All these wonderful creations of nature are made according to one principle - cutting the edge of a strip from which a flower will be made. The final shape of the flower depends on the cutting shape. Please note that some require a core and others do not.
Please note: despite the very simple design, the flowers turn out very realistic. If you have very little time to make, then this is an ideal option.
Experiment and discover your unprecedented plants - be sure to tell us what happens.

Paper roses
Magic roses are one of my favorite flowers
Rose with twisted edge
The main difficulty here is to carefully twist the edge of the corrugated paper, straightening out the folds. Then make sure that the folds are even. Now twist the strip so that the layers fit tightly together. At the end, secure with thread, trim off the excess.

Simple rose
Need to make a plant in five minutes? Then this rose is definitely for you! Just cut out a circle and draw a spiral in it. Cut out a spiral as in the photo and twist the rose, starting from the longest link of the spiral (the central part will serve as the base).

Big rose
Even gigantic, if you follow these exact dimensions. The heart petals are stretched and placed on top of each other in a circle, secured with glue. Green petals are attached at the end. Of course, the flower doesn’t have to be as big as in the photo – go with your preferences.
Twisted paper rose
Once upon a time I already described this method of creating a rose (here is the second one). The principle is absolutely the same, but the sizes of the triangles resulting from twisting must be the same along the entire length of the ribbon, otherwise the flower will not be very neat.
Once I even made a Rosemary doll, which took part in a city exhibition. Her whole body was covered with roses, made exactly according to this method (the roses were made from ribbons, however).

Clover
I'll just show you how to make the base for the four leaf clover. To do this, take a square of paper and fold it in half lengthwise and in half again. Fold the ends towards the center. Cut out a heart from the resulting design. The result will be exactly what we wanted - a happy flower.

Nameless
No matter how I tried, I couldn’t give a clear name. As a result, the product remained just a beautiful flower, reminiscent of kanzashi motifs (the Japanese art of making jewelry from satin ribbons).
The beginning here is the same as in clover. But after bending the edges, you will need to bend the ends so that the length of the bent part is equal to the length of the visible side in the middle. Then these parts are straightened out and their edges are folded so that the sides are even. They are folded again and glued together to form three stamens. There should be three such petals.
This flower is most suitable for decorating a gift in Japanese style.

And again the aster
This time you need to glue the petals along the edge until you reach the desired volume. Decorate the center as you wish or simply fill it with as many petals as possible.

With this, I declare the big flower review closed. I hope you have found exactly the option that will help you decorate your gift in the best possible way. See you soon, subscribe and share with your friends!
Sincerely, Anastasia Skoracheva
Children love everything new and unusual. Today we will look for real masterpieces in the world around us. Natural materials are an inexhaustible source of inspiration that is available to everyone!
Don't wait until autumn to start creating with freshly picked chestnuts and acorns. Summer is a great time for creative activities in nature. Think back to your childhood. Have you ever done a petal manicure? It's time to teach your daughter how to “sculpt” them!
In fact, this is just the tip of the iceberg. You can create real masterpieces from flowers, petals and leaves. In principle, this purely summer creative material can be used all year round if you collect the plants and dry the herbarium.
Flower men
Children love funny people. So let's tell them the secret of making cute and funny inhabitants of the flower country!
To make a flat man, you will need some flowers and leaves. They can be laid directly on the lawn or asphalt, but it is best to glue them to a paper base. This way you can take the funny applique with you and show the masterpiece to everyone: at home, in the yard, at school or kindergarten.
You can make little people as an option for one of the creative competitions. Don’t forget to take pictures of your crafts right away, because fresh petals will quickly wither and become deformed.


Flower dolls
In my childhood yard there were hollyhocks, or hollyhocks. We made dolls out of them. Manufacturing is very simple. You need a thin flexible stick for the base, several buds and mallow flowers. We string flowers on a stick in any order and get a pupa. Any flowers and leaves are suitable for making.


Fashionable looks made from petals
With older girls you can do fashion decorating. To create dresses or paintings with images of women in dresses from flower petals, just draw the outline of the dress and make a petal appliqué. It is not necessary to glue delicate petals - just lay out the desired composition and take a photo!


Postcards from fresh flowers
There are many design techniques. Complete your collection of ideas by decorating with dried flowers. Agree, it looks beautiful and unusual!


Animals made from petals
Flower petals, like bright puzzles, can be put together into a variety of images. These can be animals, birds, fish.


Paintings from plants
Having mastered the petal appliqué technique, you can move on to making paintings. This painstaking work will require time and a lot of carefully collected and dried plants. But what a great result awaits you!
Painting with flowers is called "mistake". It turns out that this is a fairly popular direction of creativity.


Leaf and Flower Portraits by Justina Blakeney
Serious adult designers and artists also use flowers and leaves as materials for their creative works. Let's admire their works.


For a birthday or other family holiday, you and your child can make a family portrait-caricature of leaves and flowers. The result will be a fun and memorable craft!
Kathy Klein Flower and Leaf Crafts
Popular today, interest in images and coloring books - mandalas, kaleidoscopes with colored glass from childhood - perhaps Kathy Klein was inspired by some of them when creating her crafts from flowers and leaves.


Now you have no doubt that summer is a great time for crafts made from natural materials? And if you dry the flowers and leaves by collecting a herbarium, then for a whole year you can do creative work for school and kindergarten, organize children's contests and competitions, congratulate loved ones on the holiday with original cards or portraits, make anti-stress “mandalas” or kaleidoscopes!
Photos used from the sites: worldhobbies.ru, youloveit.ru, newfound.ru, 2301302.ru, toponogova.ru, vecherkom.com, artfulparent.com, green.jofo.ru, portalidei.ru, liveinternet.ru, moi-detki .blogspot.ru, greendom.net, dimchenko.ucoz.ru, boombob.ru, vashsad.ua, xallyava.ru, vashsad.ua, radostklub.ucoz.com, allwantsimg.com, chudo-sad.com.ua, liveinternet .ru, dddeti.ru, era2012.ru, babyblog.ru, searchmasterclass.net, s30893898787.mirtesen.ru, bestin.ua, foxyshazam.ru, dou70.ru, trozo.ru, liveinternet.ru, 3010203.ru, prigodina .vkrugudruzei, m.babyblog.ru, livemaster.ru, blog.i.ua, avivas.ru, subscription.ru, good-deeds.ua, portal-bliznetsy.ru, lolgirl.ru, m.goodhouse.ru, kleinburd .ru, triinochka.ru, livemaster.ru, numama.ru, blog.7ya.ru, postila.ru, maniaexpress.ru, forum.prihoz.ru, pictures11.ru, xvastunishka.mirtesen, bolshoyvopros.ru, by.livemaster .ru, penzamama.ru, nail-on.ru, baby.ru, cmlt.ru, klub-rukodeliya.ru, strana-sovetov.com, znaj-vse.ru, secrets-of-love.ru, trendinfo.biz , blogs.porti.ru
Olga Netrebina
The annual charity event will take place very soon" White flower"
We are preparing for this day All: both schoolchildren and preschoolers with parents, educators and teachers. And our Child Development Center did not ignore this action. After all, love for people, care and compassion must be instilled from early childhood.
I work with the youngest children, 1.5-2.5 years old. Therefore, parents of students take part in the action. They willingly responded to my request for help in making White flowers. However, some had to be taught the simplest and fastest way to do this crafts.
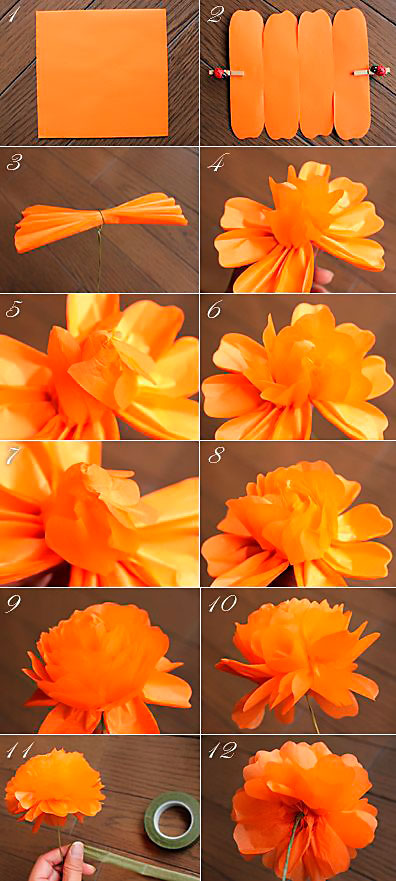
I present to your attention Master Class"Aster" from napkins.
For work we need: white paper napkins, scissors, stapler, wooden sticks, plasticine (you can color, glue.

Cut from napkins circle of desired diameter (about 10cm) and stack 12-16 layers of circles on top of each other.

We cut our circle from the edge to the center, not reaching the middle by about 1.5 cm. The more often you make cuts, the more petals Astra will have.

We fasten the layers of circles in the center with a stapler.

Now, we lift each layer up, giving volume to our flower.


When all the layers are fluffed, we begin to prepare the stem. To do this, string a plasticine ball, the size of a pea, white or yellow, onto a wooden stick from the blunt end. colors. It will serve as a retainer for flower from above.

The next step is to connect the stem and flower. To do this, insert the prepared stick with sharp ends into the top flower.


Now we wrap the stick napkins, having previously coated it with glue.

Glue the leaves of the desired shape and our Astra is ready!


Publications on the topic:
Every year in April, our kindergarten hosts the “White Flower” campaign. We are starting to prepare for the White Flower campaign in advance. We are writing.
Application with napkin balls “Polar Bear” Topic: Polar bears Purpose: familiarization with appliqué along the contour with napkin balls Educational area - artistic and aesthetic.
Among the usual bustle, we do not notice the beauty, we do not rejoice in the small miracles that surround us. Snow is a unique creation of nature. Kids.
On Thursday, September 3, 2015, teachers and parents of MBDOU kindergarten No. 33 in Belgorod took part in a charity fair. Which.
Festival of physical education and sports "Polar Bear" As part of the city festival of physical education and sports "Polar Bear", a small Winter Olympics was held in our kindergarten. Except.
Goals: To teach children to emotionally perceive and realize the figurative content of a poetic text. Objectives: To develop children's figurative speech.
Project “So White and Insidious” Project type: Dominant method: cognitive - research. Content: short-term (3 weeks). Object of study:.
On the theme "Spring" for kindergarten. We searched the entire Internet and found 20 unconventional, but at the same time simple spring crafts that children can make with their own hands.
It’s not just kindergarten that needs ideas for spring-themed crafts. Children who do not go to kindergarten also love to craft, and they will probably be interested in making something new and unusual with their own hands, for example, a spring cloud, a voluminous paper rainbow, or
Many of these crafts can be a wonderful gift for your mother or grandmother on March 8, 2019 or Mother's Day. After all, there is nothing more enjoyable than a craft that a child makes with his own hands with the thought of how happy his mother or grandmother will be. Needless to say, some of us even wear them on the street to show off what a wonderful gift the child gave.
20 ideas for crafts on the theme "Spring" for kindergarten
Hurray, the snow is over. And we have three months of rain, thunderstorms, colorful rainbows and magnificent flowers ahead of us. This is what we will display in crafts on the theme “Spring”, which children will make with their own hands in kindergarten.
First, we suggest you make a cloud with rainbow rain. The execution and details depend on your imagination and the age characteristics of the children. For example, ask younger children to make a cloud with rain from ribbons (thinner or thicker), but in the older group you can try making voluminous drops from colored paper.
.jpg)

Here are a few ideas with a voluminous rainbow made of multi-colored paper for a craft on the theme “Spring”. Instructions on how to make them are in the photo.


A simple craft for children, even children from the younger group can do it with their own hands, provided that the teachers prepare the preparations in advance.
.jpg)
You can make such a bouquet of paper hyacinths with your own hands as a gift to your mother on March 8 or Mother’s Day.

Spring craft for the junior and middle groups of kindergarten - flowers made from ribbons, paper and ice cream sticks. Instead of textile ribbons, you can use paper serpentine that was left over after the New Year.


Everything is simple here: cut out hearts from colored paper (three for a flower, one for a leaf), pierce a hole in the middle of each of them and string them onto a drinking straw. Voila, and the “Spring” themed craft is ready. All that remains is to bring more straws to the kindergarten.


For this craft, you first need to draw and cut out flowers from paper. Then we fold a fan out of green paper and glue the prepared flowers onto it.

And perhaps even kids from the nursery group can handle such flowers made from wooden sticks. They just need a little help with the glue.

We will cover the topic of paper flowers with origami. Follow the link to find a diagram of origami tulips.

When the children are tired of creating, get dirty from head to toe with glue and cut with scissors even what was not allowed to be cut, invite them to draw spring flowers. Here are some examples of simple drawings, but dandelions and hyacinths need to be drawn with your fingers. If you wish, you can turn these drawings into appliques by cutting out some elements for them from colored paper.


And finally - a spring tree with birds that have returned from warmer climes. The tree trunk is a cardboard tube from toilet paper or paper towels. We cut out the crown, leaves and birds from colored cardboard, and “sculpt” nests and flowers from corrugated paper, crumpling it.

Now you have a ton of ideas for crafts on the theme "Spring" in kindergarten that any child can handle. Good luck and inspiration!


