A beautifully set and decorated table always pleases the eye and stimulates the appetite. But serving children's table must be special - welcome here a large number of bright colors, as well as the use of a variety of hand-made elements. This is exactly what a paper napkin candy bowl is, which anyone can make by following the proposed step-by-step master class.
To work, you will need a paper napkin, the size of which will determine the size of the candy bowl, as well as a glass.
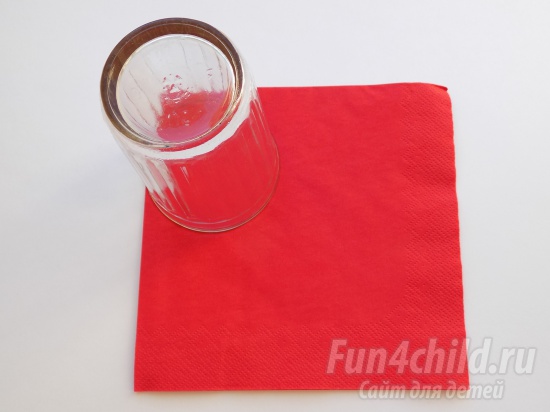
First, let's completely unfold our napkin and begin to bend all its corners towards the center. As a result, the blank of the future candy bowl takes the shape of a square.

We repeat the same steps (bend the corners towards the center), our square has become smaller.


Let's do the same thing again.

Now the blank of the future candy bowl needs to be turned over to the other side.
Again, bend all the corners towards the center. As a result of all these actions, our square has become even smaller and denser.

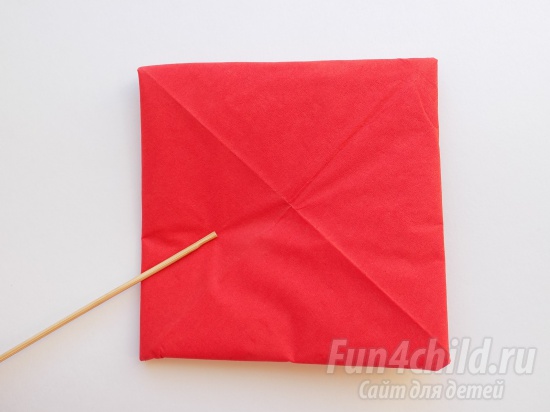
Now let’s proceed directly to the formation of the candy bowl. To do this, turn our workpiece over and place it at the bottom of the glass. This is what we will need to form the walls of the candy dish. To do this, take the very top corners and carefully pull them down.

Then we take the next corners and straighten them in the same way. Finally, you need to bend the last 4 corners down. This is how we formed the bottom of our candy bowl and its walls.

Remove the craft from the glass, the paper napkin candy bowl is ready.
A technique called “decoupage” is becoming more and more popular. Of course, decorating objects in this way takes a long time, but it is interesting and not so expensive. Usually most of materials are at hand, and only a few of them need to be purchased in a special store for needlewomen. From this article you will learn many ways to decoupage glass vases, and also learn how to make a vase from napkins with your own hands.
Making a vase from napkins
As a gift, you can safely give a vase of napkins with your own hands - such a piece of furniture can always fit harmoniously into the room.
To start making such a candy bowl, you need to stock up on everything you need:
- Lacy napkin.
- Starch paste.
- Three-liter jar or bowl.
In order to make a vase from napkins with your own hands, you must adhere to the following algorithm:
- Wrap the prepared container cling film.
- Prepare starch paste. To do this, you need to mix 2 tablespoons of starch in cold water, then pour this liquid into a glass very hot water and stir.
Important! If the composition is very thick, dilute it with water.
- Place the napkin in the cooled starch, then remove and squeeze out the excess.
- Place the napkin on an inverted bowl and wait for it to dry.
Decoupage a vase using napkins
It would seem that you can make a original gift, and almost without spending money? Very simple.
Method 1
For subsequent work, stock up on the following materials:
- Smooth glass flower vase.
- Napkins with beautiful patterns.
- Sharp scissors.
Important! The word “sharp” is very important here, since napkins are a very thin and capricious material. If you manipulate it with dull scissors, it can tear and ruin the whole look.
- Acrylic paints.
- Decoupage glue or PVA glue.
- Brushes of different sizes.
Below is a detailed algorithm for how to decorate a vase with napkins:
- Prepare the vase - remove dirt, degrease it, wipe it with acetone or a liquid used to wash glass.
- Cover the base with prepared white acrylic paint. Cover the places where the ornament will be with thicker paint.
Important! Should be given Special attention the top and bottom of the vase.
- Dry the vase, leaving it in this position for about 4 hours.
- Carefully cut out the design from the napkin.
- Once the vase is completely dry, glue the floral design onto it.
Important! A perfectly even layout of the design can be ensured by making small cuts on it immediately after it is cut out.
- Next, decorating the decoupage of the vase with your own hands will not be so difficult. You can use anything as decoration - threads, rhinestones, decorative beads.
Method 2
For the next master class we will need the following items:
- Smooth glass vase.
- Decoupage soil.
- Acrylic paint.
- Tassels.
- Napkins with ornaments.
- Sponge.
- Sharp scissors.
- Decoupage glue or PVA.
Decoration process:
- Remove dirt and degrease the vase.
- Mix decoupage primer with acrylic paint (you can choose the color yourself) in a separate container.
Important! If the mixture turns out to be too thick, you can add a little water, otherwise, decoupaging a vase from napkins with your own hands will ultimately not be as beautiful as expected.
- Cut a small piece from a regular dishwashing sponge, soak it in the colored primer, then apply the mixture onto the vase with very light pressing movements.
- Wait for the soil to dry. It will take several hours
- Cut out a suitable ornament from a decoupage or regular napkin.
- Get rid of the lower layers, leaving only the top one.
- Prepare a document file, sprinkle it with water, and place the cut-out design face down.
Important! On the file, the drawing is perfectly aligned; no noticeable ugly folds will be visible.
- When the paper is completely saturated with water, drain off the excess water.
- Carefully lift the file and place a damp cloth on the vase. The napkin should stick to the vessel.
- Decorate the vase with your own hands with decoupage drawings in other places, if this is intended.
Important! Don't be afraid to correct the drawing with your fingers if necessary.
- Wait until the paper drawing dries a little.
- Go over the ornament with a brush moistened with a solution of PVA glue and water. Direction - from the center to the edges.
- The edges of the drawings can be painted with the same color as the vase was painted using primer. This way the transition will be as smooth as possible.
- Dry the vessel thoroughly, then coat it with three layers of varnish.
Egg decoupage
In order to decorate a vase with your own hands in a completely new way, you will need the following materials:
- Glass vase.
- Eggshell without film.
- Glue.
- Wide, flat brush.
- Decoupage napkin.
- Toothpick.
- Light brown acrylic paint.
The decorating process is very painstaking:
- Crush the white eggshells with your fingers.
- Apply glue to the entire surface of the bottle, except for the bottom.
- Glue the shell onto the bottle, pressing it down a little, using a toothpick with a moistened tip. This way you need to cover the entire bottle.
- After the product has completely dried, coat it with white acrylic paint.
- Choose the right tone brown paint and decorate the vase with your own hands by blotting the composition with a sponge and applying the dye to the vessel.
- Wipe the vessel with a rag after each layer of brown paint - this is necessary in order to give the surface greater relief.
- Next, if desired, you can decorate the surface using a decoupage napkin, as described in previous master classes.
- Finally, the vase is coated with several layers of varnish and allowed to dry.
Decoupage floor vase
Have you started a renovation and now the old floor vase doesn’t fit into the interior? It's not a problem. You can always decorate a vase with your own hands - decoupage is a great idea for this. It is worth noting that this decoupage technique differs from the previous two methods.
For work you will need the following materials:
- Old floor vase. Its color can be absolutely any.
- Decoupage soil.
- Fabric that matches the color of the ground.
- Eggshell without film.
- Glue.
- Wide brush.
- Decoupage napkin if desired.
Now let's move on to the procedure itself, in which we will decorate the vase with our own hands using decoupage. To do this you need to do the following:
In this article we have offered you several ideas on how to decorate a vase with your own hands. We hope you are satisfied with the result of the work done, and are now ready to take a creative approach to furniture decor.
Irina Averina
I bring to your attention the production candy bowls. To begin with, I did it myself. The girl showed them they liked it. We figured out what we could use it for. Many ideas arose, some of them them: game "Shop" to lay out candies and put it on display in the store. For a gift to your friends.
When we started making it and our boys became interested, they liked it (the process itself).
That's how we got this one candy bowl.
My master class is shown.
For work we need:
Paper napkin, good mood.

unfold napkin and begin to bend each corner towards the center napkins.


After this, we bend all four corners to the center again.


This is the part we got, bend all four corners again, we succeeded in bending the corners to the center three times.
After this, we turn the part over and bend all four corners to the center again.

To make it more convenient to perform next action, I used a small glass (upside down) Place our part on the bottom of this glass and bend the corners. You need to bend it carefully so as not to tear it. napkin. Children need help.

After this, bend the corners again.

Once again

Turn it over and place the vase on the table.

Publications on the topic:
Hello, dear colleagues! I suggest you and your children make such interesting flowers. This is a wonderful decoration for the interior. Materials.
Greetings to all guests who visited my page! It's no secret that all women have a sweet tooth. Let's make a candy bowl together as a gift. For.
Hello, dear colleagues! It is pleasant to note that even in such a remote place as ours you can get acquainted with the best practices of preschool institutions.
H4]We will need: napkins of different colors; threads to match the color of the napkins and of course patience! 1. We fold the napkins in two pieces - one.
Master class “Christmas tree made from napkins”. For master class unusual Christmas tree For napkins I will need: Whatman paper, napkins of two colors (dark.
I would like to offer you a master class on making an unusual painting. For work we will need: - Napkins selected by color.
Master class “Doll from napkins” For the Maslenitsa holiday, you can make a ritual doll from paper napkins. For the manufacture of.
Beautiful flowers made from paper napkins with your own hands.
Simple paper napkins provide amazing creativity for creativity.
Handmade crafts serve as wonderful decorations for home and office interiors and table settings.
Such affordable material is very often used to decorate festive events.
DIY napkin flowers for beginners: diagrams, templates, photos
The humble carnation Fluffy dandelion
 Bright aster
 Delicate poinsettia
 Yellow peony
 Flowers for topiary from napkins: diagrams, templates, photos
 The original way making wood blanks
 Using the proposed patterns for making flowers, you can create wonderful trees of happiness.

 European tree made from ordinary napkins
 Tree of happiness made from napkin decorations
 Video: DIY napkin topiary
How to make flowers from napkins for volumetric figures?
To make a figure, 50 cm high, 30 x 10 cm wide, you will need:
- Napkins - 270 pcs.
- Glue - 3 small medium-sized tubes
- Cardboard or cardboard box
- Scissors
- Medium width tape
- Stapler
Let's get started:
- Using scissors, we make blanks in the shape of the desired number. In our example, this is one
- Glue all the parts together with tape
 The basis for an unusual gift decoration
 - Mask the cardboard with napkins, fixing them with glue
- While the blank dries, we make flowers
- Fold the napkin in half twice
- We fasten the center with a stapler
- Cutting out a circle
- We lift each petal up, forming a flower
- We do not touch the bottom leaf; in the future, we will use it to attach the flower to the base.
- We prepare 250-270 flowers

 Next preparatory stage
 - Paste over our number
- It turns out very impressive if you use napkins of different colors

 This is how beautiful it turns out
 Volumetric flowers made from napkins - origami
Doing everything clearly according to the scheme proposed below, you get a very unusual and beautiful flower. The main advantage of which is that its production does not require much experience and labor-intensive cutting.

 Using the ancient art of paper folding to make beautiful jewelry
 Lotus flower made from napkins
Necessary materials:
- Green napkins - 8 pcs (33/33 cm)
- Regular white - 24 pcs.
- Yellow - one 33/33 cm
Manufacturing process:
- Fold the factory napkin, without unfolding, into a triangle
- Bend the corners of the triangle from the top down

 1 step
  It will look like this
 - We wrap the resulting tails from the back side up
 Step 2
 - Fold in half outwards. The first base for the leaf is ready
- We make eight such blanks

 Step 3
 - Using a stapler, we connect the formed greens
 Step 4
 The green base is ready.
- To make flower petals, we make 24 leaves from a white napkin in a similar way.
- Place 3 rows of white petals on top of the green base

 Step 5
 - Add, for brightness, yellow stamens twisted diagonally

 Step 6
 - If desired, you can modify the flower by folding several yellow napkins in half and then twisting them diagonally

Large flower made from napkins
Fluffy flowers are indispensable when decorating banquet tables and festive rooms. You can create any composition by learning how to make this simple decor.
- Fold a single-layer white napkin into a small accordion. The smaller the step, the more voluminous the flower will be.

 Carefully make folds
 - Fold it in half. We form triangles at the ends using scissors
 Cut with a corner
 - We get a blank for the central part of the decoration
 We get a jagged fence
 - We do similar manipulations with a red napkin, only we round the edges


 Duplicate all actions
 - We connect both blanks, as shown in the figure.

 Combining colorful napkins
 - We fasten with thread in the middle

 We fix
 - Lift the petals gently up
- In this way we prepare the required number of flowers of different colors.
 Straightening the layers
 - We put the resulting lush flowers into the chosen composition

 Beautiful decor from lush floral preparations
 Flowers napkin applique
A great opportunity to spend your leisure time together with children aged 4–5 years by making this simple work.
Auxiliary material:
- Napkins - blue
- Cardboard - white and colored
- Paper - green
- Brush
- Scissors
- Pencil
Progress:
- Cut wide strips of blue napkins and roll them into lumps
- Take white cardboard and draw bells on it
- We cut out the flowers and glue balls formed from napkins onto them.
- Draw a twig and leaves on green paper
- Cut it out
- On yellow cardboard or thick paper we glue one by one: sepals, flowers, twig, leaves

 Handmade bells
 DIY poinsettia flower from napkins
 The best New Year's gift
 A very elegant and festive flower. It is one of the most popular New Year and Christmas decorations.
Necessary materials:
- Pink and green napkins
- Pieces of white napkin
- A little gold paint
- Scissors
Let's get started:
- Draw on napkins:
- from Pink colour- 1 small and 2 medium flowers
- from green - 1 medium
- Cut it out

 Making blanks
 - Round petals are slightly trimmed into a triangular shape.

 Forming the natural shape of the petals
 - We cut the green blanks into:
- 2 leaves with two petals
- 1 single

 Divide the green base into separate leaves
 - Glue the flowers together, moving the petals together, leaving no space
- First two medium sized pink flowers, then a small pink one
- We twist stamens from small pieces of white napkin
- Cover them with golden paint
- Fix with glue in the center of the flower
- Glue green leaves to the underside of the flower
 Put everything together, securing with glue
 - Beautiful New Year flower is ready
 Poinsettia from napkins
 DIY flowers made from sweets and napkins
We prepare in advance:
- Round chocolates - 5-7 pcs.
- Several pieces of green and yellow napkins
- Toothpicks - 5-7 pcs.
- Scotch tape narrow
- A piece of polyethylene or cling film
- Scissors
- Plastic glass or any jar for a stand
- A beautiful thin ribbon
Step-by-step instruction:
- Wrap the candy in cling film to create a curled tail.
- Secure the toothpick with tape to the twisted polyethylene

 Packing sweets
 - Cut a napkin folded in four into the same size - 6 by 4 cm
- We twist each piece in the center
- We connect the resulting halves to each other
- We get such a petal

 Forming a yellow petal
 - Wrap the bud with a petal
- We secure it with tape

 Connecting to the base
 - We cut the green napkin into 4 parts, each of which we cut into 2 more parts.
- We cut deeply and twist the tails, as shown in the example.
 Sepals
 - We wrap the finished sepals around the flower

 Delicate, barely opened buds
 - We cover a plastic glass with yellow napkins
- Stuff it with foam
 Vase for a bouquet
 - Crumble green napkins into wide “noodles” and stick them onto foam plastic

 Extra greens for garnish
 - Decorate the glass with a bow

 Candy bouquet
 How to fold a flower from a napkin onto a table with your own hands?
A very simple option for folding a napkin, used when setting the table:
- We close the unfolded napkin so that its two sides meet in the central vertical line
- Make folds on both sides of the horizontal strip dividing the napkin in half.
- We get two even folds in the center of the form

 Decorate the table with flowers from napkins
 - Next, we form an accordion in the direction of the resulting folds
- Carefully press through the folds
- We take the center of the resulting “butterfly” shape with our fingers, fold it into triangles, in the opposite direction from the formed fold of the triangular side
- Unfolding the finished serving flower

 Ideal for serving
 Flowers from napkins - roses
A very simple option for making roses, for the subsequent formation of various compositions.
- We do it very carefully, using the suggested diagram below
- We collect ready-made roses into a bouquet or topinary
 Making a bouquet of ready-made flowers
 - After making many small roses from napkins, place them in a large vase. This will serve as a wonderful decoration for the holiday table.
 Beautiful decoration with a napkin rose
 Flowers from napkins in pots
Necessary materials:
- Simple napkins
- Ordinary balloon
- Paste
- Scissors
- Stapler
- Cut plastic bottle or flower pot
Let's get started:
- Inflate the balloon to the desired size. It must be suitable in volume for the pot in which it will be located.
- I paste napkins on it, leaving only the tail

 The ball should be the size of the pot
 - While the ball is drying we make flowers
- We fold two standard napkins on top of each other and fasten them in the center with a stapler.
- We give the workpiece a round shape using scissors.
- We make about 30 such templates
- We form flowers by lifting each layer up to the center

 For greater pomp, make cuts along the edges of the mold.
 To brighten the composition, add multi-colored napkins
 - We proceed to pasting the dried ball with ready-made flowers.
- Apply very tightly, add green napkins in between
- Place the colorful ball in the pot
- Decorate with a bow

 Volumetric composition in a pot
 Flowers made from viscose napkins
- Let's start with manufacturing cardboard forms in the form of petals length: five, four, three centimeters
 Cardboard blanks
 - Transfer the templates to a viscose napkin
- Cut out pink fabric: 7 large and 7 medium petals, one circle measuring 4 cm
- We make 7 small petals from pale pink viscose

 Viscose petals
 - Pour glue onto the wide base of the large petal
- Fold the petal inward


- We attach all seven large petals to a round pink base using glue
 Distribute evenly
 - Add a row of middle petals
- We finish with a row of pale blanks, placing them between the petals of the previous layer
 The main part of the future accessory
 - From a strip of light pink napkin (2 by 8 cm) we form a core
- To do this, fold the strip in half
- Making cuts along the fold
- Gradually twist

 Make the strip the size of the desired core width
  We get this core
 - For greater expressiveness, we make a bright pink border from a strip of 2 by 8 cm, formed as in the first case
 Central part of the flower
 - We fix the resulting shape in the center of the petal blank
- A wonderful accessory is ready

 Viscose wardrobe accessory
 Flowers made from openwork paper napkins
The openwork napkins themselves are very beautiful. Using the proposed schemes you can get very original decorative elements.
 Delicate pink bouquet for gift decoration
 Yellow rose for a beautiful table setting
 You can fold napkins in an original way in just a few minutes. And decorations made with their help look very impressive.
Video: How to make beautiful flowers from paper napkins with your own hands?


