Every mother tries to protect her child from all kinds of worries and adversity. As the child grows up, this becomes more difficult. And when he is little, he is ready to accept all the affection and care for himself. For a sound sleep, your baby needs a blanket. Only after warming up does he relax and calmly fall asleep. A wonderful blanket can be substituted for a blanket, which any mother who passionately loves her child can knit.
Crochet baby blanket
A children's blanket knitted with your own hands, even using the most expensive threads, will be much cheaper than the purchased product. For knitting you can use a crochet hook or knitting needles. It depends on the pattern you choose. It is most reliable to knit a product that has a step-by-step description and diagram.
Functions of a knitted baby blanket

If a child appears in the house, a blanket is one of the main things that should be there. A white, pink or blue blanket will definitely be needed when the child is taken from the hospital. In the future, you can use it, or you can knit a product of a larger size, because the child is growing.

Depending on the time of year, different threads are used for knitting it, be it a hook or knitting needles. Patterns are also selected depending on the thickness of the threads and the season for which the bedspread is being prepared.

It’s good when there are two blankets in your arsenal of children’s clothes – one for home and the other for the street. It is useful both for a crib in an apartment and for a stroller outside. In cool weather it is simply irreplaceable. It is advisable to knit items from threads of different thicknesses using a motif. Then the blankets can be used in different weather conditions.
Advantages of a knitted product
A product that you can knit for a child with your own hands is much warmer than a purchased analogue. The same can be said about the blanket. Watch crocheted baby blankets video.

Knitting is considered simple and calming activity. Over time, when the drawing is already familiar, the work moves faster. Difficulties arise when you need to knit complex patterns. If you need a simple knitting pattern, then you can do the work only with single crochets or single crochets. A bedspread knitted with such a simple pattern can be decorated with crocheted toys, various animals, for example, bears or other children's decor.
Below are diagrams and descriptions for the products. The main thing about them is that you can knit any product to the length and width that you need.
Crocheting a simple baby blanket
For knitting, alternating double crochets and air loops are used. The finished fabric looks like a mesh through which you can thread threads of different colors. The result is a beautiful and elegant product.

You can also try knit a similar product, but complicate the process itself a little. To do this, colored threads are not threaded into the mesh, but tied. So let's get started. The first row of the mesh is knitted with the main thread, for the second row colored yarn is used and you need to knit a row with single crochets. Where the threads join, there is no need to trim the ends, but rather, leave them longer so that you can tie a tassel later. The entire blanket is knitted in this sequence, up to a certain length.

The good thing about the option using two colors is that the product can be knitted from leftover yarn. The tassels on the product can be made either single-color or colored.
The finished product turns out very beautiful, and its density directly depends on the thickness of the threads.
Knitting in the round
This product has a square shape because knit in the round from the middle. It can have different sizes, depending on the age of the child and your preferences. For a children's blanket, you can use both single-color threads and multi-colored ones. The finished product, knitted from threads with a gradient effect, looks beautiful. You can independently choose bright threads for such a product, there is only one motive.

The heart is knitted from the middle, in the round.

The work begins with five air loops connected in a circle. The second row is knitted with double crochets, and two air loops are knitted at future corners. The next row consists of simple stitches above each loop, and in the corners they must be knitted from two air loops of the previous row - three.

The next row is more difficult than the previous ones. To lift, three chain stitches are cast on, then three double crochets are knitted from three stitches and joined together. Next are two air loops and the same combination. To decorate the corner: two air loops, three double crochets, connected together from one column of the previous row, three air loops and again three double crochets from one loop, connected together.

Such a blanket can be knitted from thick threads and placed on the floor so that the baby can play comfortably on the floor.

Openwork
This product can be knitted as a gift for a newborn. You need to choose high-quality and soft threads for children's knitting. The beginning of work is a chain of air loops, in the amount of one hundred and ninety-six.

The finished product is tied with single crochets, and the next two rows with double crochets, not forgetting to make five stitches in one loop in the corners.
According to the pattern, the product is knitted to the desired length.
- row: all air loops.
- row: five chain stitches are knitted, and a single crochet is secured into the fourth.
- row: nine double crochets in one resulting cell, and a single crochet in the next cell, in the middle.
- row: above nine double crochets, seven double crochets are knitted, between which you need to knit a chain loop.
- row: three chain stitches and a single crochet - this is how you need to knit over seven double crochets. The pattern should be repeated five times over the seven stitches of the previous row.
- row: like the second.
You can decorate the finished blanket with an airy ribbon. For it you need to knit the following row: three single crochets, three air loops, a base through three loops, etc. The roundings are knitted according to the second pattern.

To the finished product thread the ribbon- the new thing turned out. Every mother loves the happy smile on her child's face when he sleeps under such a blanket.
Blanket made of crocheted motifs size 125x125
The description corresponds to the finished product, the dimensions of which are 125x125 cm. You will only need one hundred squares, knitted from yarn of different colors. The total weight of the yarn must be at least 1.5 kg. But all these indicators will depend on the thickness of the threads; the motif may vary in size.

Such a product can be tied, decorated with a ribbon or daisies tied separately (if the blanket is intended for a girl).
Let's get started.
- Knit one square for the sample. Measure its dimensions, calculate how many squares are needed for a blanket of this size. Start making.
- Using different colors of yarn of the same thickness, knit the required number of squares.
- Connect them together using a needle or hook to create a single piece of fabric. You can use a contrasting thread if you are sure that the seam will be beautiful.
Conclusion
Some knitting patterns examined in more detail will help you make a unique product for your baby. Choose the most suitable option for you and get creative. Create comfort and warmth for your baby. When leaving the maternity hospital, it is customary to pick up the baby in a white blanket when leaving the hospital. The decoration can be a pink or blue ribbon, for a girl or a boy.
A baby blanket is a functional and irreplaceable thing in a family with a newborn. This blanket will be useful at home in a crib, in a stroller on the street, at discharge or at a clinic appointment. And when the baby grows out of the blanket, you can use the product as a play mat. If your mother or grandmother has mastered knitting, then you can try making a blanket with your own hands using a crochet hook.
Children's blankets made from motifs
Beautiful and unusual models are obtained from motifs (squares). In addition, it is difficult for beginners to crochet a large, bulky item; it is much easier to make several small motifs and combine them into a single fabric.
Blanket for a newborn using the Granny Square technique
The good thing about this product is that it is not necessary to buy many skeins of new yarn; you can use the balls that are left over from previous projects. The more different colors, the brighter and more interesting the model will be.
Such a beautiful and bright blanket will decorate any nursery.
Materials
- Threads of different colors, but of the same thickness and fiber structure - 1800 g (for a blanket with dimensions 110 cm x 130 cm). For a newborn, you can make a smaller model, but it’s better to work hard and knit a blanket “for growth” so that it will last the baby more than one year.
- Crochet hook No. 3.5-4.
- Sewing needle, scissors.
How to knit "Granny Square"
Knitting patterns can be used in different ways, but for beginners it is better to choose simple motifs that will definitely not cause difficulties.

Scheme "Granny Square"
Description
Work begins with an air loop (you will need 4 of them).


The next row is knitted from 5 tbsp. double crochet +2 tbsp. double crochet loop of the first row + 2 air. loops + 2 tbsp. with a double crochet in the second air. loop + 2 double crochets. We knit the combination 4 times.


To join the knitting and make the seam invisible, you need to use a sewing needle.

The first square is ready.

All subsequent squares are knitted in exactly the same way. For a blanket measuring 110 cm x 130 cm you will need 221 pieces.

To connect the squares together, use this method:
When all the blanks are sewn together, the blanket can be considered ready.

This is such a fun blanket for a baby
For knitting, you can also use this simple pattern:

Grandmother's square (option 2)
Using this scheme, you get the following squares:

Crocheted children's multi-colored blanket from squares
The pattern is even easier to knit than from the “Granny Square” motifs. No diagram required. Squares of the required size are simply knitted with single crochets. For a blanket measuring 125 cm x 125 cm you will need 100 pieces. squares with a side of 12.5 cm.

Another bright blanket option for a baby
Materials
- Various yarns – 1500 g.
- Hook No. 4.
Note: If the yarn is not uniform in thickness, then you need to focus on the length and width of the square; the number of loops may be different. Also, the hook number may be different for thin and thick yarn.
Description
- First the squares are knitted. The quantity can be as in the master class; if you need a larger or smaller blanket, then the number of motifs changes.
- Then you need to connect the squares together with a hook or needle in any usual way.

In this case, this method of crocheting squares was used:
The blanket is ready!

Such a colorful thing is perfect as a gift not only for the birth of a baby, but also for older children
An original blanket for a newborn using the woven fabric technique
The size of the blanket can be varied by adding squares or changing the width and height of the motif.

A stunningly beautiful thing for a little princess that can be crocheted
Materials
- Yarn of different colors, but the same structure - 1500 g.
- Hook No. 3.
- Hook No. 6.5-7.
- Sewing needle.
Description
1. The basis of the product is 9 or more squares, which are knitted with a “loin mesh” pattern. The pattern is simple and is done with double crochets, alternating with air loops. At the beginning of each row, 3 air movements are made. lifting loops. You will need to knit 9 squares with a width of 40 cm for a product with dimensions of approximately 125 cm x 125 cm.

The basis of the work is squares from “loin mesh”
2. To imitate a woven fabric, you will need to pass threads or cords knitted from air through the holes in the base of a contrasting color. loops The length of the cords depends on the chosen pattern; it is better to measure the pattern in advance, pinning the cords with pins.

Outlining the future drawing
3. When making a design, the beginning of the thread or cord must be secured with a sewing needle.

It is better to secure the cord with threads in the color of the base.
4. It is convenient to pass the cord using a large crochet hook. The end of the cord is also secured with a needle.

Decorating a mesh square with cord
5. This is how you need to decorate all the squares. It’s better to choose a different pattern – it will be more interesting. The colors of the cords should be bright.

Ready-made “woven” motif (option 1)

Option 2

Option 3
6. Finished squares can be connected in any way, for example, with connecting posts.
7. To make the blanket look elegant, it is good to tie it with a “shell” pattern. The tying begins from the corner of the fabric (single crochet, three loops are skipped, from 4 loops there are eight stitches with two crochets, the pattern is repeated the required number of times).

The baby blanket is ready! For a boy, it is better to choose cool colors for decorative cords.
Openwork knitted blanket for a newborn
Making such a blanket will require great skill from the needlewoman, but the result will exceed all expectations. Yarn calculations are given for a blanket with dimensions of 92 cm x 114 cm.

2. Now you need to add a border to the main fabric where the ribbon will be threaded. The border is made according to the following description:
3. When the main fabric with the border for the decorative ribbon is ready, you can start tying. The binding will be done according to the pattern in the form of beautiful fans, so that the pattern echoes the motif of the main knitting. There should be 7 fans in length and 6 in width, plus one fan in the corners.
4. A ribbon is inserted into the holes of the border; a neat bow can be tied on one of the corners.

A beautiful blanket is ready for discharge!
You can knit an original children's blanket not only with crochet, but also with knitting needles. .
Every child always wants to bury himself in a soft blanket on quiet evenings so that nothing can disturb him. But you must agree that a blanket knitted by your mother with love and warmth will be much better than a blanket bought in a store, especially since it will be much more expensive. Below is a step-by-step master class on a crocheted children's warm blanket, and a diagram and description will help you quickly master the technique.
Beginner craftswoman and don’t know how to knit? No problem! In today's material you will learn how to easily make different types of blankets; patterns for children's cozy blankets will help you master the crochet technique much faster.
Crochet striped children's blanket according to patterns and descriptions
Blanket size: 80 by 97 cm.
For the blanket you will need: polyacrylic yarn SMS Bravo Baby blue (2 skeins of 50 g (184 m) and white (2 skeins of 50 g (184 m), hook No. 3. For a girl, blue yarn can be replaced, for example, with pink .
Sequence of alternating colors: * 3 rows blue, 1 row white, 1 row blue, 3 rows white, 1 row blue, 1 row white, then repeat from *.
The main pattern is knitted according to the pattern. Row 1 is repeated.
Description of how a crocheted blanket works: with blue thread you need to make a chain of 187 chain stitches + 3 chain stitches, then knit the main pattern in the specified sequence according to the pattern.

This is how a single crochet stitch is knitted (1 tbsp. s/n).

After 97 cm = 103 rows from the cast-on edge, the work can be completed.
Source: “Lena Creative” magazine No. 2 2016.
The best of the best product options
Blue baby blanket
To knit this blanket you will need 4 skeins of cotton or acrylic thread (382m/100g) and a hook No. 3.5 (4).
Blanket dimensions: 92*92 cm.
You need to cast on a chain of 206 chain stitches. In the second air loop you need to knit a single crochet and continue according to the pattern until the length of the blanket reaches 86-87 cm. The tying is done with double crochets.
Scheme:

"Like a cloud"
It is better to take white yarn "Naco Bambino" acrylic/wool - 75/25 (skein - 130m 50g), hook number 2. Consumption for a blanket measuring approximately 1m by 1m: 1,250 kg.

Scheme:

"Angel wings"
Knitted from soft silky yarn “Maigik” with a 3.5 crochet hook.


Blanket knitting patterns:


Thumbelina blanket
Jeans yarn from YarnArt (55% cotton, 45% polyacrylic, 50 g/160 m), pale pink color. A blanket measuring 90*90 cm takes 9 skeins. Hook 1.75.

Scheme:

"Tenderer than tender"
Alize Diva yarn (100% acrylic microfiber, 100 g/350 m) – light silky yarn, pleasant to the touch, hygroscopic, white color, 6 skeins. Hook 1.75 Clover. The size of the finished blanket is 90*90 cm.

Scheme:

Video on crocheting baby blankets:
Working with motifs in crocheting a baby blanket
A warm children's soft blanket, knitted from motifs, will be the most tender and pleasant gift for a baby.

It will take a couple of evenings to make a children's blanket from motifs. Despite its size, approximately 1 m * 1 m, this blanket of motifs is knitted quickly and easily. This work will be suitable for both experienced knitters and beginners in knitting. Below is a step-by-step master class “Crochet baby blanket”, a diagram and description will help you quickly master the technique.
The material that will be needed in the master class on creating a children's blanket, namely a pattern of motifs: yarn (you can use leftovers) - acrylic, half-wool, wool. In 100 g no more than 240 m; hook - 4.5, scissors, needle, thread for connecting motifs.

Abbreviations:
- Вп – air loop;
- Sc – single crochet;
- С1н – double crochet.
When crocheting a baby blanket, you need to knit loosely, as the edges and tops of the blanket may end up skewed. The blanket consists of two parts. The first is the inner part of the motifs (4 square motifs), the second part is the crocheting of the motifs. Each of the four motifs is knitted according to pattern 1.

A square motif is knitted. You need to put a chain of 5 chains on your hook.

The chain is closed with a half-column and 2 ch are knitted.

You need to yarn over the hook and knit 1h into the ring of the chain. 2 such columns are knitted.


Another 3 stitches are knitted.

Work 3 ch again. This will be the second vertex of the square element.

Then another 3 dc and 3 ch for the third top of the square.

In this first row of dc you need to knit a total of 12 dc. So, let's knit the last 3 dc and 3 ch.

A half-column closes the beginning and end of the row.

To switch to knitting the second row in a square motif, you need to make 4 ch.

Under the chain of 3 ch of the previous row we knit 3 dc.


We knit 1 ch and in the next chain of 3 ch of the previous row we knit 3 s1n.

3 ch and another 3 dc are collected under the second chain of ch.

Using the same principle that two vertices were knitted, the third vertex of the square element is also knitted.

The fourth top should be connected like this: 3 s1n, 3 ch, 2 s1n. In this case, the third column with 1n will be the air loops at the beginning of the row.

Pull the thread under the ch chain.

Pull one loop through the other to secure the thread.

The inner part of the square element for the children's blanket from the motif is ready. The gray thread is cut. The yellow thread is crocheted, and a chain of 3 ch is knitted under any one of the ch of the previous row.

Under the same 1 ch, 2 sc are knitted.

We knit 1 ch, and at the top we knit 3 s1n and 3 ch.

Under the same 3 ch of the previous row, another 3 dc are knitted. This will be the newly formed top of the square.

We knit 1 ch and 3 s1n under 1 ch of the previous row.

Next, the second peak, the third and the fourth are formed.


To move to the second row of yellow yarn, cast on 4 ch.

3 s1n are knitted into 1 ch of the previous row.

Finish the row with yellow yarn, forming all 4 vertices and connecting the row with a connecting half stitch.

The yellow thread is cut and secured. A green thread is pulled up and 2 rows are knitted.


By analogy with how the first motif was knitted, you need to knit 3 more of these. Total 4 square motifs.

Sew 2 finished motifs along the edge, folding them right sides inward. So you need to sew all 4 motifs.


When the motifs are sewn, we proceed to the binding. We connect the yellow thread under any of the chs of the previous row and knit according to the same principle as we crocheted small square motifs for a children's blanket.

Where the seam passes between the two motifs, 3 dc are knitted.

You can make the top of a children's blanket using crochet motifs following pattern 1 (the same as the top of the motifs).

We tie the stitched motifs with one row of yellow yarn.

We hook up the light pink yarn and knit the next row. You need 5 of these nearby.


A blue thread is knitted and 1 row is created.

Again 2 rows with light pink yarn.

And 2 more rows of light green yarn.

Repeat knitting with 2 more rows of pink and yellow yarn.


A row of sc is knitted around the perimeter of the blanket. At the tops, 8 sc are knitted under a chain of 3 ch.

To make wavy edges for a blanket, knit 2 rows of ch chains around the perimeter like this: place the hook under the sc of the previous row, pull a loop, knit 5 ch from it. Skip 1 sbn of the previous row and insert a hook into the next sbn, on which there is a chain of ch.
Pull the yarn through the sc of the previous row and the last loop on the hook. Repeat this around the entire perimeter of the blanket. Knit the second row of ch chains by placing the hook under the 5 ch chains of the previous row.


A children's crocheted blanket made from motifs is ready!
Video on knitting children's blankets from motifs:
Studying the beautiful “Houndstooth” pattern


This crochet pattern looks very good on high-volume threads, such as acrylic, that is, fluffy ones. The pattern is reversible and is perfect for children's blankets.
For the blanket you will need: woolen or wool blend yarn of three colors (bright shades), hook number 4. Another option is acrylic yarn 230m per 100g, hook 4.5.

The pattern consists of four rows. In the first three rows the warp is knitted.
We start knitting the base like this: we knit a chain of ordinary air loops, determining the number of them desired for the length of the future product, a multiple of 4 + 2 lifting loops.
The pattern of the first row will be single crochets. The beginning of the second row will be three lifting loops. Then you need to knit three double crochet stitches. We repeat the entire row with a pattern of 1 chain stitch and 3 double crochets. We end the row with a group of 4 columns. We knit the third row according to the pattern of the second, paying attention that the groups of three columns do not move relative to each other. After the third row is knitted to the end, it is time to move on to a thread of a different color. Carefully secure the end of the thread in the knitting, passing it several times through the loops of the previous row.

Good afternoon friends!
Nowadays you can find quite a lot of patterns and patterns for knitting children's blankets. But this is the first time I’ve met this one in person. A crochet baby blanket for beginners will be especially easy to knit, because it uses a very simple pattern and, mind you, no motifs! Many people will like this fact; I know that not everyone likes to sew motifs.
The blanket is made using the fillet technique and is knitted as a whole fabric. The main beauty is given by the delicate blue color, and the slightly openwork pattern looks wonderful.
Selection of yarn for a blanket and calculation
Take skeins of 50 grams/150 m. You will need about 20 of them or a little less. It is impossible to say the exact quantity, let there be more, and if there is any left, you can knit both booties and a hat for the baby.
Choose the color of the yarn according to your taste and the sex of the child, for example, delicate pink for girls or blue like this one for boys.
I never recommend a specific hook number; it should always be selected according to the density of your knitting. For the specified yarn of medium thickness, numbers 1.7 - 2 - 2, 5 may be suitable.
Try crocheting samples with different hooks and determine which option looks best.
Depending on their purpose, children's blankets are knitted in sizes 100x100 or 110x140 cm.
There is no need to calculate the required number of loops based on the pattern; then I will tell you how many loops to cast on and how to crochet a baby blanket for beginners.
Crochet blanket pattern
In the source I found, the pattern for knitting a children's blanket for beginners turned out to be somewhat incorrect and did not correspond to the pattern of the blanket; I discovered this when I tried to knit the sample.
Therefore, I made adjustments and drew the diagram myself. This was my first time doing this, and it may have turned out a little uneven. But that’s not the point; the main thing is that the diagram is understandable. And it is so simple that any novice needlewoman can figure it out.

Description of crocheting a baby blanket for beginners
We start knitting a baby blanket with a set of air loops. You need to dial a chain approximately 100 (110) cm long.
In this case, the number of loops should be a multiple of 30 (the number of loops of one repeat - a repeating part of the pattern) + 4 more loops for the edge of the product.
Now we set aside the started ball of yarn (there is no need to break the thread) and return to the beginning of knitting the chain. We attach a thread from another ball and knit the first row with it. When knitting in this way, having reached the end of the row, we will understand how many more loops are needed and simply knit the chain to the desired size.
We knit the blanket according to the pattern using double crochets and chain stitches between them. At the beginning of each row, instead of a column, you need to dial 3 VPs necessary to lift the row.
The first rows will require special care and accurate counting, and then knitting will become easier.
How to crochet a baby blanket
For beginners, a very convenient and again simple blanket tying scheme is used.

First, we tie the finished blanket with two rows of double crochets. In the corners, to make them even, knit three stitches from one loop.
And the last row is a somewhat unusual, but interesting version of the binding - 3C1H above each arch and 4 VPs between them.
Such an air border is obtained.
Look at other options, as well as one that is perfect for children's blankets.

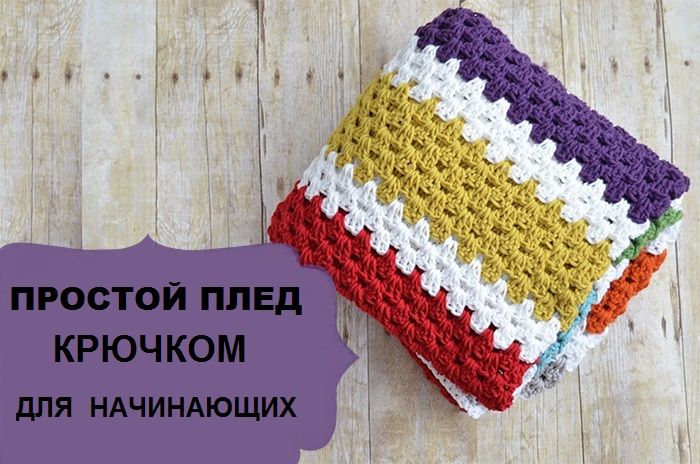
Today in our master class - a charming crocheted blanket for beginner craftswomen. This soft and cozy blanket is quite easy to knit. And for those needlewomen who are just taking their first steps in this type of needlework, we have prepared a knitting pattern and a step-by-step description with photos to make the work easier.
Tools and materials Time: 48 hours Difficulty: 4/10
- crochet hook 6.0 mm;
- about 1490-1500 meters of worsted yarn in several colors;
- darning needle to hide the ends;
- scissors.
A warm crocheted blanket and a cup of delicious tea are the best remedy for any stress! Pamper your household with a simple and beautiful blanket knitted by you! Rest assured, they will appreciate your work!
For this tutorial we used cotton yarn in white, red, brick, turquoise, light green, purple and gray shades. In general, everything that we had at home was leftovers. You, in turn, can use any threads that you have in your stash and the shades that you like!
Abbreviations:
- v.p. - air loop;
- Dc – double crochet;
- conn. st – connecting column;
- RLS – single crochet;
- p.p. – lifting loop;
- () – indicates the number of loops;
- * - indicates the number of rapports/repetitions.
Finished blanket size: approximately 100 x 112 cm.
Notes:
- All stitches are worked through both stitches unless otherwise indicated.
- The dimensions of the finished blanket are approximate. They won't be accurate. The final size will vary depending on how tightly or loosely you crochet.

Step-by-step description with photos
So, let's get to work. In this blanket, the simple pattern is more than offset by the bright colors of the threads.
Step 1: Tie the Warp
Start: 130 air loops.
Row 1: 2 dc in the 4th loop from the hook, *skip 2 loops, 3 dc in the next loop**. Repeat from * to ** until the end of the row. Turn. (129)
Row 2: 3 ch, *3 dc between the next groups of 3-dc from the previous row**. Repeat from * to ** until the end of the row, 1 dc in p., turn. (129)
Row 3: 3 ch, 2 dc in the space between the 1st dc and 3rd dc of the group from the previous row, *3 dc in the space between adjacent 3-dc groups from the previous row**. Repeat from * to ** to the end of the row, 3 dc in the space between the last 3-dc groups and sts, turn (129)
Row 4-71: repeat Rows 2-3.
Row 72: repeat Row 2.
For this blanket, we knitted 6 rows in one color, 3 rows in white and continued to weave the color pattern, alternating between different colors and white in between. However, you can choose the colors and thread patterns you want. Since we crocheted this blanket for beginners for ourselves, we used all the colors that we had available at home.
Step 2: Add Trim
Connect the white yarn with the conn. Art. in the last stitch of row 72.

The master class is completed. Agree, this crochet blanket is ideal for beginner crafters! We hope you are satisfied with the results of your labors. And if you have any questions or suggestions, write to us below in the comments. We wish you good luck!


