Poor stitching means weak or too tight stitching with uneven or askew stitches, looping at the top or bottom, unsightly or dirty.
Reasons for bad stitching:
incorrect thread tension;
unequal thickness of the upper and lower threads;
weak pressure of the foot on the fabric;
sewing with a curved or blunt needle;
poor quality slats;
poor rack performance;
inconsistency in the operation of the fabric engine and the shuttle;
sewing on a machine that has not been cleaned for a long time or has just been oiled and not wiped.
A weak stitch is considered to be one whose threads are visible between the stitched panels.
If the stitching turns out to be weak, you need to increase the tension of both threads (top and bottom) and adjust it to normal, and first you need to slightly increase the tension of the bottom thread, and then, while sewing, gradually increase the tension of the top thread until it is the same for both threads.
A tight stitch is considered to be one in which thin soft fabric is pulled together and gathered, but on thick, dense fabric the stitching is weak, i.e. when the fabric is slightly stretched along the stitch, the threads break.
Rice. 2. PMZ (Podolsk sewing machine)
If the stitching turns out to be tight, you must first loosen the bottom thread a little, and then, while sewing, adjust the tension of the top thread along it. If this weakening is not enough, you need to loosen the lower thread a little more, and then the upper one, adjusting until the thread tension becomes normal (not very tight and not weak) and the same for both threads. If the machine loops at the top or bottom of the fabrics being sewn, it means that the thread tension is not equal. To fix this problem, you need to determine which thread is looping - the top or bottom.
Loops 5 (see Fig. 28, a) on the underside of the fabric are made by the upper thread if it is stretched much looser than the lower one. In this case, you need to increase the tension of the upper thread and stitch. If loops 5 at the bottom have disappeared, and loops 6 at the top have appeared (Fig. 28, c), it means that the upper thread is now tighter than the lower one. Adjustment of thread tension should be carried out until the loops disappear on both sides of the fabrics being sewn.
If the loops do not disappear, then the cause of the looping may be inconsistency in the operation of the fabric motor with the shuttle, which can be eliminated in the workshop.
If bad stitching occurs due to the “rolling” of the rack, you need to tighten the screws securing the rack to the rack fork more firmly (see Fig. 46, a).
If the rocking of the rack occurs due to the rocking of the rack fork due to the loosening of the screws that connect the parts of the fabric motor mechanism, you need to contact a workshop. If oblique stitches are obtained due to the difference in the thickness of the upper and lower threads, you need to thread the same threads into the machine.
Oblique stitches can be made by a crooked needle, which should be replaced.
Oblique stitches can also be obtained by swinging the slats to the right - left, along the platform, when, due to the displacement of the slats, the fabric also moves. In this case, strengthen the rack screws.
If the stitching is obtained with stitches that are uneven in length, it is necessary to check the pressure of the foot on the fabric, the fastening of the foot and the condition of its sole. How to change the pressing force of the presser foot on the fabric and tighten the fastening screw was discussed above. If there are uneven spots on the sole of the foot, the foot needs to be changed.

Rice. 28. Looping threads with a stitching stitch: I - top view of the stitch; b - looping of the upper thread; c - looping the lower thread
Uneven stitching, with frequent and sparse stitches, can be obtained by rocking the staff back and forth (from the worker to the worker). To avoid this, tighten the screws securing the rail.
If you need to tighten the screws connecting other parts of the fabric motor mechanism, then you need to turn to the help of a workshop.
The reason for the uneven length of the stitches may be the wear of the rack teeth when some of them have already stepped. The solution is to change the rack.
When sewing items from very thin, but not transparent fabrics, even with thin threads, almost always (if the fabric is not soft enough) the interlacing of the upper and lower threads is noticeable on the front side.
In order for this weave to be visible only from the wrong side, you should slightly loosen the tension of the upper thread.
An ugly stitch is obtained when thin fabric is sewn with thick threads, but if, on the contrary, thick fabric is sewn with very thin threads, then the stitching will be fragile.
Dirty stitching results from a machine that has not been cleaned for a long time. In this case, in a PMZ machine (Podolsk sewing machine), you need to disassemble the shuttle set and wipe each of its parts.
Most often, dirty stitching results from the fact that they sew immediately after lubricating, without wiping the machine, and not on a piece of scrap, but directly on the fabric for the product.
In addition to the problems that fall into the main six groups, there are others, for example, when the machine knocks very loudly or has a hard ride. The machine does not turn on after winding the bobbin because the flywheel 1 (see Fig. 2) is not connected to the main shaft 2 or is not turned off before winding the bobbin. In sewing machines that make zigzag stitches, there are problems with the control levers, and in those that have a copying device (automation), there are problems with stars or automatic levers.
The machine knocks loudly if it has not been cleaned, lubricated for a long time, or if it has been lubricated with stale, thickened oil.
The machine must be promptly and thoroughly cleaned, lubricated with fresh machine oil, and if it has not been cleaned for a long time, even washed with kerosene.
Loud knocking of the machine and even its stopping can occur due to the thread getting stuck in the shuttle set.
The reasons for thread getting into the shuttle set are: turning the handwheel away from you when the thread is threaded into the needle, or rotation of the handwheel when the presser foot is raised and the thread is threaded into the needle.
Not in all cases and not in all machines, when thread gets into the shuttle set, it is necessary to disassemble it in order to remove the thread stuck in it, but to do this you always need to remove the bobbin case from the machine. If the needle is in the up position, the bobbin case can be removed immediately. If it is lowered, that is, it is in the shuttle set, you must first remove the needle from the machine.
When the bobbin case is removed from the machine and the thread is removed from the needle, you need to try to forcefully turn the flywheel half a turn away from you, and then the same amount towards yourself. If this cannot be done, you need to put oil on the shuttle track and then try to slightly turn the flywheel away from you. If the wheel does not turn or the loud knocking of the machine cannot be eliminated, then in the PMZ machine (Podolsk sewing machine) you can disassemble the shuttle set, remove the stuck thread and, after wiping all the parts, reassemble the set.
The thread does not get stuck in the shuttle set of the Tula machine, and it is accessible for cleaning without disassembling.

Rice. 46. Working with a darning foot: a - darning and embroidery foot, installing an embroidery plate; 6, c, d, e and f - sequence of operations when installing the embroidery plate on the needle plate; g and h - installation of a darning foot on the machine (with an external spring); and and k - darning feet (with an internal spring)
In car. "Veritas" if the thread gets stuck in the shuttle set, it does not need to be removed or disassembled. You just need to remove the needle and remove the bobbin case from the machine, try to forcefully turn the flywheel one third of a turn away from you and make several rocking movements. If, as a result of this, the thread stuck in the shuttle set does not fray or fall out of it, then you can loosen the screws of only one removable plate 5 (Fig. 83, a) of the shuttle set, which goes around it almost halfway and has the shape of a narrow strip. One end 6 (Fig. 83, b, c) is sharp and faces the nose 7 of the shuttle, the other end 8 (Fig. 83, a, d) is smooth and closely adjacent to the permanent plate 9. The thread can only get stuck under the plate 5, which you can remove yourself. It is attached to the kit with three screws 10, 11 and 12 arranged one after the other (Fig. 83, a). If, after loosening these screws, the thread cannot be pulled out from under plate 5 (it breaks), then screws 10, 11 and 12 are completely unscrewed, plate 5 is removed and the stuck thread is taken out.
Screws 13 (Fig. 83, d), 14, 15 and 16 of the permanent plate 24 do not need to be loosened or unscrewed, so their caps are ground flush with the surface of the permanent plate.
To clean the shuttle set, do not unscrew screws 17 (Fig. 83, a), 18 and 19 (Fig. 83, d) securing the shuttle set to the shuttle shaft. If, due to poor shuttle performance, it is necessary to loosen or remove these screws, this can only be done in a workshop, because a thorough knowledge of the rotary hook machine and installation experience is required to accurately determine the distance from the hook nose to the needle and the approach time her. The slightest inaccuracy in installing the shuttle set in the machine can lead not only to skipped stitches and broken needles, but also to the nose of the shuttle becoming dull on the needle and even to its breakage, then you will need to replace the permanent plate or the entire shuttle set.
Loud knocking, skipping stitches, poor stitching and needle breakage can occur when screw 20 (Fig. 83, d) of pin 21 is loosened. It is necessary to check the fastening force of screw 20 in groove 23 of the fastening and, if it is loose, tighten it. To do this, you need to install the finger 21 so that its end 22 does not touch any of the walls of the groove 23 through which the thread passes (there should be a small distance between them). Then, while the machine is running, the thread will pass freely through the groove.

Rice. 83. Shuttle kit of the Veritas machine: a - the position of the removable plate, providing access to all three of its screws; b - the same, to two screws; in - the same, to one; d - position of the permanent plate attached with four screws
Heavy running of the machine is observed when the drive belt tension is very high in foot-driven machines. In this case, you need to buy a longer drive belt and put it more loosely on the flywheel of the machine and the drive wheel of the machine.
Another reason for the heavy running of a manually driven Tula machine may be working on it without turning off the electric motor.
In addition, machines that are not lubricated and have not been cleaned for a long time have a heavy, “stiff” movement.
If by turning the friction screw 5 towards you (Fig. 84, a, b), it is not possible to turn off the machine, that is, to disconnect the flywheel from the main shaft, and the needle continues to work while winding the thread onto the bobbin, then the reasons for this may be: dryness of the bushing 6 (Fig. 84, b), incorrect position of the friction washer 7, shown in Fig. 84, b, c, d, or incorrect rotation of the friction screw 5 (Fig. 84, b).
If the reason the machine does not turn off is a dry bushing, you need to let oil into hole 8 on the flywheel.

Rice. 84. Removing and installing the friction washer: a - removing the friction screw; b - removing the friction washer (the washer and screw are shown separately); c and d - friction washer in various working positions
If the needle continues to work after lubrication, it is necessary to check the condition of screws 5 and 9.
If the limit screw 9 and the friction screw 5 are screwed correctly, the reason for the non-disconnection of the flywheel from the main shaft is the incorrect position of the friction washer 7 (Fig. 84, b, c, d).
To check the position of this washer, you need to unscrew the limit screw 9 (Fig. 84, a, b) of the friction screw 5 and remove the friction washer 7 (Fig. 84, b, c, d), which has three horns 10 (Fig. 84, c, d), 11, 12 and two protrusions 13 and 14. In the bushing 6 (Fig. 84, b) of the flywheel, into which the friction washer is inserted, there are two recesses - grooves 15 and 16. Protrusions 13 and 14 (Fig. 84, c, d) the washers must, firstly, fit into the recess of the sleeve and, secondly, with their bent ends facing outward, since they serve as a stop when rotating the friction screw to turn off or turn on the needle mechanism. Insert this friction washer into place before
quite difficult, it moves out of the installation site when screwing in the friction screw.
If you hold the machine with the flywheel up (head down), it will be easy to put the friction washer 7 and screw in the friction screw 5, and then the limit screw 9 (Fig. 84, b). If, when winding the thread onto the bobbin, the needle continues to work, you need to take out the friction washer 7 again (Fig. 84, c), but do not turn it over, but only turn it 180° in a circle (Fig. 84, d) so that only the horns 10 11, 12 swapped places, tighten the friction screw 5 (Fig. 84, a), screw the limit screw 9 into it.
When turning the machine on or off, the friction screw 5 can be turned no more than 7 times a turn, i.e. from one protrusion 13 (Fig. 84, c) of the washer to another 14 or, conversely, from the horn 11 to the protrusion 13. If you transfer through them, the inner end 17 (Fig. 84, b) of the limit screw 9, then the washer 7 can turn, but will not disconnect the flywheel from the main shaft or turn on the machine, i.e., will not connect the flywheel to the main shaft, then it will rotate at the so-called idle speed.
In the Veritas machine, the separation and connection of the flywheel to the main shaft occurs in exactly the same way as in the PMZ machine (Podolsk sewing machine). In the Tula machine, when winding a bobbin using an electric motor, the flywheel does not rotate, because it is mechanically turned off along with the main shaft. The thread is wound onto the bobbin using a special device on the electric motor shaft.
Problems associated with the operation of the electric motor can be eliminated by electricians in consumer service workshops.
Why does stitch skipping occur? In general terms, the cause of the malfunction is as follows - the upper thread, lowered by the needle down, is not picked up by the nose of the shuttle.
Why is the loop from the top thread not captured by the nose of the shuttle? There are many reasons.
But before you call a mechanic, CHECK THE NEEDLE!
A dull or bent needle is often the cause of skipped stitches. Replace the needle with a new one.
The needle may be set to the wrong type for which the machine is adjusted. For example, a needle with a round bulb is installed. Replace the needle with the correct one.
The reason may also be a mismatch between the needle and thread: a thin needle and a thick upper thread. In this case, a lap-loop from the top thread can form on the opposite side of the needle, where it cannot be picked up by the nose of the shuttle. The thickness of the thread should always correspond to the needle number.
A strongly twisted thread can also cause skipping stitches - the overlap loop immediately twists to the side when formed. It is necessary to replace the threads with high-quality ones.
Skipping stitches can also be caused by material, such as thick knitwear. The needle, getting into the thread of the fabric, pulls it down, forming a loop that prevents the formation of the overlapping loop of the upper thread. In this case, replacing the needle with the thinnest one can help, because... a thin needle may be able to pass through the material without dragging it.
If skipping stitches occurs even with the thinnest needle, try sewing under a strip of thin paper. Sometimes this helps because the paper prevents the needle from pulling the fabric down.
What to do?
If your sewing machine starts skipping stitches, proceed as follows:
1. Check that the upper and bobbin threads are threaded correctly.
2. Loosen the upper thread tension.
3. Change the needle. An old needle can become dull, bent, or become covered with dirt as a result of long use. It is important to know what type of needle your machine is set for. All needles have their own markings and gauge; write down the markings of the recommended needles from the sewing machine instructions and then you can find on sale exactly what suits you.
When purchasing needles, you should choose the smallest appropriate needle gauge for your specific fabric. It is preferable to use a universal needle, or a needle with a medium or wide round point, or a finishing stitch needle. To sew elastic fabrics, choose special needles marked “stretch”.
The needle must be inserted into the needle holder correctly, until it stops. But in particularly difficult cases, it can be lowered a little, sometimes this method helps so that a sufficiently large loop can be formed from the upper thread.
4. Check whether the presser foot is installed evenly, sometimes you need to increase its pressure (or even pull the nose of the foot down when sewing), as a result of which it will hold the fabric much better. This will prevent the needle from pulling the fabric down through the needle plate. It is preferable to use a straight stitch foot (with a small round hole). If you don't have a straight stitch foot, try moving the needle to the far right.
5. Use a needle plate with a small hole, if you do not have a needle plate with a small hole, then try to cover the wide hole part of the regular needle plate with adhesive tape.
6. Change sewing threads. Perhaps the threads you use have a high twist. Due to the strongly twisted thread, the overlap loop may immediately fold to the side when formed, which leads to a skipped stitch.
7. When sewing elastic synthetic fabrics, you can try to stabilize the fabric with a special water-soluble material; if this is not available, soak the fabric in a solution of gelatin or starch. You can place thin paper under the fabric, which should be carefully torn off when finishing sewing.
8. When moving from a thick to a thin section of a seam, use a special tool-foot for passing thick places. Some models of sewing machines have a special mechanism that simplifies the transition from a thin to a thick layer of material - carefully read the instructions for your sewing machine.
9. If none of the methods helped you, your sewing machine may be skipping stitches due to a mismatch between the movements of the hook and the needle. In this case, the best way to fix the problem is to call a sewing machine repairman.
Many people have problems when working with knitwear on a household sewing machine. They consist in the fact that the sewing machine cannot make an even and beautiful stitch. As a result, gaps appear, the lower thread lies askew, and sometimes even breaks off completely. Luckily, this problem can be solved with a few sewing tricks.
Why doesn't the machine sew knitwear?
Skips and uneven stitching when sewing knitwear are a common problem. It occurs on almost all household sewing machines, regardless of their cost and class. The problem lies in the special structure of the knitted fabric.
The fact is that knitwear is elastic, it stretches well due to the peculiarities of the weave of the threads. For this reason, it is difficult to work with the material on conventional machines.
How to sew knitwear?
If the machine does not sew knitwear, then you need to do the following:
- Buy a special sewing needle. A lot depends on what needle you use to sew knitwear. Special needles are called knitting needles. Their peculiarity lies in the rounded tip, which does not pierce the fabric, but pushes the fibers apart. When sewing knitwear with needles, defects may occur.
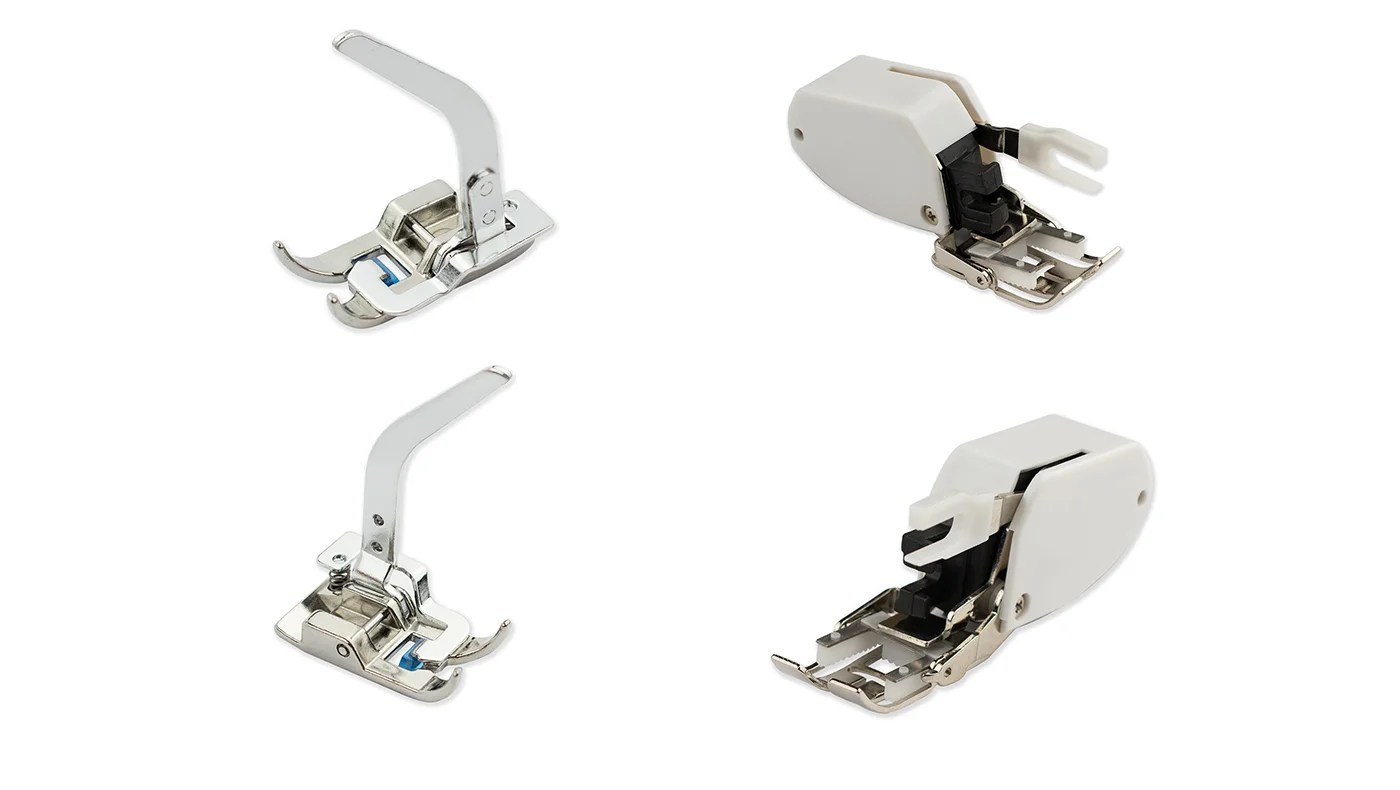
- Application of the upper conveyor for a sewing machine. This is a special device in the form of a plate, which promotes uniform movement of the material. The conveyor is installed above the needle plate. It is necessary in cases where the presser foot greatly displaces the parts being ground. Knitwear stretches a lot, and therefore in some cases it is impossible to do without the use of auxiliary means.
- You can level the supply of material using paper sheets. They are placed under the bottom fabric and under the foot. After joining the parts, the sections are carefully trimmed and removed.
- Buy polyester threads. The quality of the seam and its durability depend on what threads are used in the work. Luckily, polyester thread is the most common sewing machine thread, so purchasing it won't be too difficult.
Whichever of the above options you choose, it is initially recommended to sew a stitch on a small piece of material. Fold it in half first. This method will allow you to set up your sewing machine by setting the optimal thread tension, selecting stitch length, etc.
We make knitted seams on a regular machine
Straight stitch
You can sew knitwear with a regular straight stitch. But to do this, you should pay attention to the following tips:

- Set the stitch length to no more than 2 mm. Better - 1.5 mm.
- We sew a line at a distance of 1–1.2 cm from the edge.
- When sewing, you need to lightly pull the fabric with both hands in front and behind the foot. This is necessary so that the threads do not break during wear. You should stretch the knitwear only in the place where the stitching goes.
- After the knit stitch is completed, you need to fold back the seam allowances and iron them.
A regular straight stitch can be used to sew fabrics that have moderate stretch.
Knit stitch

This type of stitch is present in some modern sewing machines. The seam has the appearance of a zipper and is highly elastic, due to which the fabric stretches well, and the thread holding it together does not break when stretched too much.
Overcast stitch
This seam allows you to simultaneously grind the workpieces and process their cuts. It has an aesthetic appearance and is great for working with knitwear.

The edge stitch is an imitation of an overlock seam. However, unlike it, this seam is less elastic. It has high strength and is well suited for sewing clothes from well-stretching thin knitwear. The overlock stitch is often used when working with tight-fitting clothing.
There is no need to stretch the fabric during the sewing process because the seam stretches slightly. But be careful when using backstitching. In some places, the seam may become compacted, as a result of which it will lose its elasticity and may rupture under strong stretching.
In modern machines there can be several types of overcast stitches. In addition to external differences, their application may require different conditions. Therefore, before starting work, it is better to read the operating instructions for a specific sewing machine.
Some types of overlock stitches resemble a four-thread overlock stitch. However, this is no more than a superficial resemblance, since a household sewing machine is not capable of threading in the same way as an overlocker. Therefore, it is advisable to stitch the knitwear at a distance of 0.5 mm from the edge of the cut, and then carefully trim off the excess fabric. This will allow you to get a perfectly smooth and beautiful edge.
Zigzag
This is a classic stitch used on many household sewing machines. It is great for working with knitted fabrics because it does not tighten the fabric and has a sufficient margin of strength. Zigzag stitch sizes are customizable, allowing you to work with a variety of materials.

To sew knitwear, you need to listen to the following tips:
- The average stitch length is 2.5–3 mm.
- Stitch width – 1 mm. For small items it can be reduced to 0.5 mm.
- The seam is laid at a distance of 1.5 cm from the edge.
- There is no need to stretch the material during the stitching process. If difficulties arise when moving it, you should release the press of the foot.
- After completing the stitching, you need to bend the seam allowances and iron them.
Double stitch
The peculiarity of this method is the execution of two parallel seams. They can be either straight or zigzag. The latter option is preferable due to the elasticity of the seam.

The line is executed as follows:
- We make the first line along the stitching line.
- The next line is located at a distance of 0.5 cm from the first and runs along the allowance.
- Trim off excess fabric along the last stitch.
If you use straight stitches, remember to slightly stretch the fabric while sewing knitwear.
Double needle stitch
This type of stitch can be used when working with any type of material. In the process of working with shuttle thread, an elastic zigzag seam is formed.

Main nuances:
- When stitching with a double needle, make sure that the right needle goes along the stitching line, and the left one goes along the seam allowance.
- Adjust the thread tension on the unwanted piece of material. To do this, monitor the quality of the seam. If it turns out weak (a zigzag does not form on the wrong side), then the tension should be increased. If a groove appears between the lines, this indicates that the tension of the fabric is too strong.
- Once you have adjusted the thread tension, there is no need to pull the fabric by hand.
Is cut processing required?
This question worries many beginning seamstresses, because without finishing the edges, some fabrics begin to crumble. Fortunately, this does not happen to most knitted materials. Their edges do not curl or crumble, and therefore no additional processing is required in this case.
If the knitwear crumbles along the cuts, then in this case you can do without buying an overlocker. It is enough to process the cut with a zigzag, which is found in every modern sewing machine. Some machines have several of these seams.
The best way to protect the cut of knitted fabrics, in addition to overlocking, is processing with a wide zigzag. To do this, set the stitch width to 0.7 mm with a length of about 5 mm.
Of course, a universal household sewing machine will not replace special machines for knitwear, and will not provide the same stitch quality as an overlocker, coverlock or cover stitching machine. But the lack of special equipment is not a reason to deny yourself knitwear, so just use our tips and sew clothes from knitwear now.


