28.01.2017 29.01.2018
Greetings, our beloved visitors to the Pixelbox website!
A double chin is a flaw in appearance that brings a lot of trouble to its owner. After all, every woman (and man!) wants to look attractive. Not everyone has the means or desire to undergo cosmetic procedures or plastic surgery, but everyone has access to the Photoshop graphic editor, in which you can remove a double chin.
This step-by-step instruction will help you, using the Liquify tool (its use) in Photoshop, remove a double chin from almost any photo!
Removing the double chin
Open a photo in Photoshop in which you want to remove the chin. To do this, press CTRL+O and select the desired file.
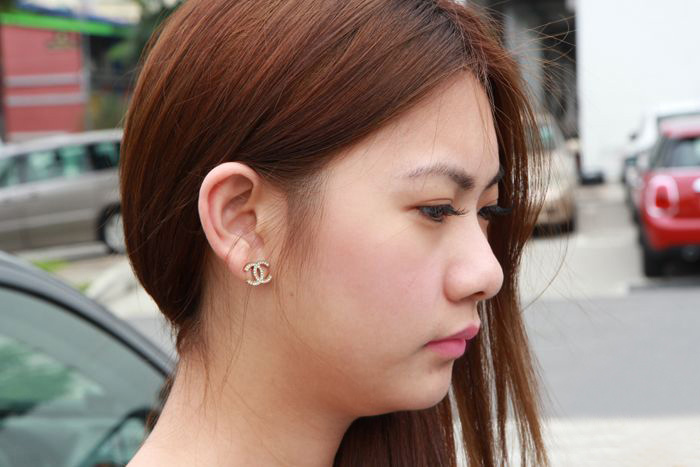
As we can see in the photo there is a small double chin. There is nothing easier than to remove it
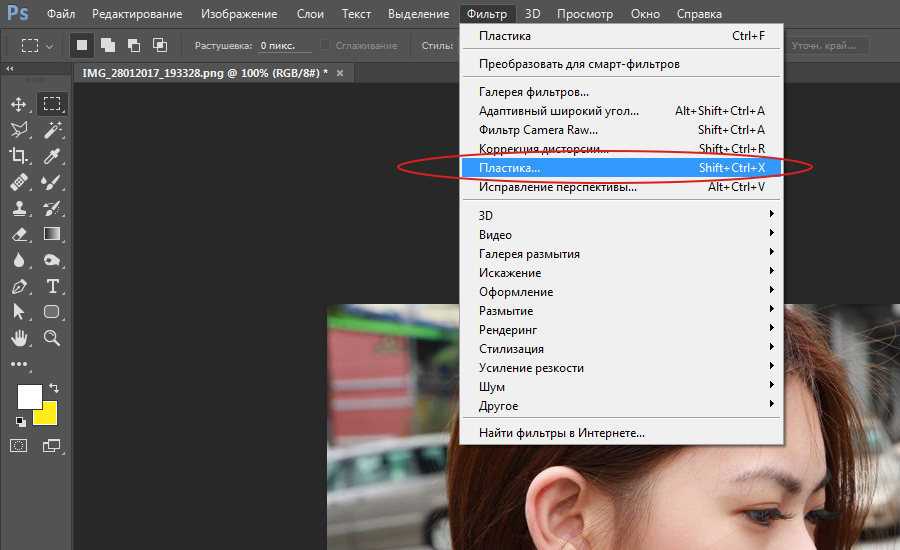
The Liquify function in Photoshop will help us with this. Go to the Filter - Liquify menu.
Now you need to perform three steps:
- Select the Warp tool, in the left-right corner.
- Set it up properly. For this photo I used Size - 45, Pressure - 100.
- Now use this tool to pull your chin up in the places where you want to tighten it.
How does this tool (Warp) work?
The answer is simple - like a simple brush in Photoshop. We have already adjusted its size and pressure. Now move the cursor to the place where you want to lift your chin, hold down the left mouse button and move the cursor up (in the direction where you want to lift your chin).
If necessary, adjust the size and density of the brush. To zoom in/out of the image, press Ctrl +/Ctrl –.
Advice: Be careful and careful with deformation. When removing your double chin, you must do it in such a way that no one will catch you faking the photo. Therefore, when distorting the image, make sure that those parts of the image where the deformation was performed remain looking natural. In this case it is hair. They should remain hanging in the direction they were hanging.
Once you are done with this feature, click OK.

Now you will see the result of your work in Photoshop. No more double chin!
The function of Plastic is wide for application. For example, it will help you lose weight in Photoshop, enlarge your eyes, and much more. Experiment with it!

Indeed, an annoying little thing, nothing more. Can’t all those with a so-called “double chin” boast a beautiful photograph? And not only, because there are angles when even thin people can see this unfortunate fold under the chin.
In our age, everything is possible. And especially everything related to computer technology, it’s not for nothing that the twenty-first century was called the “computer” century. An Adobe product will come to the rescue, familiar to many firsthand, the great and mighty Photoshop. Photoshop is a powerful graphic editor; its functionality will certainly be enough to handle such little things as a double chin.
It doesn't matter how you rate your level of proficiency in this program. You don’t need to be a pro; we even assume that this is your first time running FS on your computer. To successfully edit your photo? Just follow the instructions provided by the author of the article.
Removing the double chin
How to remove a double chin as easily as possible in Photoshop?
The first method does not require great care or special skills. And in terms of quality/time ratio it produces the best results.
Let's get started!
- Select a section of the neck using the Lasso tool from the bottom edge of the available area to the very beginning of the “double” chin.
- Press Ctrl + j (we assign a new layer to the selected area).
- Press Ctrl + t (start “transforming” the selected area).
- Carefully drag the edge of the “second” chin to the “first” one, if necessary, hold down Ctrl on the corners of the transformed area to change their position relative to each other (move apart).
- Use the eraser tool to remove everything unnecessary.
- Ctrl+e. We've merged the layers together.
- If the transformation results in some unevenness, we correct them using the patch tool.
How to remove a double chin in other ways?
If you're intimidated by a multi-step algorithm, there's a shortcut. I note that it requires more accuracy and perseverance.
- Select the patch tool and carefully remove the fold separating the chins. It didn't turn out very nicely, did it? No problem, it's easy to fix.
- We tighten the chin until the desired effect is achieved. The “plastic” (liquefy) (“filter” - “plastic” (filter) (liquefy)) and the “distortion tool” (forward warp tool) will help us. It is located in the Liquefy palette, its icon looks like the finger tool.
- Press the ok key.
Ready. Congratulations! Now you know how to remove a double chin using Photoshop.
Many of those who have a double chin wish it wasn't there at all, but we can only help remove it in photographs. Today we will try with an example how to remove a double chin in the image editing program Adobe Photoshop. All actions are performed in the version Photoshop CC.
So, we need a photo of a person with a double chin. In our specific example, I took a photo of a smiling woman.
Create 2 duplicate layers using the keys Ctrl+J and go to the menu Filter-Liquify .
Note : in the lesson about how to remove fat from sides we have already talked about this filter and provided descriptions of the tools.

Select using the tool Freeze Mask Tool that section of the chin that we need to leave (that is, NOT double).
Then using the tool Forward Warp Tool we move the double chin so that it moves towards our first chin.

Note :when you highlight the chin, be careful - leave room for editing the second chin.

After you finish moving our double chin upward, you will see that there are still a few artifacts left, since it is extremely problematic to do miracles with the help of one filter, and inconsistencies will be visible. To prevent this from happening, you need to add realism.
To do this, go back to our file (click on the button OK in the filter Liquify) and select our chin again, but slightly with the second one, so that the joining of the two chins occurs more naturally.

Note :select, of course, another layer (original) or its duplicate, where the normal chin is located (both the first and second).
Making a duplicate selection by simply pressing the keys Ctrl+J.

Now we move our new layer so that there is only one chin and it looks realistic.

As you can see, part of the second still remains, since we highlighted it specifically. We remove it using an eraser and blurring its edges, or by creating a mask (as you wish).

This is what we got.

It should be noted that this is far from the most difficult option for removing a double chin, since there are much worse people, or rather, their type of chins.


Even if you don’t have stellar looks, no one can stop you from looking great in a photo. In this short tutorial I will show you how to remove a double chin in Photoshop. This little problem is quite trivial, let's see how we can solve it using the wonderful Adobe Photoshop program.
Begin.
Open our photo, File – Open (or Ctrl+O).

We make a copy of the layer so that just in case we have the original on the bottom layer. To do this, open the layers palette “Layers” with the F7 key.
Now we have only one layer “Background” in the list, right-click on it, select “Duplicate Layer...” from the drop-down menu - “Ok”.

Now we work only on the new layer “Background copy”. Make sure it is selected in the Layers palette.
Before we get started, it is necessary to think through, from a technical point of view, an action plan “how to remove a double chin in Photoshop.”
The task before us is the following: to slightly tighten the sagging skin of the face, and then erase the boundaries between the first and second chins.
Go to the “Filter” - “Liquify...” menu to adjust the jawline.

We work with the “Forward Warp Tool” (W).
Set the brush settings:
“Brush Size” - at your discretion, depending on the size of the image itself, choose a brush size that is comfortable to work with, not too small so that you don’t have to suffer for a long time, but not too large so as not to make too rough changes. To adjust the size, simply move the slider right/left until you reach the desired size. I set the brush size to 61.
“Brush Density” - 70.
“Brush Pressure” (brush pressure) - 40.

Now we carefully lift the chin line up so that the lower border of the face merges with the line of the first chin. In other words, we try to remove the protrusion of sagging skin, smoothing the border between the first and second chin. When editing, you can zoom in on the image using the hotkeys “ctrl+” and zoom out using “ctrl -”. If you made a too sudden movement or made a mistake, you can always go back a step using the key combination “Ctrl+Alt+Z”.
Once you're done, click OK. Here is my result.

Okay, now all that remains is to remove the crease between the first and second chin.
Let's duplicate the layer again by selecting the "Background copy" layer in the layers palette, right-clicking on it, "Duplicate Layer..." - "Ok". We work on the top layer.
Take the Healing Brush Tool (J). I have already explained the principle of operation of this tool in previous lessons. In short, it takes a sample of a section of the image at a location you specify and overlays it on top of another section, taking into account the contents of the underlying layer. It turns out to be a kind of hybrid of two different parts of the image.
To take a skin sample, hold Alt and click the mouse in the desired location. It will be better if you take areas in close proximity to the fold. If you did everything correctly, the brush will be filled with the contents of the fragment, a sample of which we took.
Consider the difference between illuminated surfaces of the face and those in shadow. For these, skin samples will need to be taken from different sources, otherwise you will end up with a flat, unrealistic image.

REMOVING THE SECOND CHIN
Many people ask how to edit photos to remove a double chin.
Let's look at this question using this photo as an example: 
1. Open the photo. Make a duplicate of it by pressing (Ctrl + J). On the “Background” layer, extinguish the eye. We will work on the layer “Layer 1”. If we mess something up, you can always go back to the “Background” layer and start over.
2. In the tools window, select the “Healing Brush” tool or press the shortcut key for this tool (J), then click on the tool icon and, while holding down, select the brush we need: 
Now look at the top panel of tool options; for this photo I chose the following settings:
In general, the Healing Brush tool allows you to adjust an area of pixels, as a result of which they seem to adapt to the image around them. First you need to set the origin point that the tool will access. In order for us to select this point, with the Alt key pressed, click here in this area (when we click on Alt, the cursor will take the form of a target): 
Now release Alt and carefully paint the problem areas: 
When we finish painting everything and release the mouse button, the pixels will pick up the information and restore this area. Where there are still unnecessary spots or moles, they can also be removed by taking a sample near this spot in the same way. I got carried away and removed several spots on my face: 
3. Well, there is no double chin, now the oval of the face can be corrected a little, you can do this in different ways, for example, with the “Plastic” filter, but for this photo I took the “Smudge” tool, it is in the toolbar, or you can press the (R) key to select it, select it in the same way as you selected the Healing Brush tool: 
In the top panel of the tool options, these are the settings I have for this photo:
The Finger tool works as if you were dragging your finger across a layer of wet paint, mixing it up. Therefore, let's press the mouse button in the place we need, and make strokes in the direction we need, you will see that the color with which you started will shift in the direction where you move your “Finger”. I only corrected the oval of the girl’s right cheek, that is, I carefully moved my “Finger” in this direction: 
Well, then I got carried away with the improvements, I also went to Filter – Plasticity, selected the “Warp” tool (W) there and made my hair more full, and so on, and this is what happened: 
Good luck with your photo editing! Post your work on the forum, we'll discuss it.


