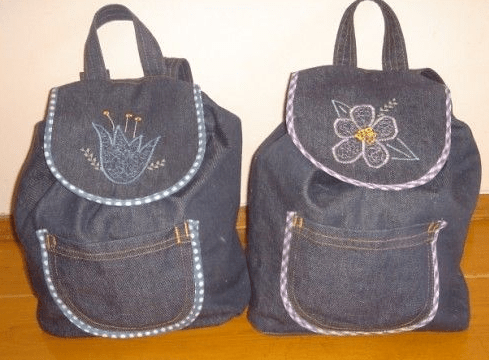
Yesterday I sewed a backpack for my youngest daughter. Quite roomy, the straps are adjustable and have a magnetic clasp. A simpler and easier option than I previously sewed for my eldest daughter ().

To sew a backpack we will need: fabric for the outer and inner sides (I have cotton), padding polyester (or non-woven fabric, dublerin for sealing the fabric), 1.7 m sling, 4 plastic frames, elastic 30-33 cm, magnetic clasp, threads , pins, scissors, measuring tape.

From both colors of fabric we cut out the following details. This pattern size is suitable for a backpack for children 2-5 years old. The size of the backpack is approximately 27x27 cm.
For children over 5 years old, the pattern size will be 65x40 cm and 20x20 cm.

The fabric for the main side needs to be compacted. I have a lot of leftover padding polyester and I decided to use it. We cut the padding polyester a little larger and place the main fabric on it. Then iron them well and steam them (the synthetic winterizer will become thinner and stick a little to the fabric). Attention! In order not to spoil the surface of the iron, it is better to iron through gauze or thin fabric, since the synthetic padding melts a little.


Now you need to quilt this part (along the edges and in horizontal stripes at equal distances).

Let's start making the straps for the backpack. To do this, we use plastic frames (constrictions) and a sling, from which we cut 2 strips of 9 cm each. We insert the sling into the frame, bend the edges of the sling on both sides and secure it with a pin. The video above shows this process in more detail.

We sew them on both sides to the bottom of the main part at the specified distance (see photo).


Now we cut off 2 more strips of sling, 60-65 cm each, and take the remaining 2 plastic frames (constrictions).

We thread one of the ends of the sling onto the middle part of the plastic frame, bend the edge and sew where it is marked with a dotted line.

We stretch the empty end of the sling into the frame-constriction (which we sewed to the main part of the backpack) and thread it through the second frame-constriction on the same strap. We check whether the length of the future strap is adjustable. The video above shows this process in more detail.

We sew the ends of the straps to the top of the main part at the distance indicated below (see photo).


Now we fold the main part in half and stitch it from the wrong side, where it is marked with dotted lines.

We turn it so that the seam is in the middle and sew the lower part of the future backpack, where it is marked with dotted lines.

Now we stitch the corners at equal distances and cut off the excess.


Let's start making a handle for the backpack. We cut off 18 cm of the sling and sew its ends to the top of the backpack at the back seam between the straps.


This is what the back of our future backpack looks like.

Let's start with the lining (inner side).

Backpack flap. We sew both parts from the wrong side.


We cut the edges on the fillets.

Turn it right side out, iron it and stitch at a distance of 5-7 mm from the edge.

We attach one of the parts of the magnetic fastener.

We place this part on the back of the backpack with the right sides facing each other and stitch it at the edge where it is marked with dotted lines.


It turns out like this.

Now let's move on to the main part of the lining. We also bend the rectangle of fabric in half and sew it on the wrong side, where it is marked with dotted lines.

We form the lower part in the same way as described above, but leave a small hole so that we can then turn the backpack right side out.

All that remains is to sew the outer and inner sides of the backpack together. To do this, turn both parts inside out and place them with their top sides facing each other.

Using pins, we connect both parts in a circle and stitch.


Through the hole in the lining, turn the backpack right side out.

We attach the second part of the magnetic clasp in the right place and sew up the hole.

Now along the edge of the upper part of the backpack we make 2 lines at a distance of 1-2 cm (without touching the valve and straps of the backpack).

We make a small hole in the inside of the backpack between the lines and insert an elastic band.

Sew the ends of the elastic together and close the opening with a blind stitch. Looks like that. In my opinion, this version of the top of the backpack (with an elastic band instead of a lace) is more suitable for small children.

Our children's backpack is ready.

The size of this backpack is 27x27 cm. This is how it looks on my youngest daughter. Katerina is 3.5 years old, height 100 cm.
A backpack is a comfortable and versatile item that is suitable for children and adults. Stores offer all kinds of models. But it happens that you don’t like any of them. In this case, you can sew a backpack yourself. The simplest pattern for a backpack made from jeans is made from the cut of pants. There is no need to rip out the seams on old jeans. It is enough to separate the lower part from the upper.
We sew a simple children's backpack with our own hands using patterns
For beginning seamstresses, we offer a small master class on sewing a children's backpack.
The pattern consists of two equal rectangles. The upper part will be tightened with a lace. This backpack is suitable for a boy and a girl.
Necessary materials:- 2 rectangles of fabric, measuring 28x35 cm.
- 4 pieces of non-woven fabric 5×5 cm.
- Lace – 2 m.
- Metal blocks or eyelets, tongs, threads.
Glue interlining to the bottom corners of the rectangles. We process the cuts with an overlock or zigzag seam.

We fold the parts right sides together, fasten them with a needle and mark an indentation along the top edge of 5 cm. Sew the parts along the long sides and one short one up to the indentation line.
Iron the side seams.
We make a drawstring by turning the top edge 2.5 cm and ironing it.
We sew it at a distance of two cm from the edge.

Mark the locations for the eyelets and make holes.
We put the washer on the wrong side, and on the front side we place the grommet with the convex side up, and clamp it.
We thread the cord into the hole and pin it with a pin. We thread the cord into the drawstring from left to right.
Now we pass it through the second hole, and direct it into the drawstring on the second side. We hide the ends of the cord.
Ready backpack.

You can sew a backpack of this model from any fabric you like. If desired, it can be supplemented with pockets. If we are sewing a backpack for a girl, then it can be decorated with beads, appliqués, ribbons, etc.
We are trying to make a roomy backpack from leather and denim
Denim and leather backpacks will always be in fashion. Therefore, we offer patterns for a women's backpack made from these materials.
The photo shows a leather model.

- Soft skin.
- Fabric for lining.
- Buckle, zipper, 10 metal scallops.
- Belt tape.
We cut out the leather parts shown in Fig. 2. Made of fabric - the main part of the product and the bottom.

Glue and sew a zipper to two leather strips, as in Fig. 3. It is designed to fit in your pocket. We attach one strip to it, and the second to the backpack, after inserting the buckle, as shown in Fig. 4. Connect the sides of the main part.
Sew the lid by inserting the strap. Leave a hole to turn it out. After this, on the front side we make another line at a distance of 1 cm from the edge, and sew the cover to the back of the main fabric (Fig. 5).
We glue the handles, and over the place where they are attached we sew a rectangle of leather 5×10 cm. Then we sew a leather strip along the bottom of the backpack, as in Figure 6. We sew the bottom to it.

Sew the lining pieces together, leaving a small hole. Fold the backpack piece and lining right sides together and sew along the top edge. Then we turn it inside out and sew up the hole.
We straighten the seam and sew, stepping back from the edge by 1 cm. Insert the scallops, pass the cord through them, as in Fig. 7.
The leather backpack is ready.
The most common way to sew a backpack from jeans is to take the top part of them. We insert the belt into the belt loops and sew up the bottom. The result is a bag-bag.
The second version of the backpack is made from flared trousers. We insert the trouser legs one into the other and get a double bag. The bottom can be made either wide or narrow, at your discretion. We process the upper part to secure the fasteners and straps. We sew the latter together in the upper part, and in the lower part we separate them in different directions and sew them at the bottom seam.
Here are more patterns for a denim backpack.

You can sew a backpack for fishing and hiking with your own hands. To do this you need:
- Waterproof fabric (nylon, polyester, cordura).
- Lining fabric.
- Accessories (carabiners, Velcro, zippers, buckles).
- Nylon threads.
First you need to make a pattern. To draw a pattern, it is better to take tracing paper or graph paper.
The pattern of a regular hiking backpack includes the following details:- Back.
- Front end.
- Sidewalls.
- External pockets.
- Straps.
When the pattern is ready, we sew the parts according to it, while adding the necessary equipment.
Some tips for equipping a hiking backpack:- Fastenings for necessary things are best placed on wide belts stitched vertically along the product.
- To make the backpack comfortable to carry on your back, we line the back of it with ventilated fabric and sew in thick foam.
- It is better to choose fastenings from metal or plastic. The zippers are made of plastic, because they jam less.
- The straps can be strengthened using modular fastenings.


A selection of videos on the topic of the article
Today, a backpack is a stylish and fashionable accessory. In stores, all the backpacks are the same, but sometimes you just want something new and unusual. If you don’t know how to sew a backpack with your own hands, then patterns and step-by-step instructions from our website will help you!
If this is the first time in your life that you have come across such needlework as sewing, then you will do an excellent job sewing an accessory. There is nothing complicated in this matter, the most important thing is to follow the step-by-step instructions with photos and videos that we will provide below.
Instructions for sewing a fashionable backpack
Let's decide on the basic tools and materials:
- Various pieces of leather;
Main fabric 145 cm*160 cm;
The cord is 115 cm long and approximately no more than 1 cm thick;
Ribbon made of keeper fabric, size 150 cm * 4 cm;
Belt adjustment devices;
Large carabiner for fastening - one piece;
Blocks with an internal diameter of 0.7 cm - 8 pieces;
Buckles with a peg should not exceed 3 cm in length;
Half rings with a diameter of 4 cm - 2 pieces.
First of all, we start by studying the pattern. You can find it on the Internet, or draw it yourself.
Backpack patterns: photos
(photos enlarge by click)


The pattern should have a pocket, the main part of the product and, of course, a valve.

DIY backpack
We decide on the dimensions ourselves, how you want your backpack to look, and we make it that way. In a similar way, you can sew a briefcase, as well as a backpack, using patterns and step by step instructions, and with your own hands.
Also, do not forget that there should still be a little indentation for processing the seams. For such a case, it is enough to leave about one centimeter.
To build pockets, you need to leave 2 cm, and for the main part up to six centimeters.
Now ready-made pattern apply it to the fabric and begin tracing with fabric chalk. Then we cut out all the necessary parts.
The parts from the main fabric should be as follows:
- Flaps for pockets - 2 pieces;
The backpack itself (base).
We make the following parts from leather, which will mainly be used only for edging the product itself:
- The strip for the backpack flap is one and a half centimeters wide and 60 centimeters long.
2. For the flap of the pockets, you will also need a strip, one and a half centimeters wide and 40 cm long.
3. Belt belts 6x8x3 cm - 2 pcs (the size is indicated in the finished state).
4. Belt loops for half rings 8x10x4 cm (the size is indicated in the finished state).
5. Patas in duplicate.
No additional space is required to process seams on leather products. We cut out the details in the same size as has already been written.

If there is no leather, then in this case you can use almost any material, but preferably a very dense one.
After all the details have been prepared, we proceed to the sewing itself. First of all, you need to make the base. To do this, take the cut out main part and fold it in half. Machine stitching. Then we move on to processing the slices. To do this, we fold the upper additional places several times and stitch them.

Now you need to build a pocket according to the pattern, using your own hands using step-by-step instructions, in order to answer the question of how to sew a children's backpack:
- The specially left space must be turned to the outside and tucked in with gentle movements.
Arm yourself with a needle and thread and stitch by hand.
Use a hot iron on the side and bottom edges.
Place the finished product in your pocket.
We place the folded lines on the ironed edges, and only then iron the folds on the sides and bottom.
We make seams in the corners of the product.
Iron it.
Now we move on to making special loops for the backpack (made with our own hands using patterns and step-by-step instructions), thanks to which the straps will be held on the backpack. With the wrong side, we fold the small loops inwards from the beginning, having previously tucked in additional space along the cut.

We sew along the edges of the product, cutting off the excess fabric.
In one of these loops you need to make a small hole into which the buckle will be inserted. And the remaining space should have been approximately 2 centimeters. Then we thread one end into the buckle. We wrap the other side so that the length remains about four centimeters.
We sew the finished loop to the pocket so that the buckle faces up.
We do the same with the second loop. When ready, sew it to the front side of the bag - backpack.
The prepared pocket must be machine stitched to the main product.
The next step when making a backpack according to step-by-step instructions is the formation of valves.
Sew the prepared cut parts together and edge them with specially prepared fabric. Once this part is ready, you need to sew it to the main product and iron it. We do the same with the pocket itself, now it becomes more or less clear how to sew a backpack with your own hands, using patterns and step-by-step instructions.


DIY backpack
Patches must be sewn onto the above-sewn blanks. The part itself should slightly overlap the valve by about two centimeters.
We do the same on the pocket. The seam should be used in the form of a square with a cross inside.
The final stage of the backpack with your own hands is to make the straps. To do this, we fold the braid in the form of an English letter V. We do this carefully, not forgetting to thread the braid into a special regulator. After that, you need to fasten a carabiner clasp to one end of the straps, and the other through the prepared half rings.

Then you need to tighten the top of the backpack; to do this, you need to make blocks at an equal distance, so that there are about four centimeters from the top edge of the place. In this way, we do it around the entire perimeter of the floor of the finished product. We thread a string through them, making a large knot at each end.
That’s all we have looked at, how to sew a backpack for children with your own hands, using the simplest patterns and using step-by-step instructions. However, such a fashionable backpack will also suit young stylish girls!
Video tutorials on sewing a backpack with your own hands:
Greetings to all readers. Let's continue the series of articles about bag patterns, and today - a backpack pattern. Backpack is one
one of the types of bags that is super convenient to use.
If you are going to go or go on a picnic, on a long journey, or go on a hike, for example, in the forest to pick mushrooms - a backpack is exactly what will make your journey more comfortable, because everything that you will definitely need to take with you, you can fold it into it and not burden your hands.
And as always, under the motto we do everything with our own hands, we will make the backpack ourselves. To begin with, four simple backpack patterns, after that - a photo master class: from cutting to sewing. And at the end of the article there is a video on how to sew a backpack, one very simple way.
- Patterns of bags, backpacks, cosmetic bags, wallets, etc. in nat. size for printing on A4 sheets.
- B — master class on sewing a stylish leather backpack.
- The first backpack pattern, like the second, is very simple, in the style of a trunk bag.

- The third pattern of the backpack is assembled like a box; it is better to sew it from thick raincoat material, leather, or leatherette.

- And the fourth pattern:

- I hope they were useful to you and here is the promised photo master class:
We cut out the required number of parts from the material we have chosen, then we sew everything as shown - stitch it, sew it together. We attach harnesses and clasps. That's it! Our backpack can be worn.


Good luck, love and warmth, look at the patterns of other bags, come back again, bye!!
We are watching a video on how to sew a backpack, the video is in English, but all the steps are shown in detail, you can just watch.
Handmade leather - how to sew a backpack with your own hands
Choosing a backpack is always not an easy task. It is important to consider a lot of points - fit, stress on the spine during exercise, design, presence of pockets, adjustability and comfort of straps, etc. I've owned many backpacks and none of them met ALL my needs.
As a result, I came to the idea that I should sew it myself and, in addition, I paint on the skin with acrylic, which means I can paint it. For a long time I was looking for a normal description and pattern - I present the search results to you in the form of a selection of material on how to sew a leather backpack with your own hands.

Description of work
Let's start with a general guide to making leather bags and backpacks for the novice craftsman. Mark the approximate shape of the bag on the fabric. By the way, the cut for sewing can be taken from an old leather jacket, For example.
Then place the prepared pieces of leather on it, after lubricating the fabric with a thin layer of glue. Apply the pieces so that each next covers the previous one by 5 mm. This will give you a surface slightly larger than the bag.

Sew the pieces using a regular seam or a zigzag stitch. Cut out the exact shape of the bag using the pattern and rubber glue glue the lining. Connect the sides with a seam from the inside, and if the fabric is thick, from the outside using an edging. For edging, a strip of leatherette, regular braid or thick film fabric is suitable.
The bag can be closed with a zipper, button or Velcro. A long strap, like short handles, can be made from an old belt, attached to the top of the bag or sewn into the side seams.
In this way, you can make a cosmetic bag, a casual or theatrical handbag, a fashionable stylish backpack, or a sports bucket bag that is in no way inferior to branded products. Appliques, embroidery, decorative buttons, fringe, braid, etc. are suitable for decoration.
How to sew a leather backpack

The first diagram shows a pattern for a large backpack with dimensions. The diagram below shows a smaller backpack.


Main details
1 and 1, a. The main part of the backpack is 1 child. with fold
2 and 2, a. Pocket flap - 2 parts.
3 and 3, e. Pocket -1 child.
4 and 4, a. Backpack valve - 2 children. with a fold.
Additional leather details:
The strip for edging the backpack flap is 60 (50) cm long and 1.5 cm wide, cut without allowances;
The strip for edging the pocket flap is 40 (30) cm long and 1.5 cm wide, cut without allowances;
2 belt loops 8 cm long and 6 cm wide, in finished form 3 cm (6 cm long and 4 cm wide, finished 2 cm);
2 patches 12 cm long and 6 cm wide, 3 cm in finished form (10 cm long and 4 cm wide, 2 cm in finished form);
2 belt loops for half rings, 10 cm long and 8 cm wide, 4 cm in finished form (7 cm long and 6 cm wide, 3 cm in finished form).
Another description with a pattern

In conclusion, I offer a clipping from a magazine with a description and patterns of a women's leather backpack from Anna Samoilenko from the city of Mogilev. Everything is described in great detail.
Men's leather shoulder bag - commander's belt


